VI软件用户操作与系统管理手册
---
> **本文档为 SafeMesh 系统的系统概览与安装入门手册**
> **适配系统版本**:V1.0.0
> **文档版本**:V1.0
> **发布日期**:2026 年 1 月 1 日
> **发布方**:EFFORT
---
# 文档修订记录
| 版本 | 日期 | 修订内容 | 角色标记 | 修订人 |
|---|
| v2.0 | 2023/10/20 | 操作与管理功能合并 | 👤⚙️ | 张工 |
# 双角色导航目录
- **👤 操作章节** (绿色书签)
- ⚙️ 管理章节 (蓝色书签)
- **通用附录** (黑色书签)
# 1.前言
## 1.1文档目标
- 让系统使用者知道如何操作系统
## 1.2 目标读者
- 系统使用者
## 1.3 文档范围
- 系统功能使用步骤
## 1.4 相关文档
- 前提文档 :《系统概览与安装入门指南》(必读)
- 关联文档 :《产品导入指引》《终端产品说明书》
## 1.5 文档架构
## 1.6 角色权限矩阵
| 功能模块 | 操作用户权限 | 管理员权限 |
|---|
| 设备状态查看 | ✔️ | ✔️ |
| 用户权限修改 | ✘ | ✔️ |
| 用户账号管理 | ✘ | ✔️ |
## 1.7 符号系统
- ▶️ 表示操作步骤开始
- ⚠️ 表示关键注意事项
# 2. 基础操作 👤
## 2.1 工作台快速指南
| 页面
| 介绍
|
| Home
| 系统大屏
|
| Devices
| 设备详情表页面
|
| Map
| 区域详情页面
|
| Timing
| 定时测试规则设置页面
|
| Records
| 测试记录页面
|
| Setting/Upgrade
| 网关升级页面
|
| Setting/Authority
| 账号配置、权限配置页面
|
| Setting/Map Settings
| 地图配置页面
|
| Setting/System Setting | 系统设置页面 |
| Setting/Email Settings
| 邮件配置页面 |
| Setting/Language Settings | 自定义语言配置页面 |
| Setting/Equipment Type Settings | 设备分类配置页面 |
## **2.2 核心功能操作**
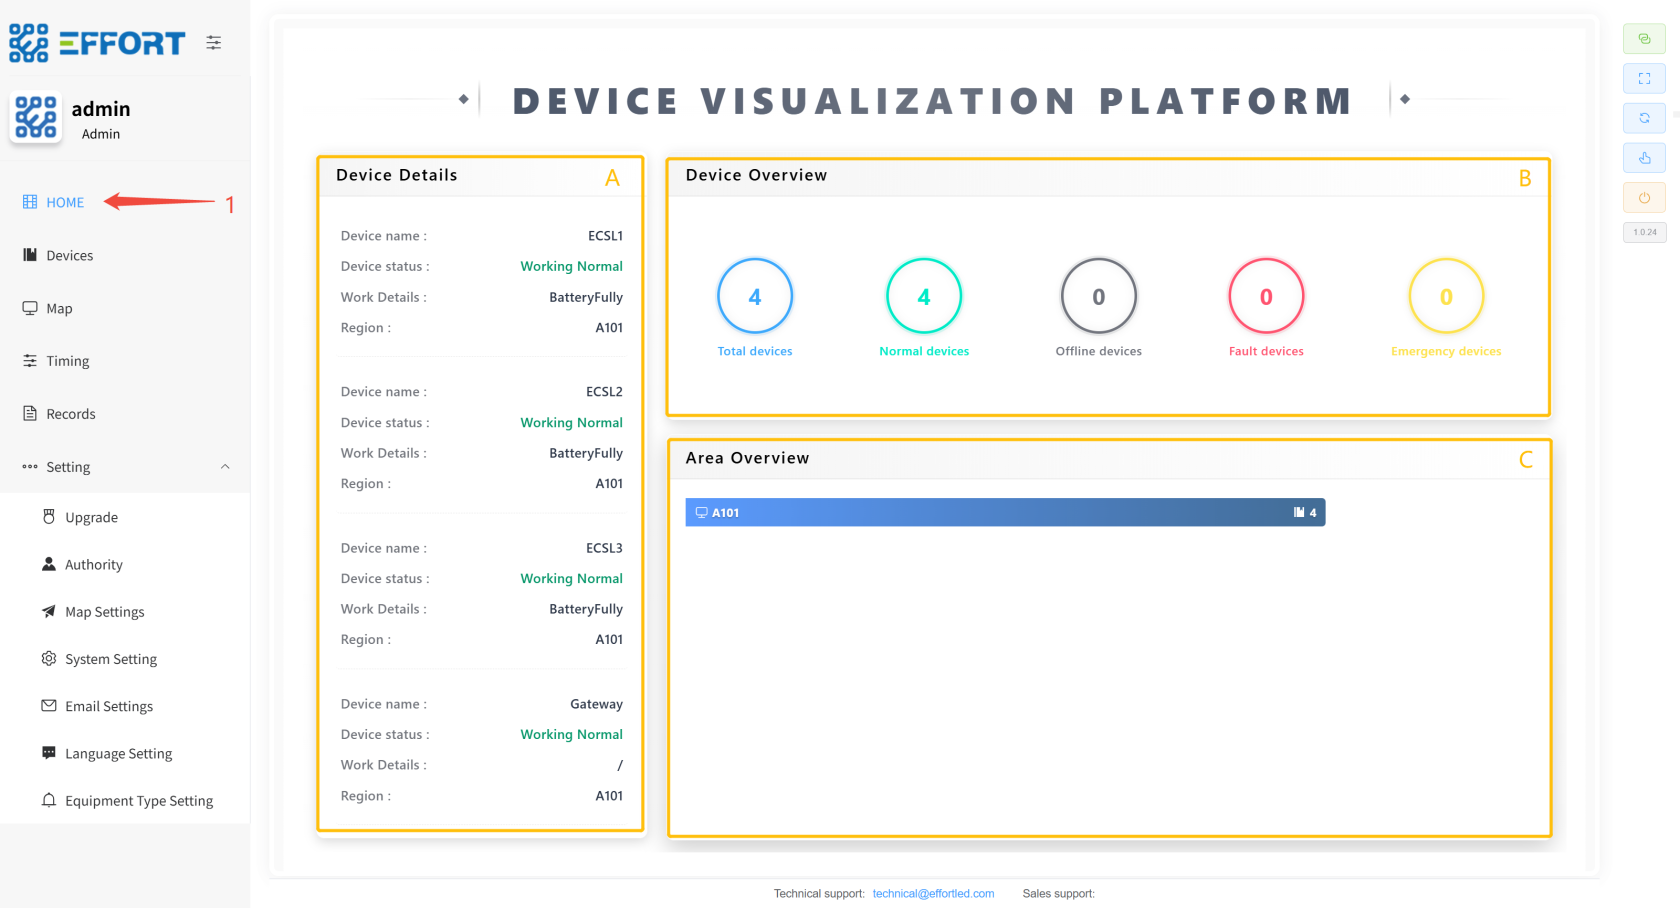
### **2.2.1 HOME**
1. 步骤 1:点击 Home ,进入大屏
2. 方框 A:设备详情信息:设备名字、设备状态、工作详情、所在区域
3. 方框 B:设备概览数量信息
4. 方框 C:设备区域分布信息
[](http://13.222.61.26:6875/uploads/images/gallery/2026-01/image.png)
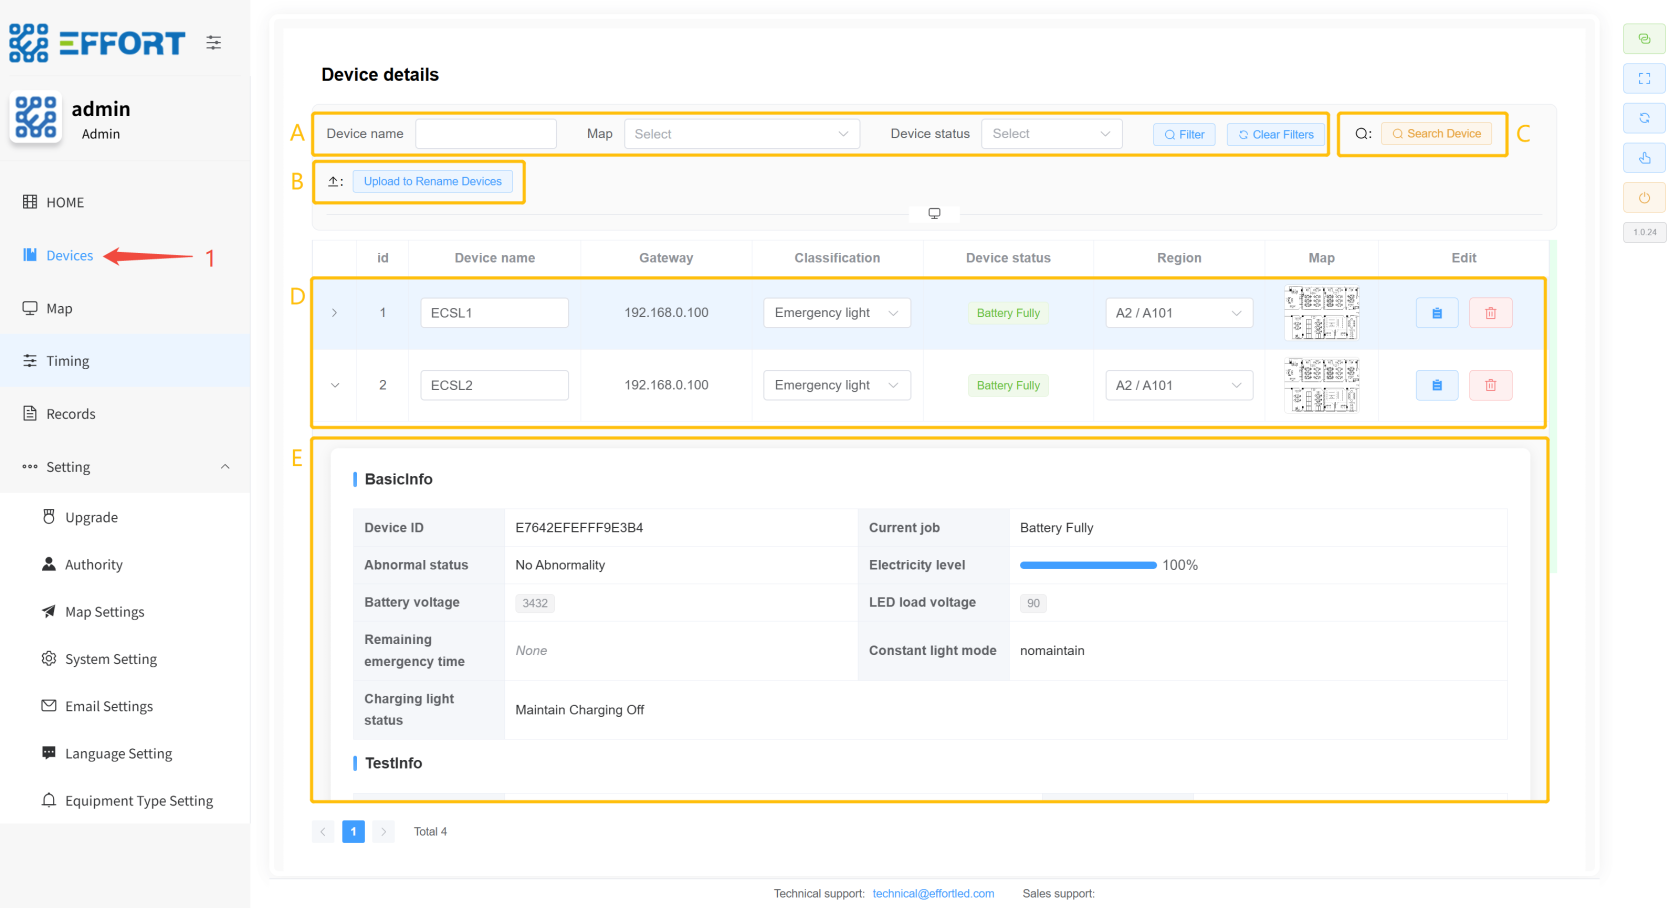
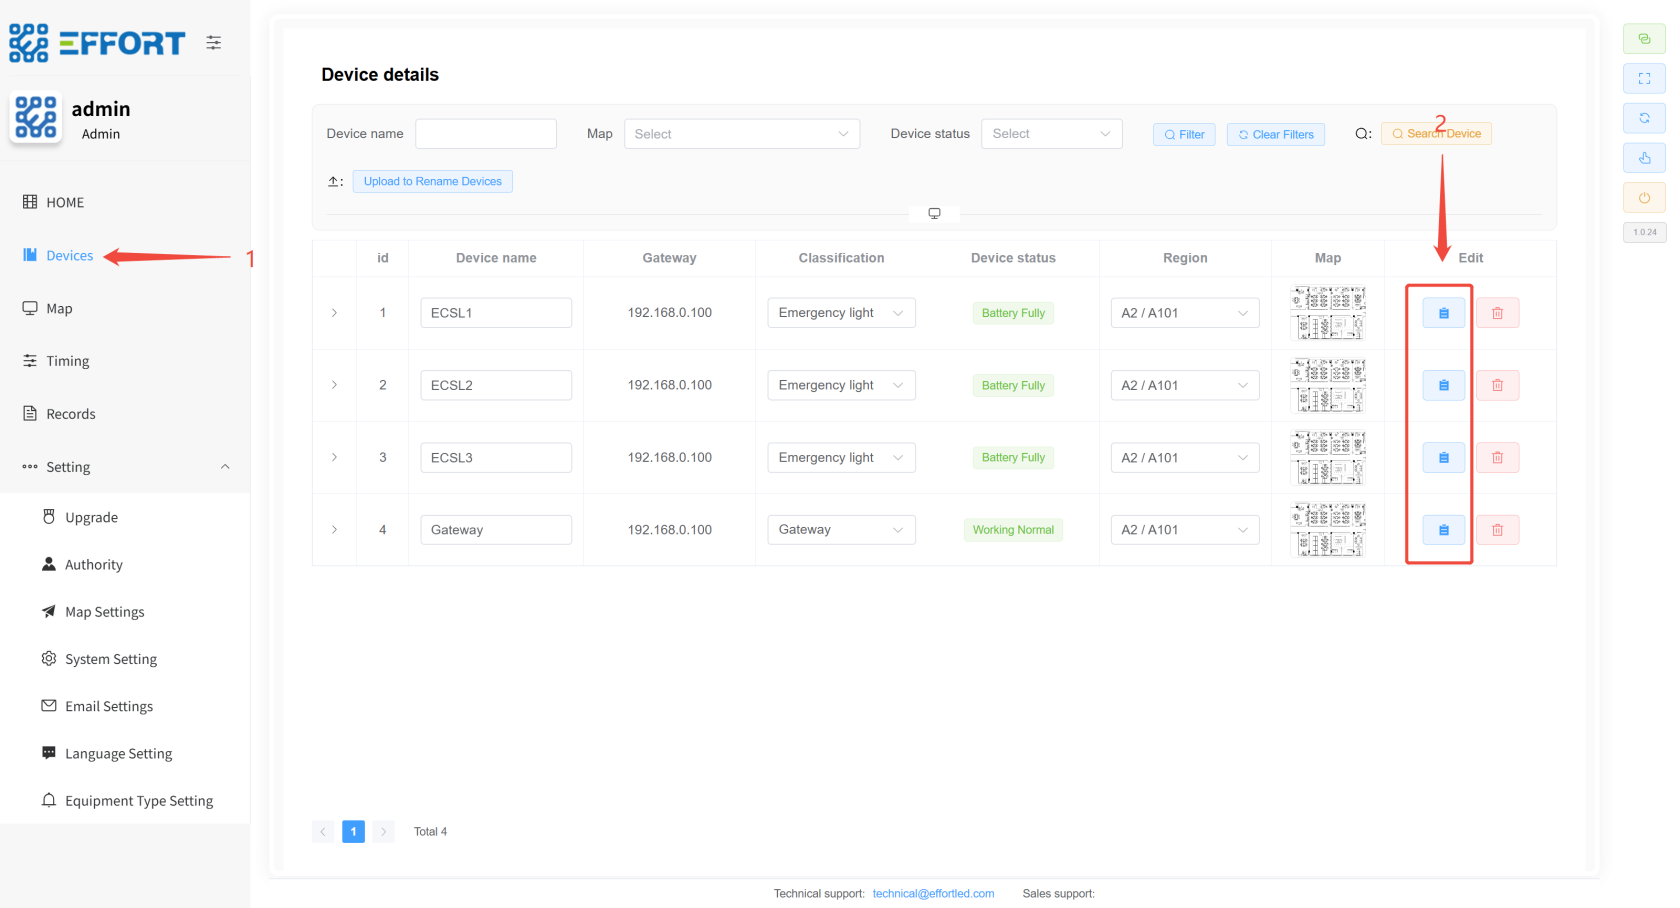
### **2.2.2 Device**
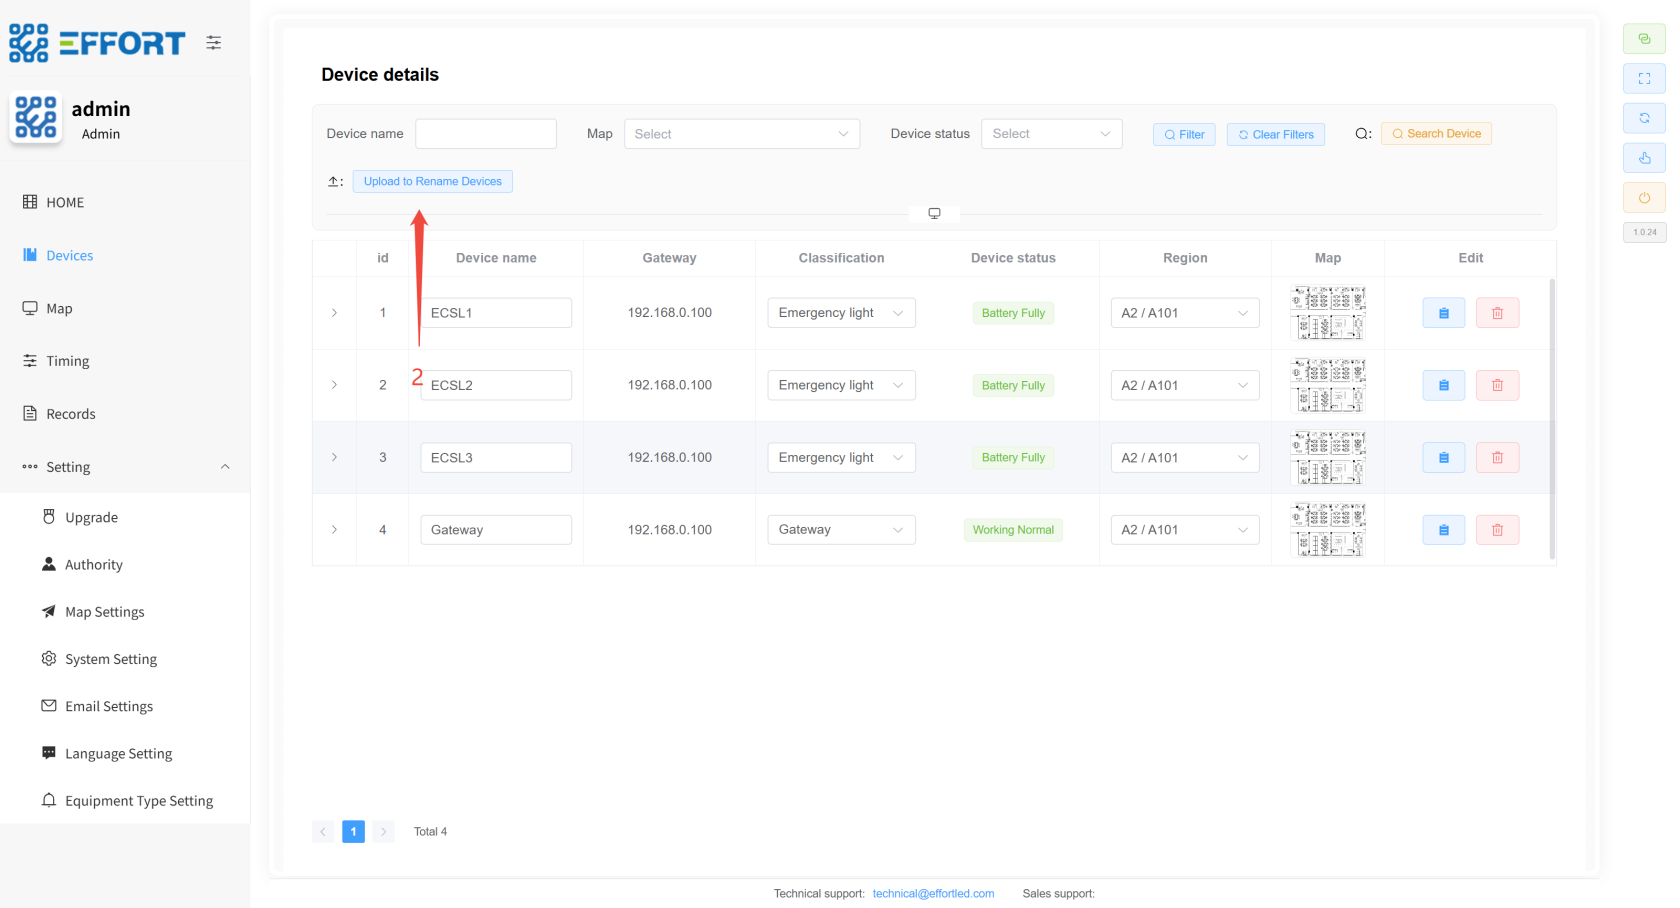
- **Device Details**
> Device Details:搜索网关、搜索设备、设备详细信息、设备测试等功能页面
1. 步骤 1:点击 Device进入
2. 方框 A:设备查询操作栏
3. 方框 B:上传设备重命名文件按钮
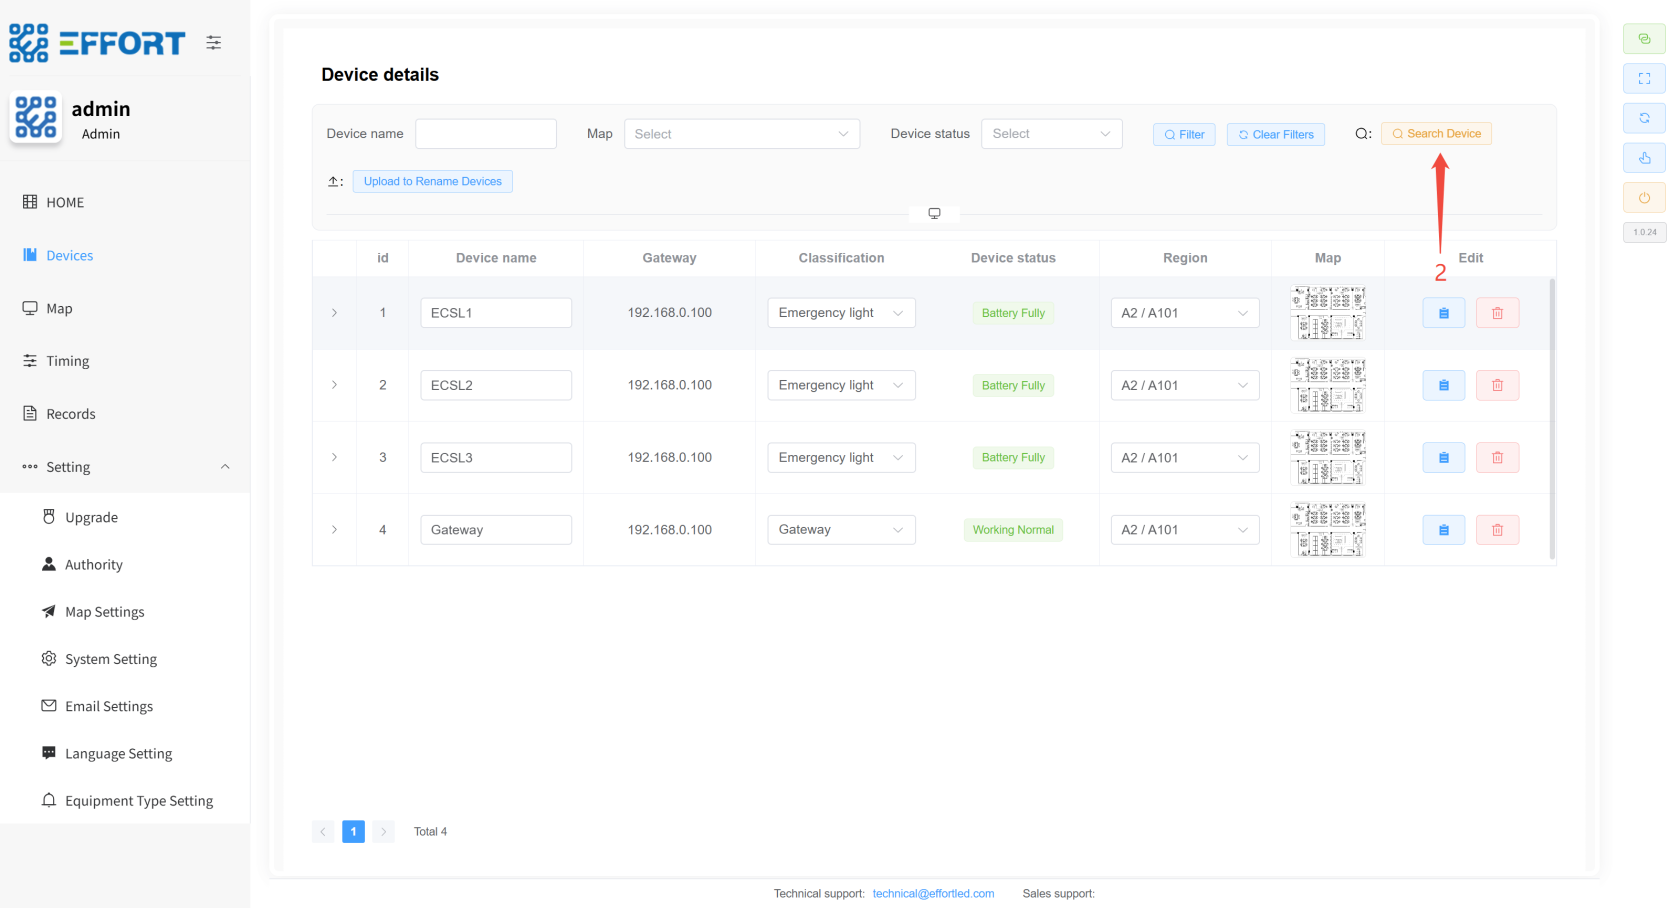
4. 方框 C:搜索设备按钮
5. 方框 D:设备基础信息:序号、设备名、网关、分类、状态、区域
6. 方框 E:设备详细信息:设备 ID、电量、电池电压、剩余应急时间、LED 负载电压、最后一次功能检结果、功能检次数、最后一次寿命检结果、寿命检次数、距离上次寿命检时间、上次寿命检持续时间、maintain 模式、充电灯状态
[](http://13.222.61.26:6875/uploads/images/gallery/2026-01/2AJimage.png)
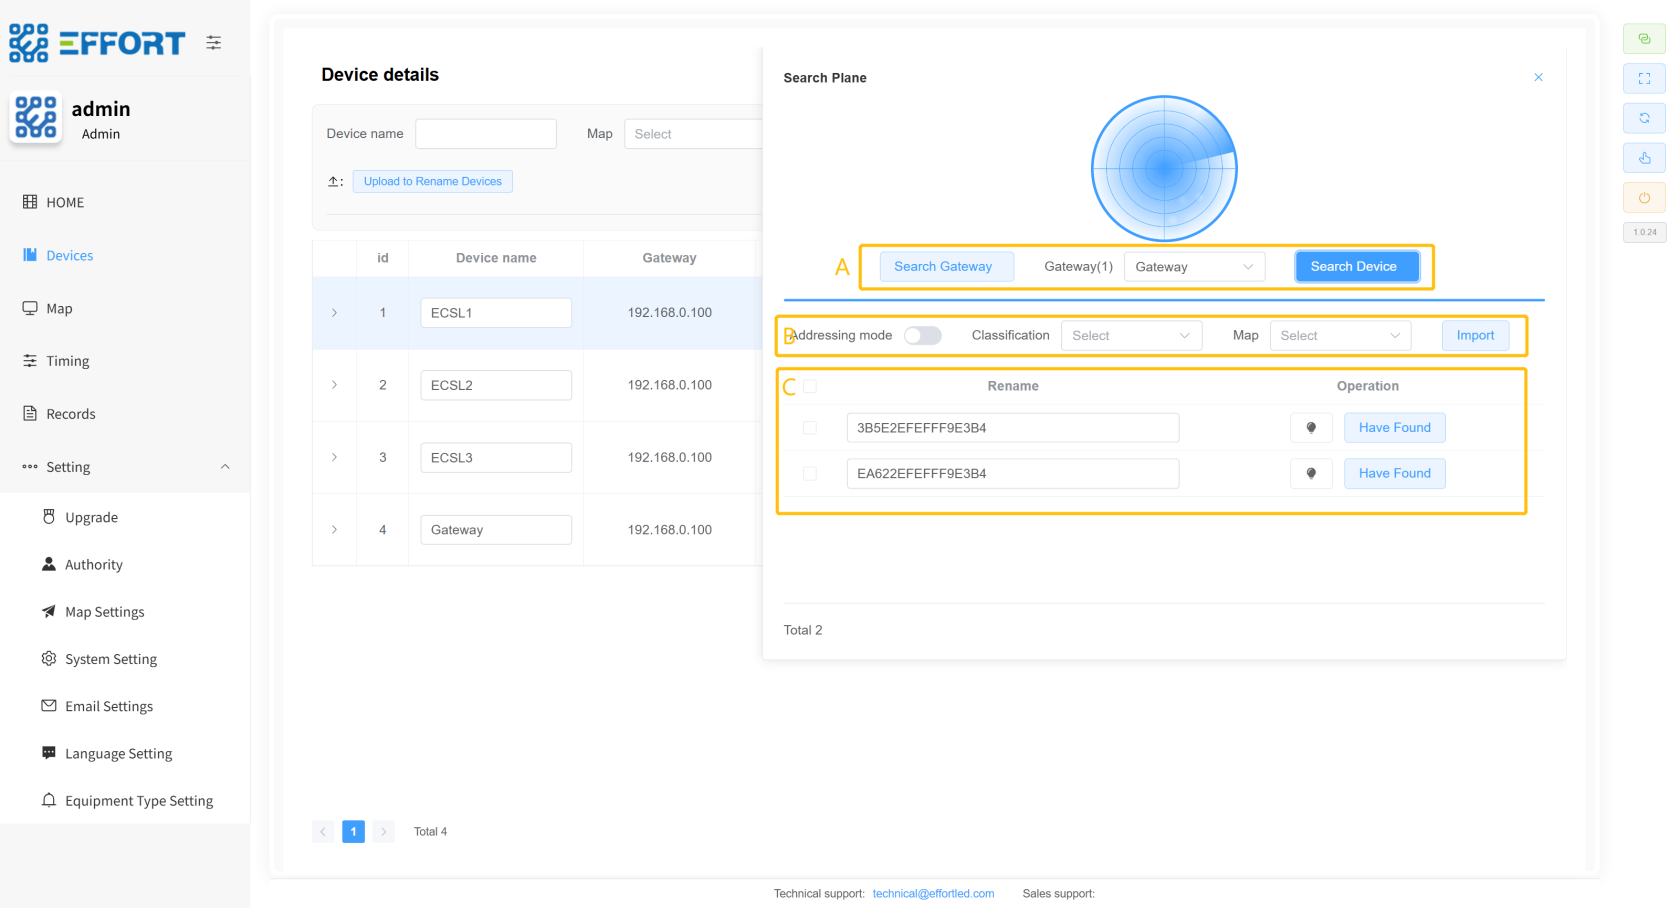
- **搜索面板**
1. 步骤 2:点击 Search Device 按钮
2. 方框 A:搜索网关、设备操作栏
3. 方框 C:寻址模式开关、设备分类、区域链接、设备导入按钮
4. 方框 D:搜索到的设备信息:设备 ID、设备行内操作
[](http://13.222.61.26:6875/uploads/images/gallery/2026-01/NoBimage.png)
[](http://13.222.61.26:6875/uploads/images/gallery/2026-01/c4timage.png)
- **设备详情面板**
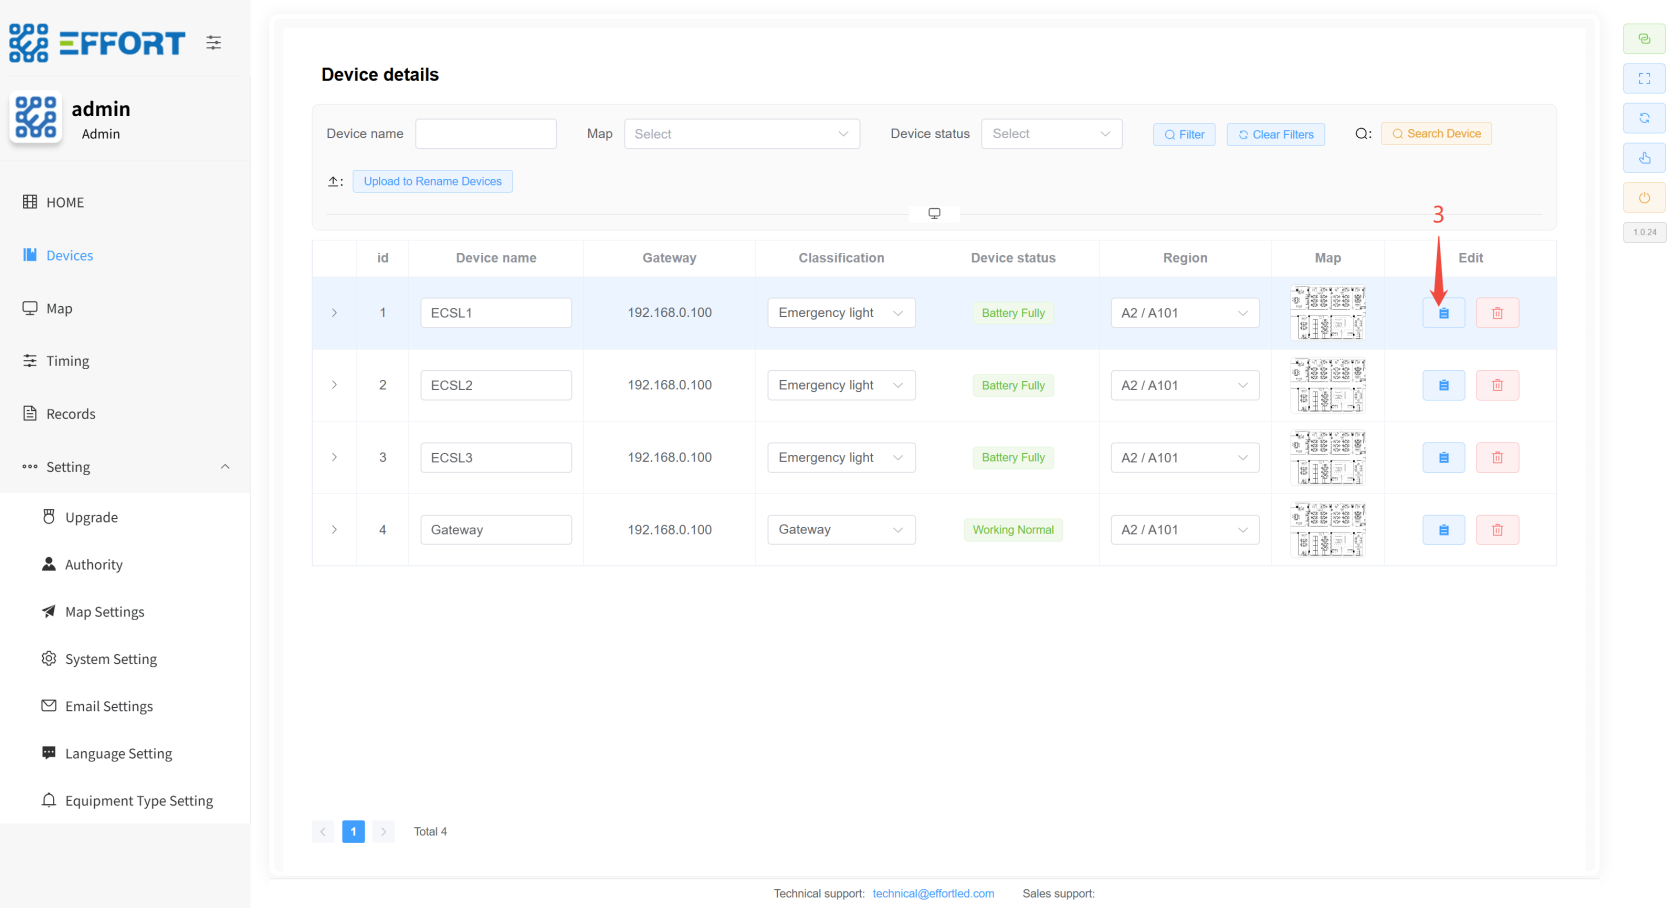
1. 步骤 3:点击 设备详情按钮
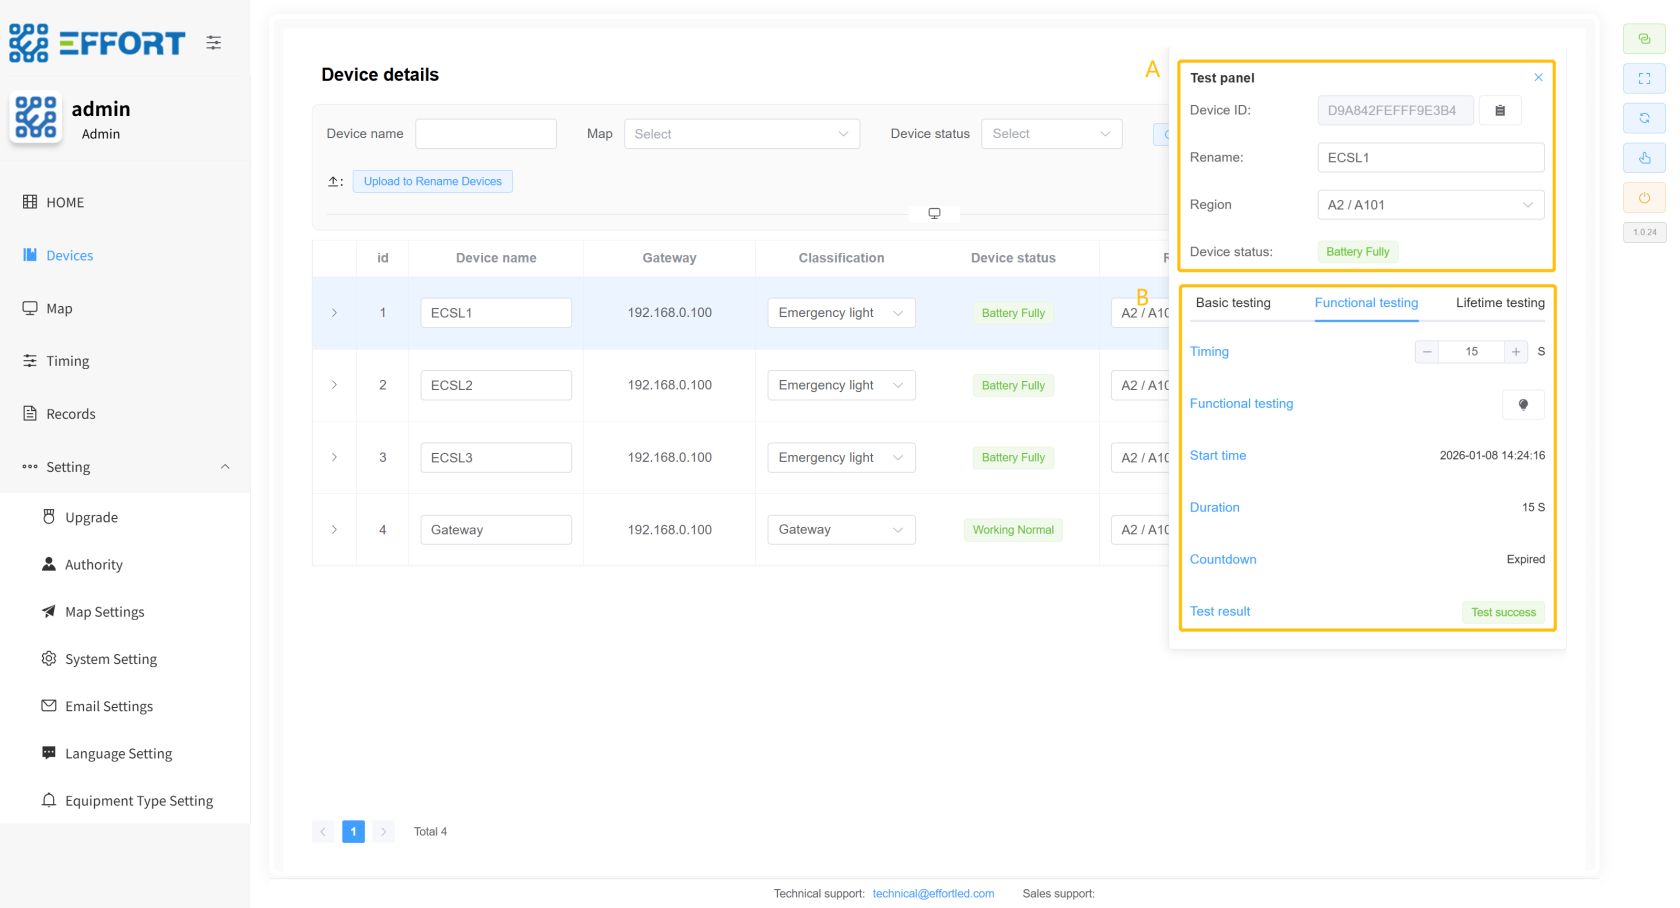
2. 方框 A:设备基本信息:设备 ID、重命名、区域、设备状态
3. 方框 B:设备测试控制面板:
1. Basic testing:寻址按钮、应急开关、maintain 开关
2. Functional testing:定时时间、测试按钮、开始时间、持续时间、倒计时、测试结果
3. Lifetime testing:定时时间、测试按钮、开始时间、持续时间、倒计时、测试结果
[](http://13.222.61.26:6875/uploads/images/gallery/2026-01/weVimage.png)
[](http://13.222.61.26:6875/uploads/images/gallery/2026-01/Cfoimage.png)
### **2.2.3 Map management**
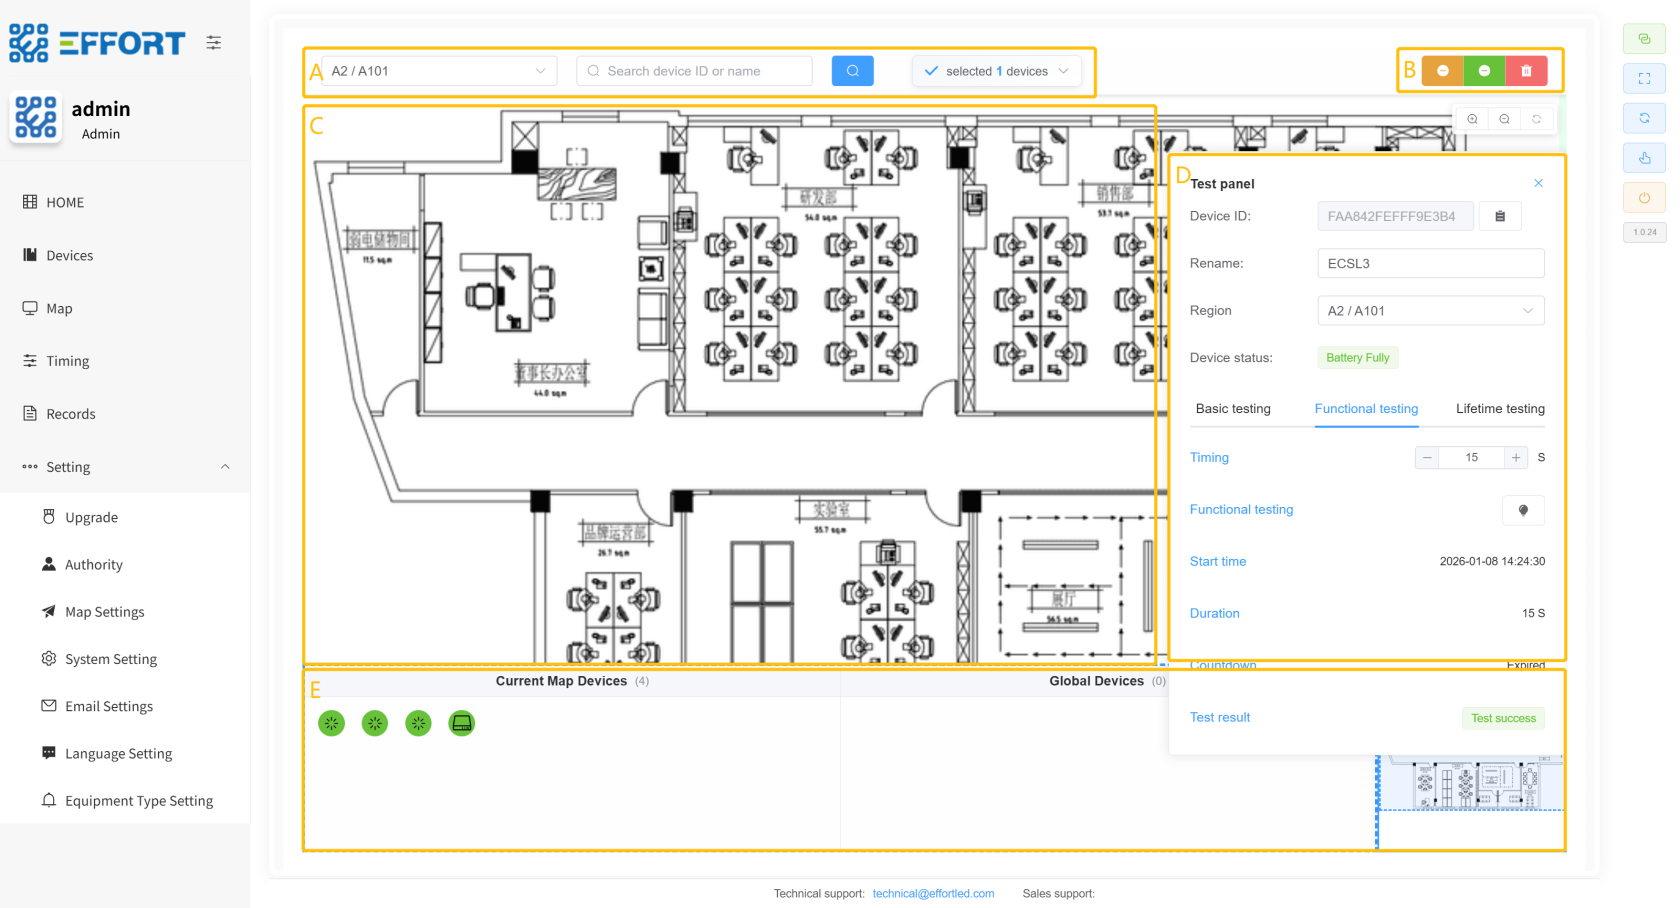
1. 步骤 1:点击 Map
2. 步骤 2:点击区域
3. 方框 A:当前区域、查找设备输入框、选中设备数
4. 方框 B:卸载按钮、解绑按钮、删除按钮
5. 方框 C:区域主图
6. 方框 D:设备详情面板
7. 方框 E:当前区域设备、未分配设备、缩略图
[](http://13.222.61.26:6875/uploads/images/gallery/2026-01/nZ9image.png)
[](http://13.222.61.26:6875/uploads/images/gallery/2026-01/tvRimage.png)
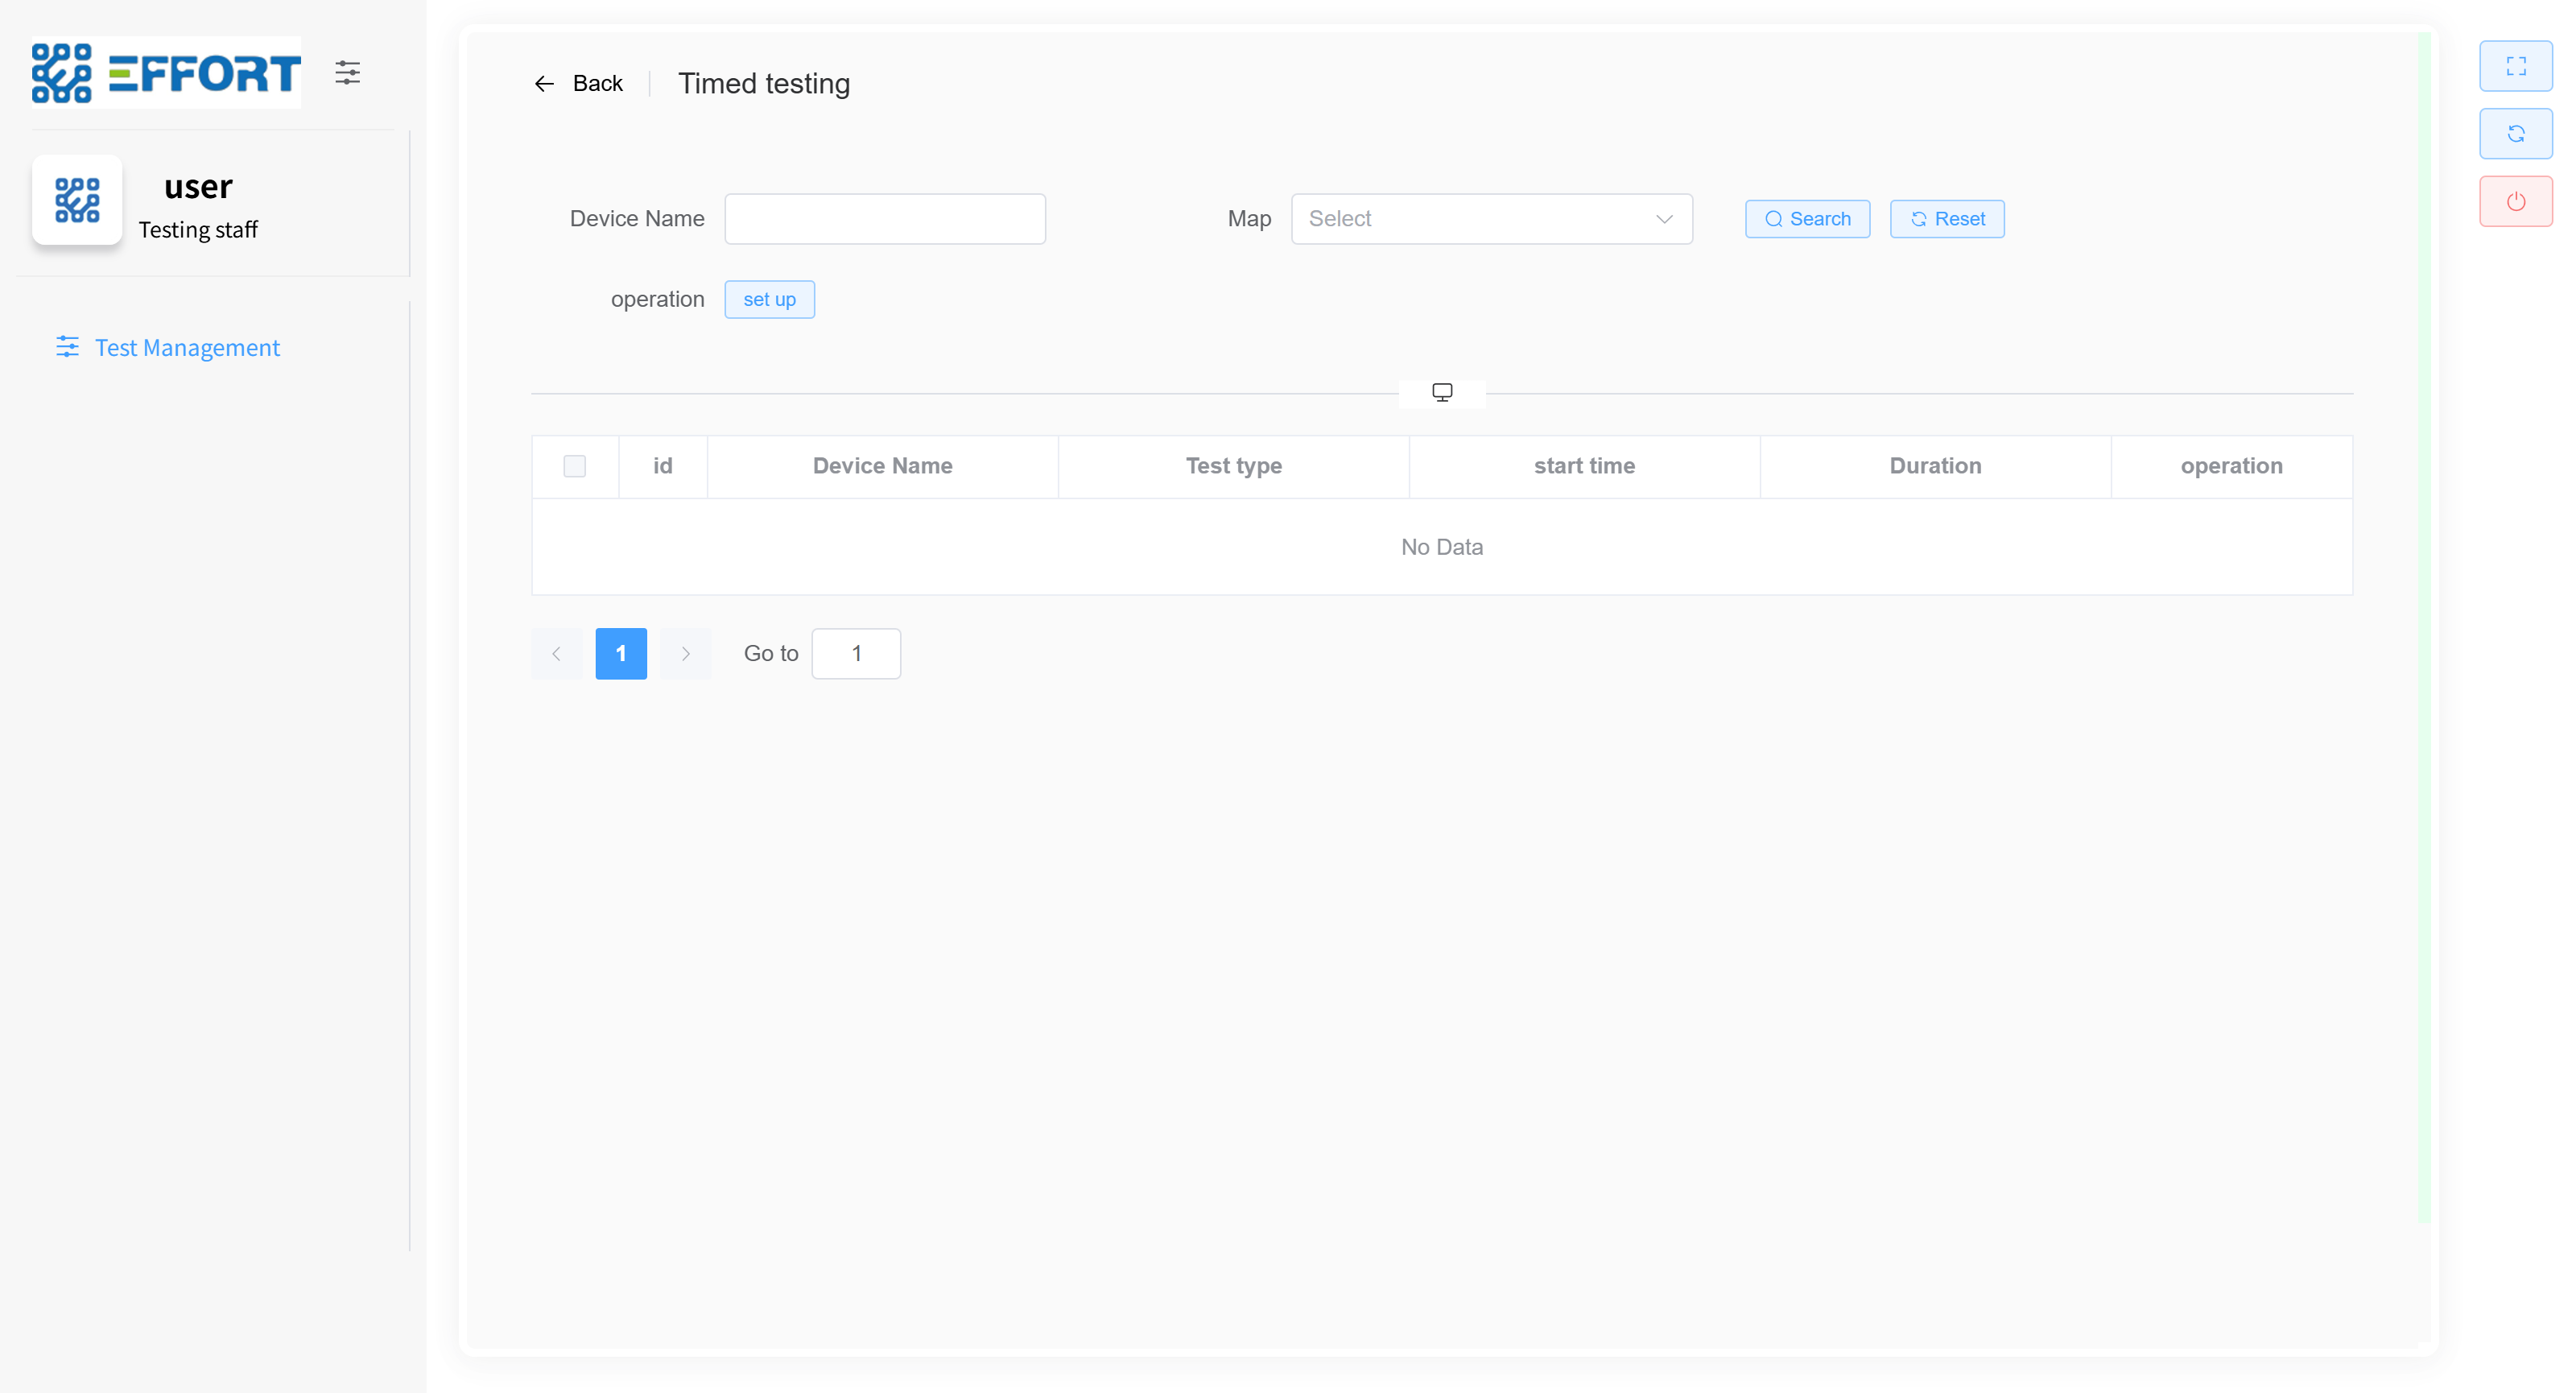
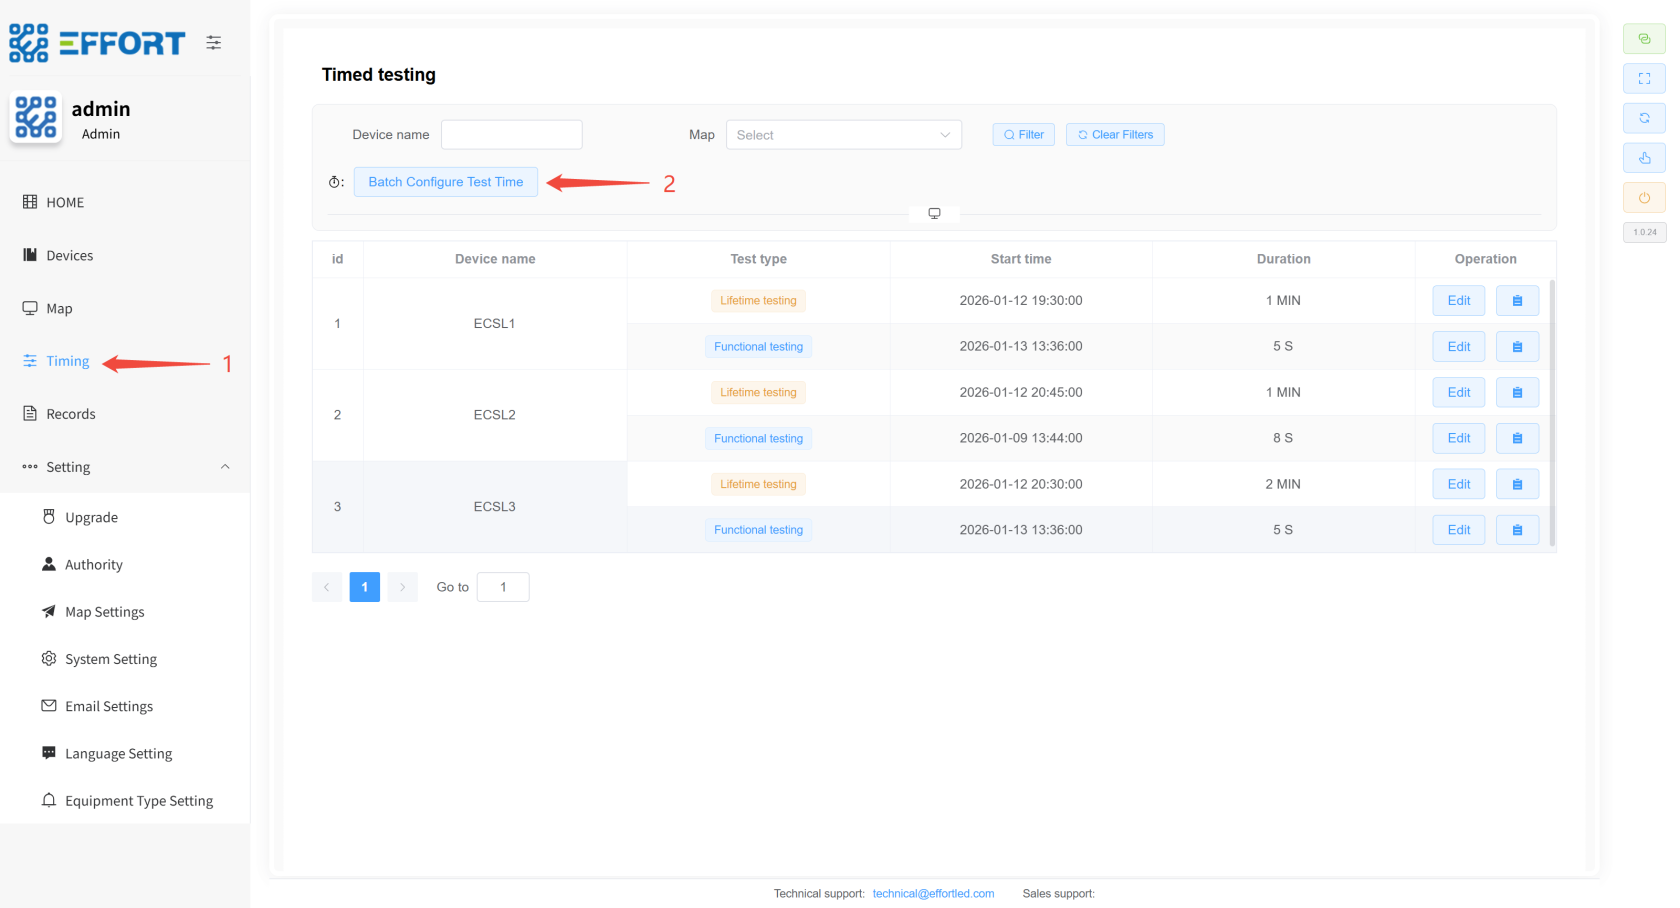
### **2.2.4 Timing**
> Timing:定时测试规则设置页面
1. 步骤 1:点击 Timing
2. 方框 A:定时规则搜索和操作栏
3. 方框 B:定时规则信息表:序号、设备名、测试类型、开始时间、持续时间、操作栏
[](http://13.222.61.26:6875/uploads/images/gallery/2026-01/Zf5image.png)
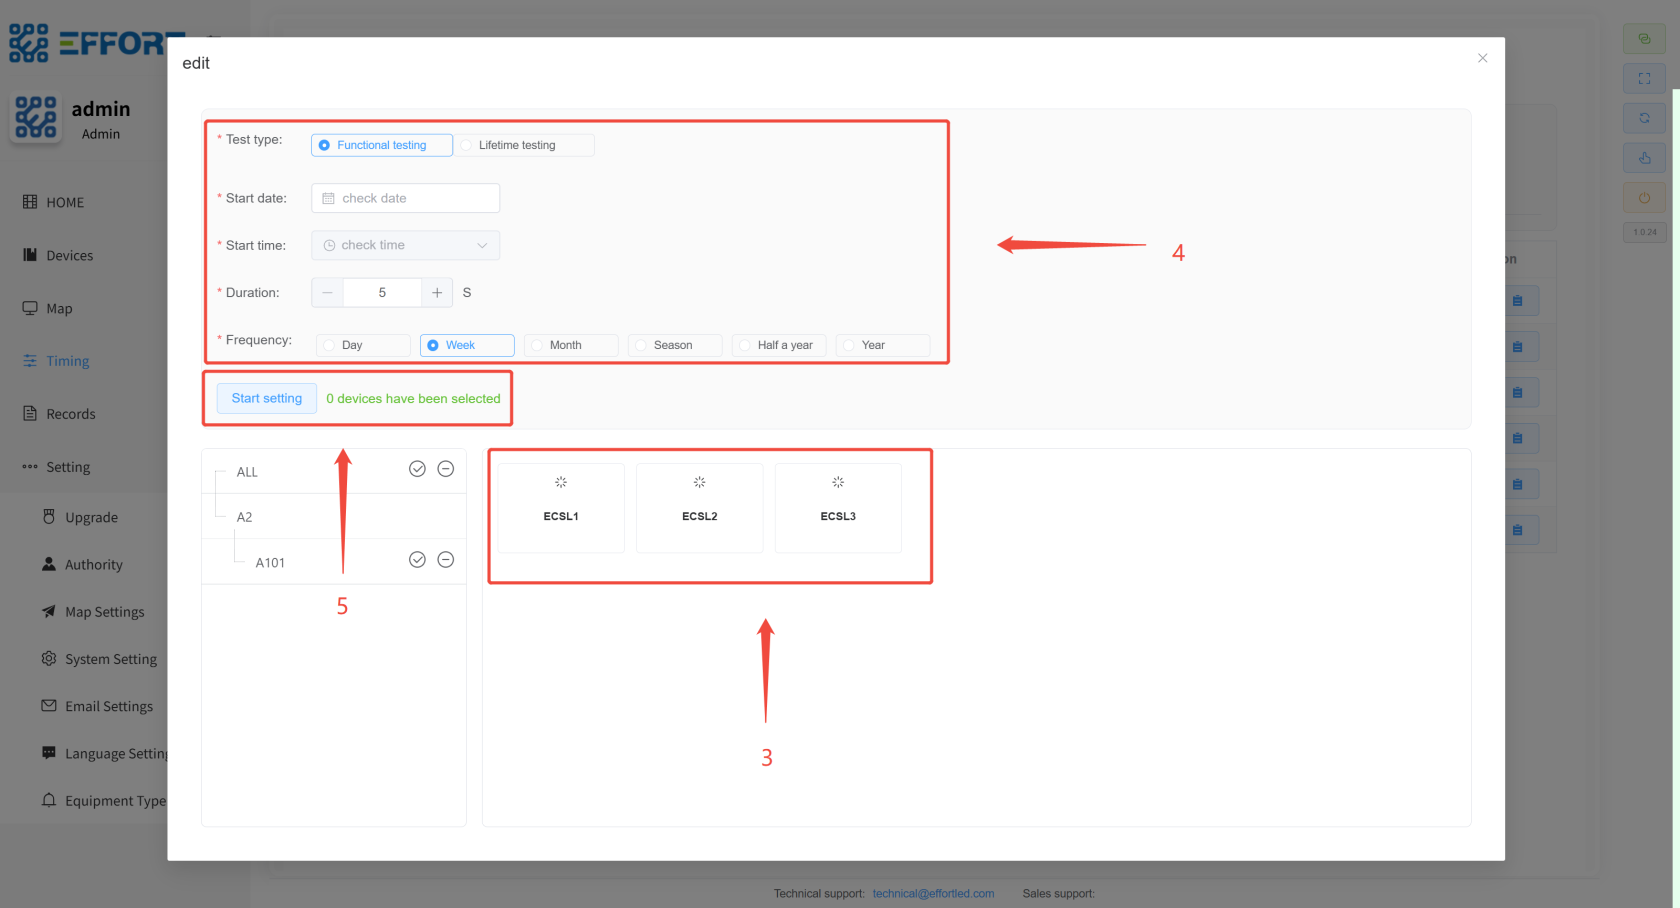
- **定时规则设置弹窗**
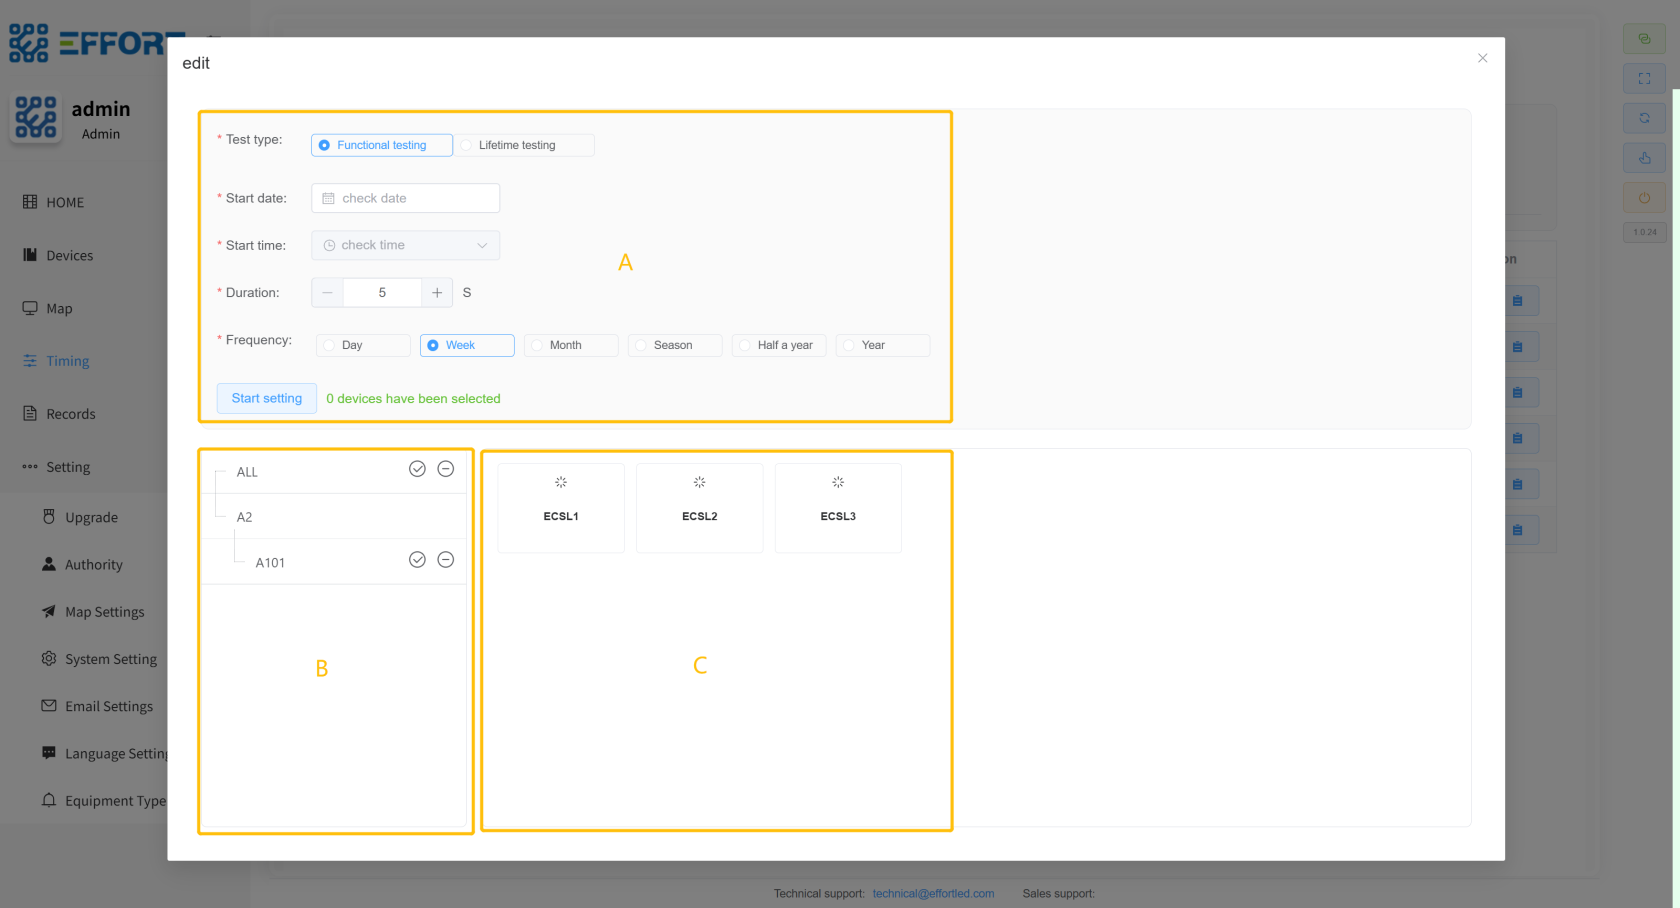
1. 步骤 2:点击 Batch Configure Test Time,打开定时规则设置弹窗
2. 方框 A:定时规则配置:测试类型、开始日期、开始时间、持续时间、测试频率
3. 方框 B:区域分类筛选,用来筛选右侧设备
4. 方框 C:左侧区域内的设备列表
[](http://13.222.61.26:6875/uploads/images/gallery/2026-01/nL4image.png)
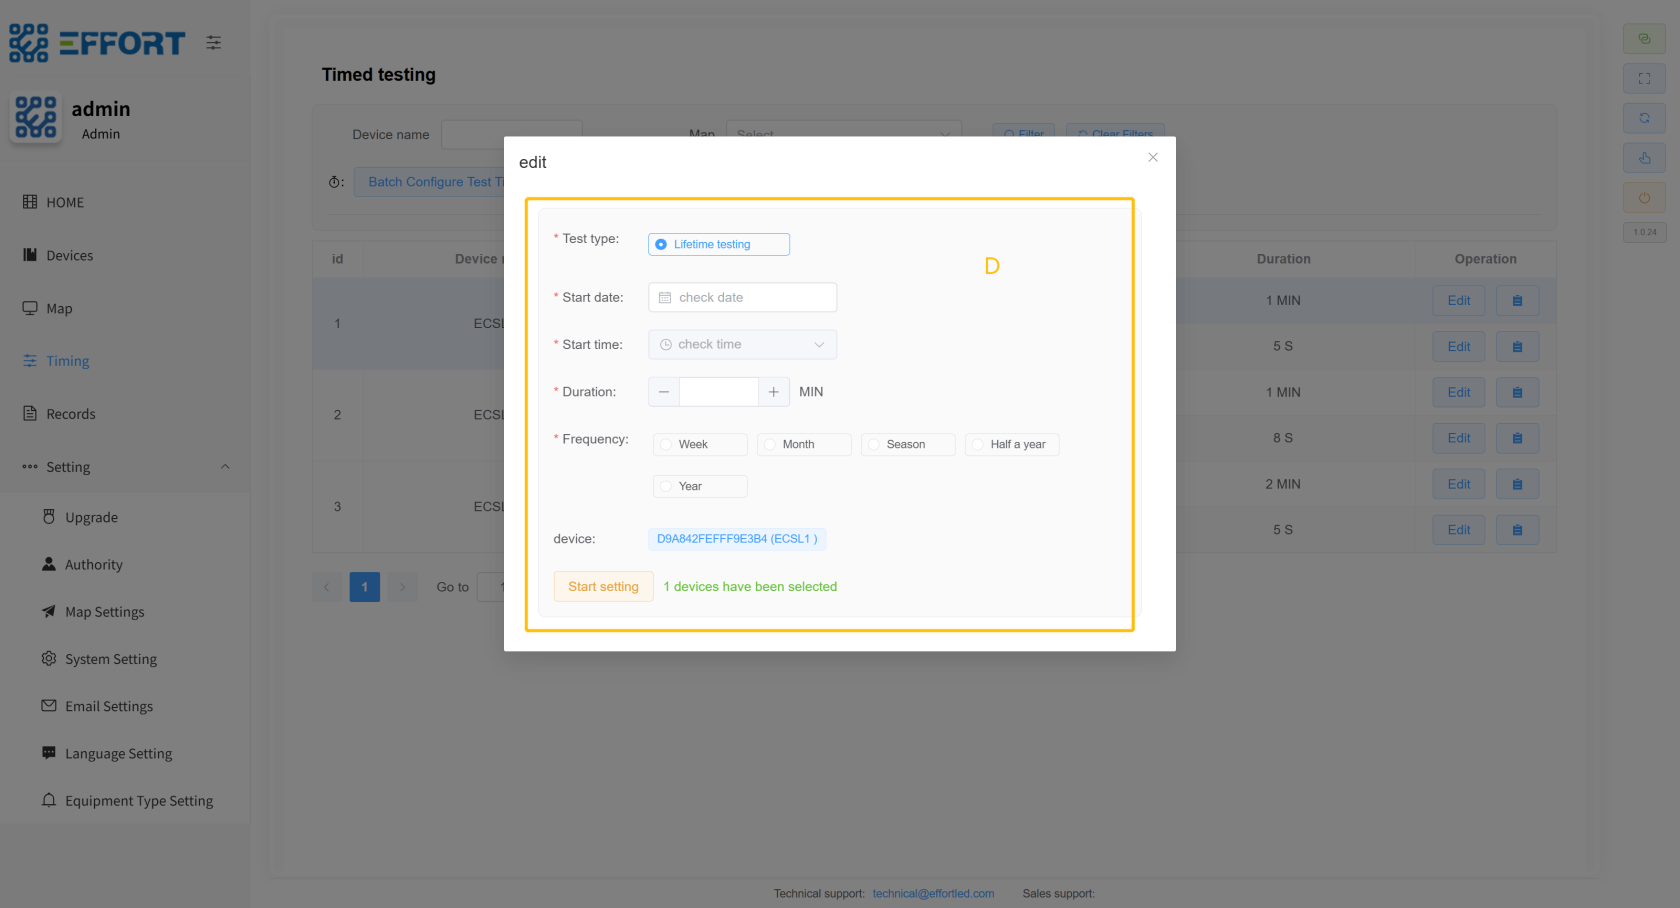
- **单条定时规则设置弹窗**
1. 步骤 3:点击 Edit,打开 单条定时规则设置弹窗
2. 方框 D:定时规则配置:测试类型、开始日期、开始时间、持续时间、测试频率、当前设备
[](http://13.222.61.26:6875/uploads/images/gallery/2026-01/zmgimage.png)
---
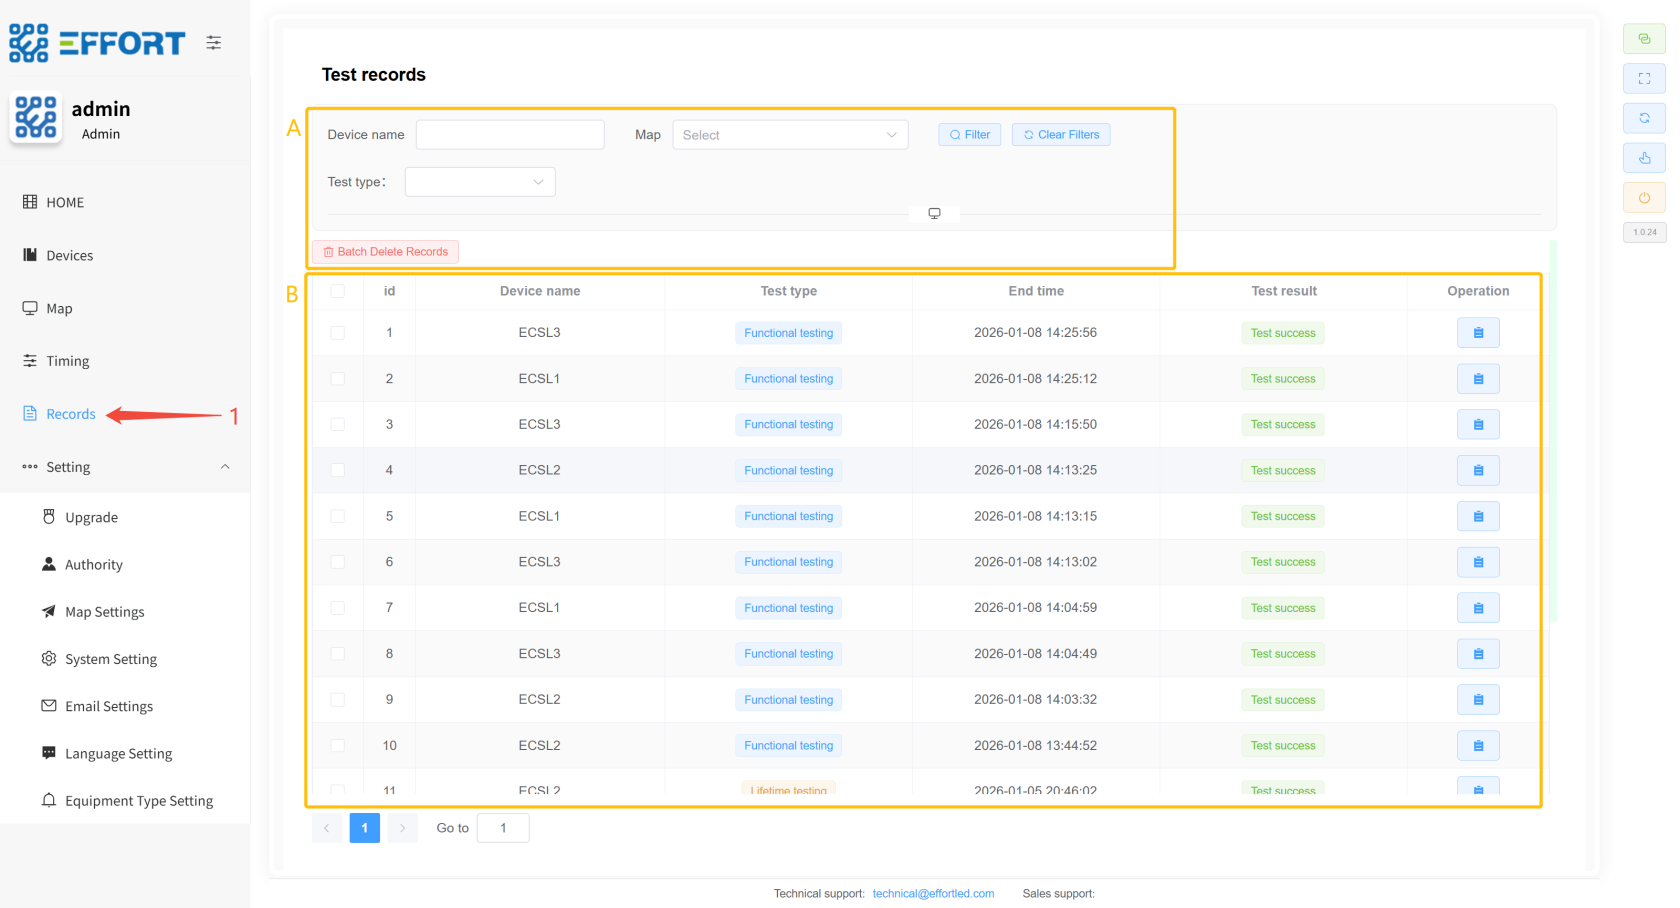
### **2.2.5 Records**
> Records:测试记录页面
1. 步骤 1:点击 Records
2. 方框 A:测试记录搜索操作栏
3. 方框 B:寿命测试记录信息表:序号、设备名、测试类型、开始时间、结束时间、测试结果
[](http://13.222.61.26:6875/uploads/images/gallery/2026-01/YuLimage.png)
---
### **2.2.6 System settings ⚙️**
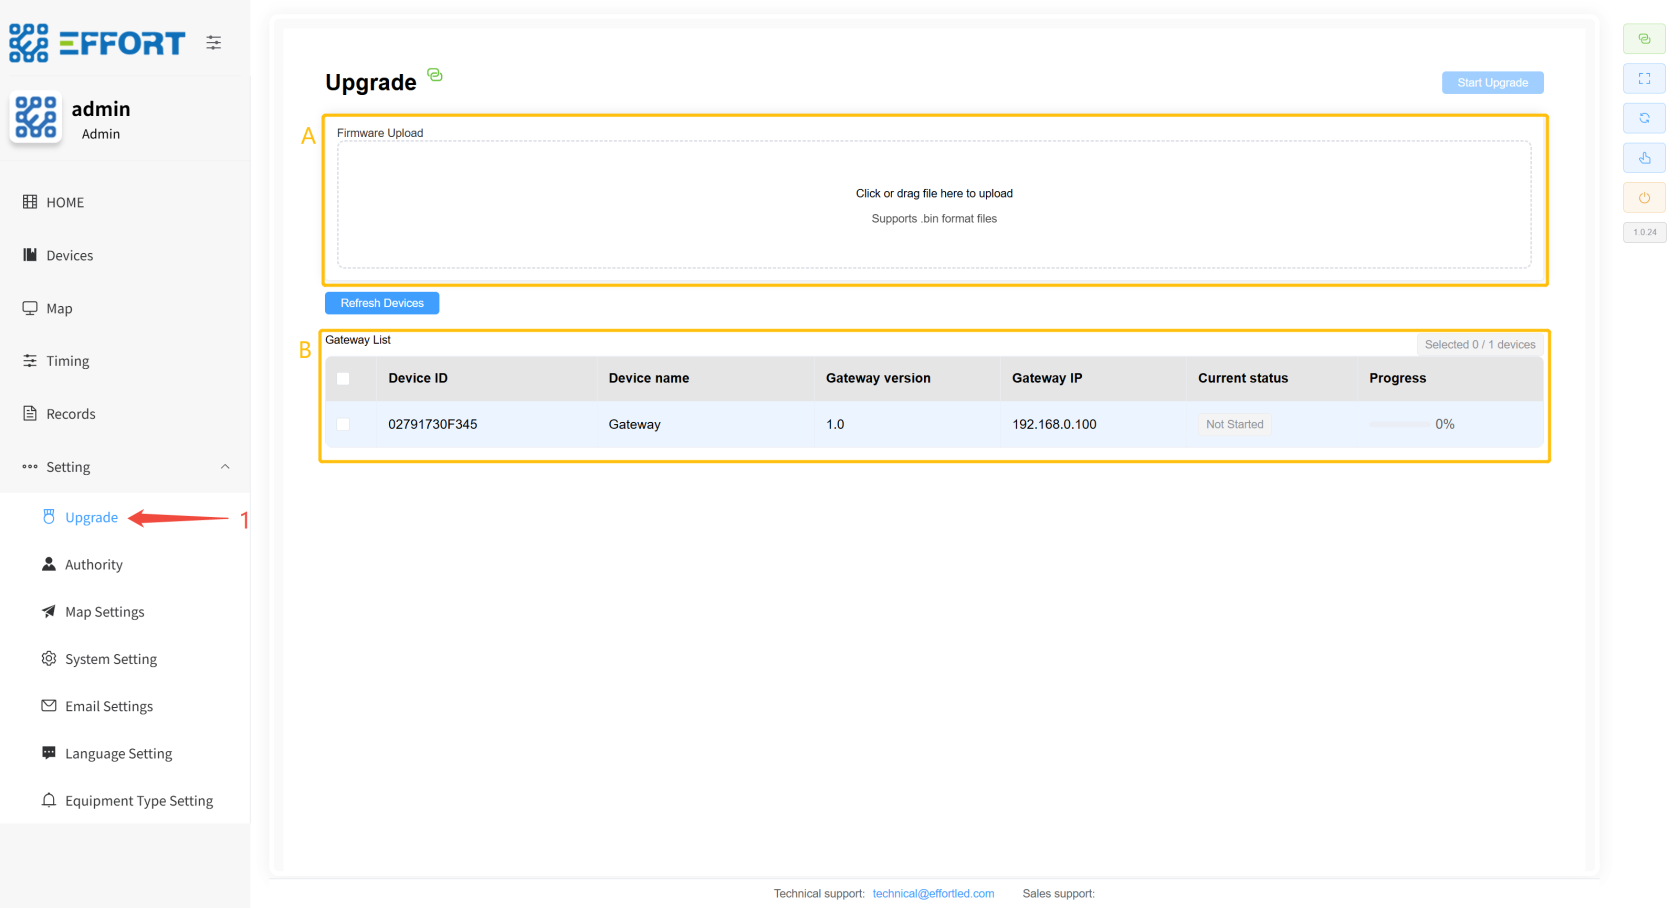
#### **2.2.6.1 Upgrade**
1. 步骤 1: 点击 Settings/Upgrade 进入固件升级页面
2. 方框 A: 导入.bin 文件
3. 方框 B:选择网关进行升级
[](http://13.222.61.26:6875/uploads/images/gallery/2026-01/bk7image.png)
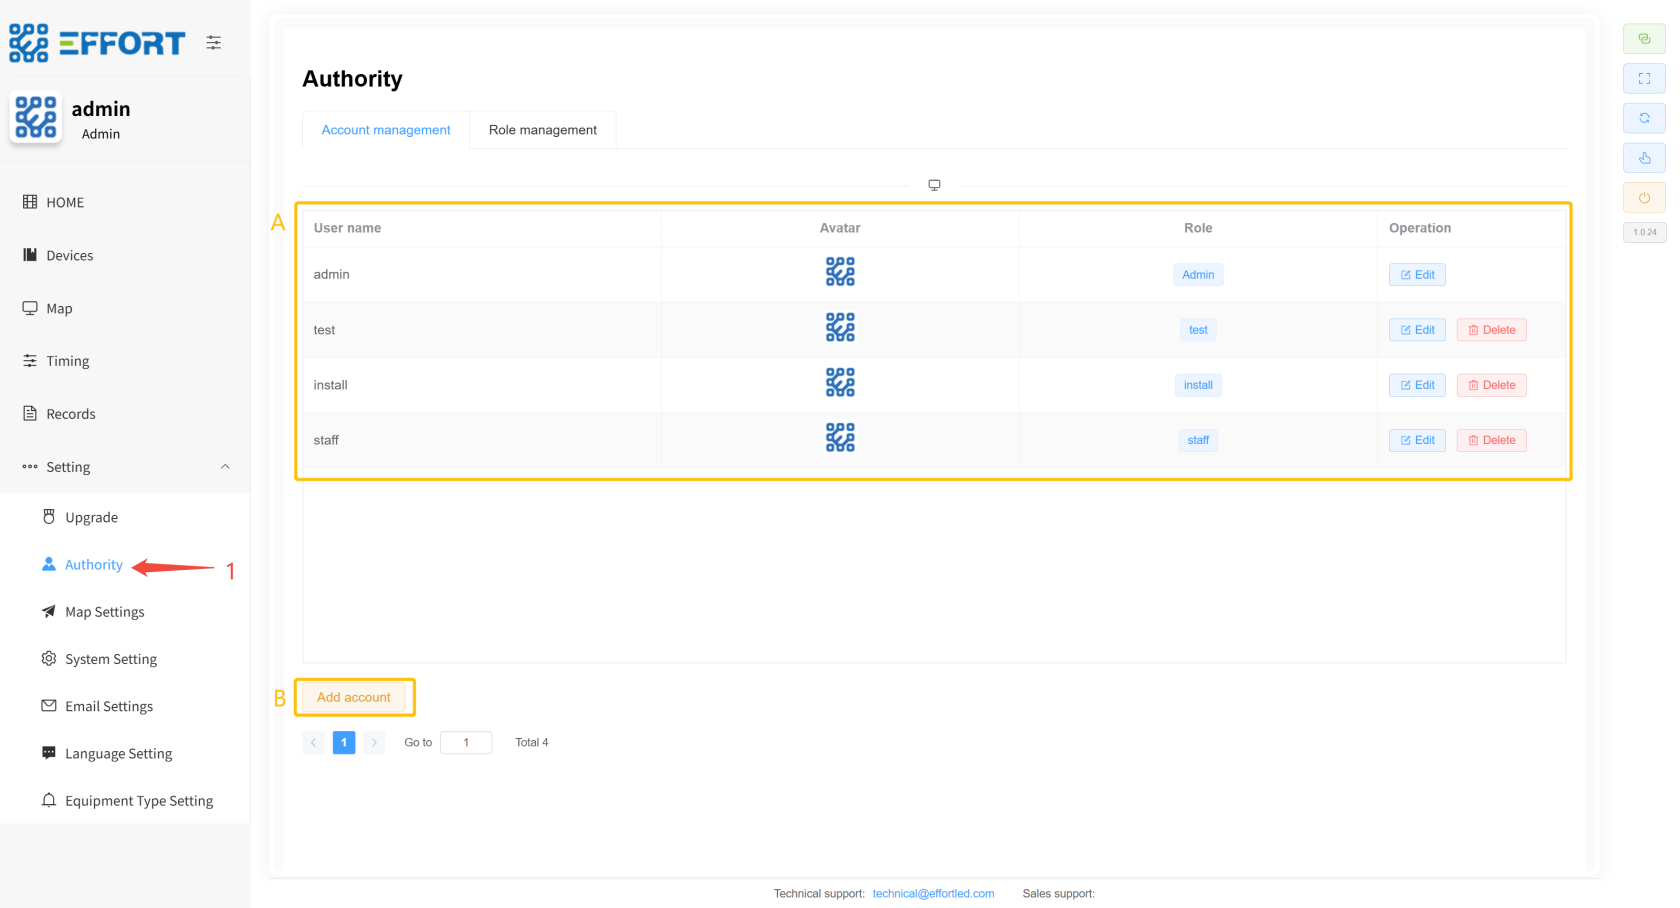
#### **2.2.6.2 Authority**
> Authority:账号配置、权限配置、自定义语言配置页面
- **账号配置**
1. 步骤 1:点击 Settings / Allocation / Account management,进入账号管理页面
2. 方框 A:账号的基础信息:用户名、头像、角色权限、手机号、账号行内操作
3. 方框 B:新增账号按钮
[](http://13.222.61.26:6875/uploads/images/gallery/2026-01/2vUimage.png)
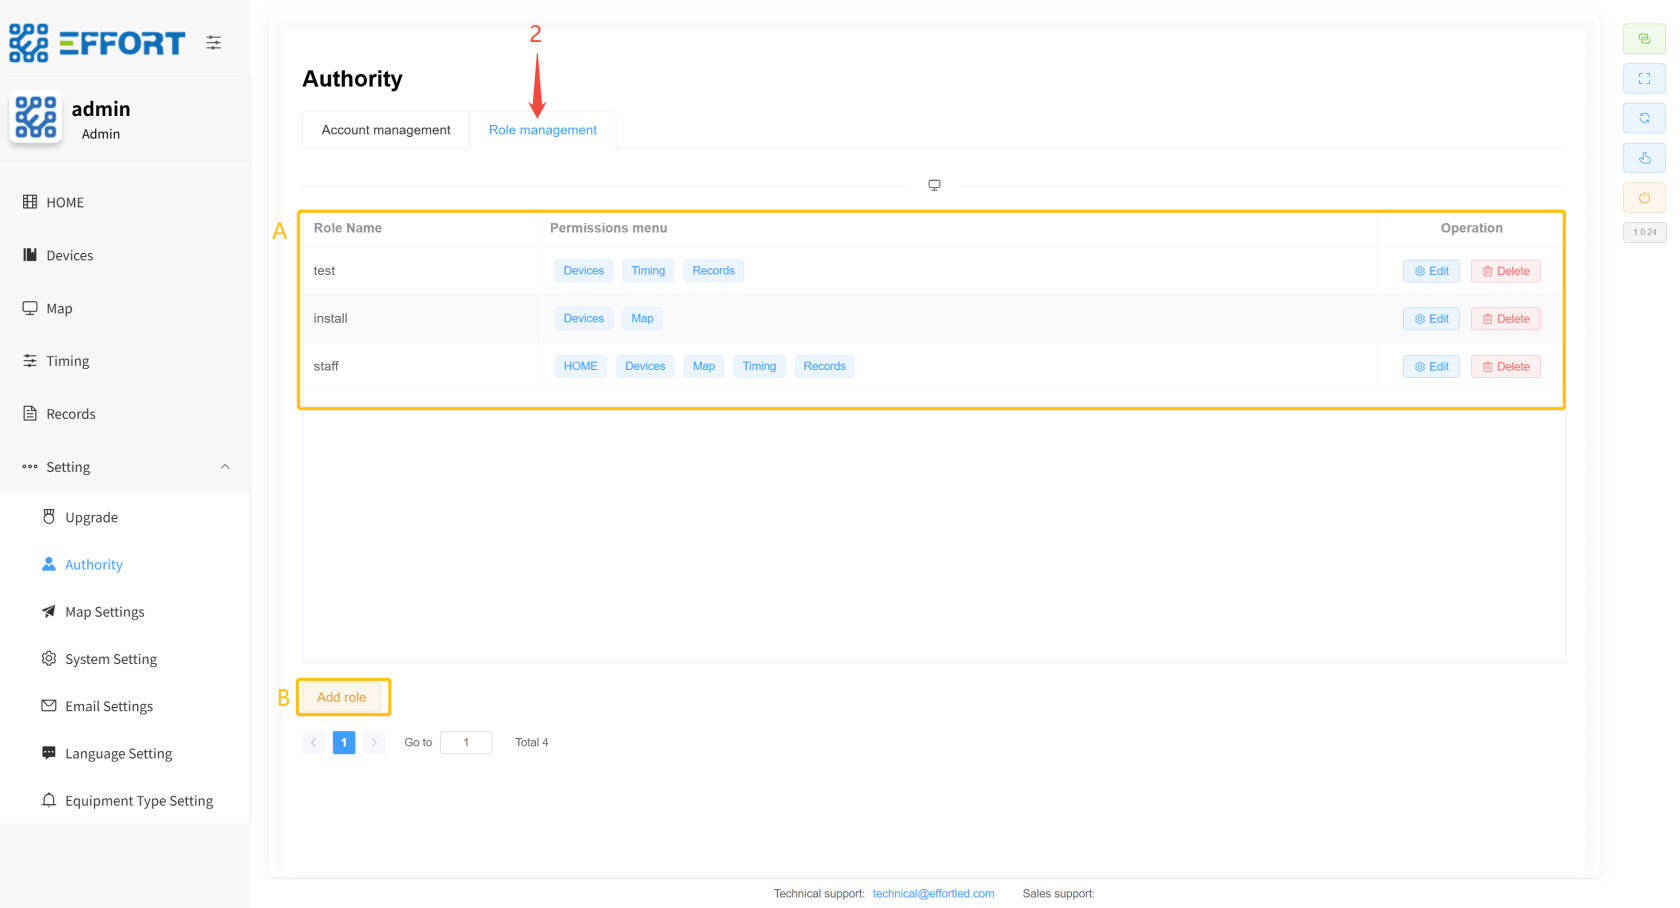
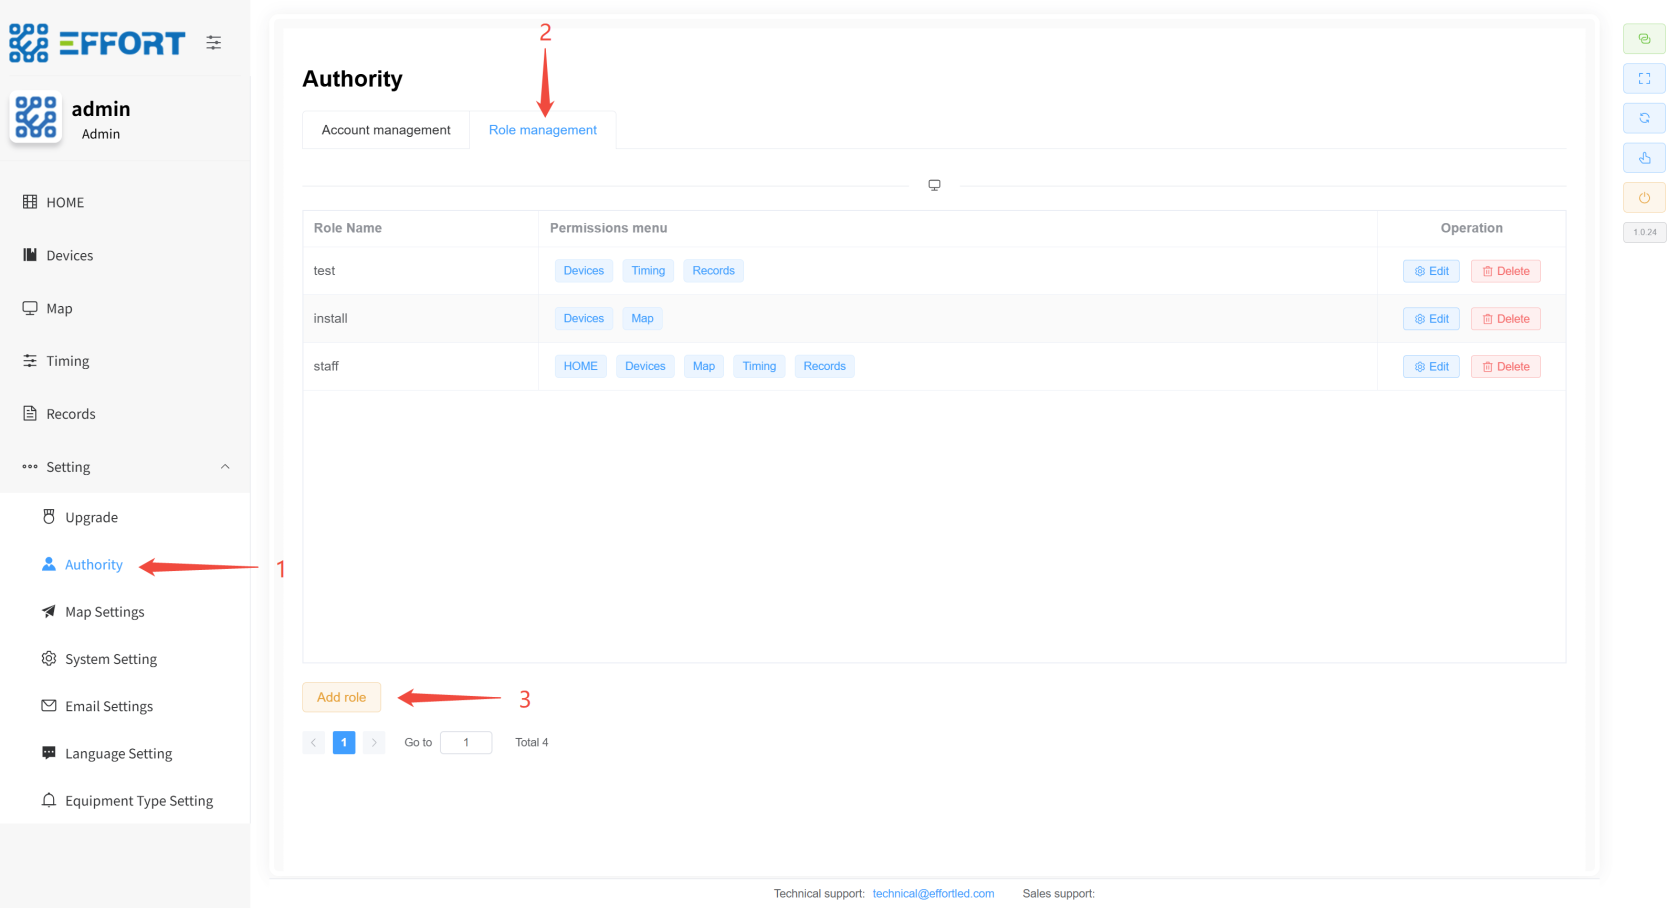
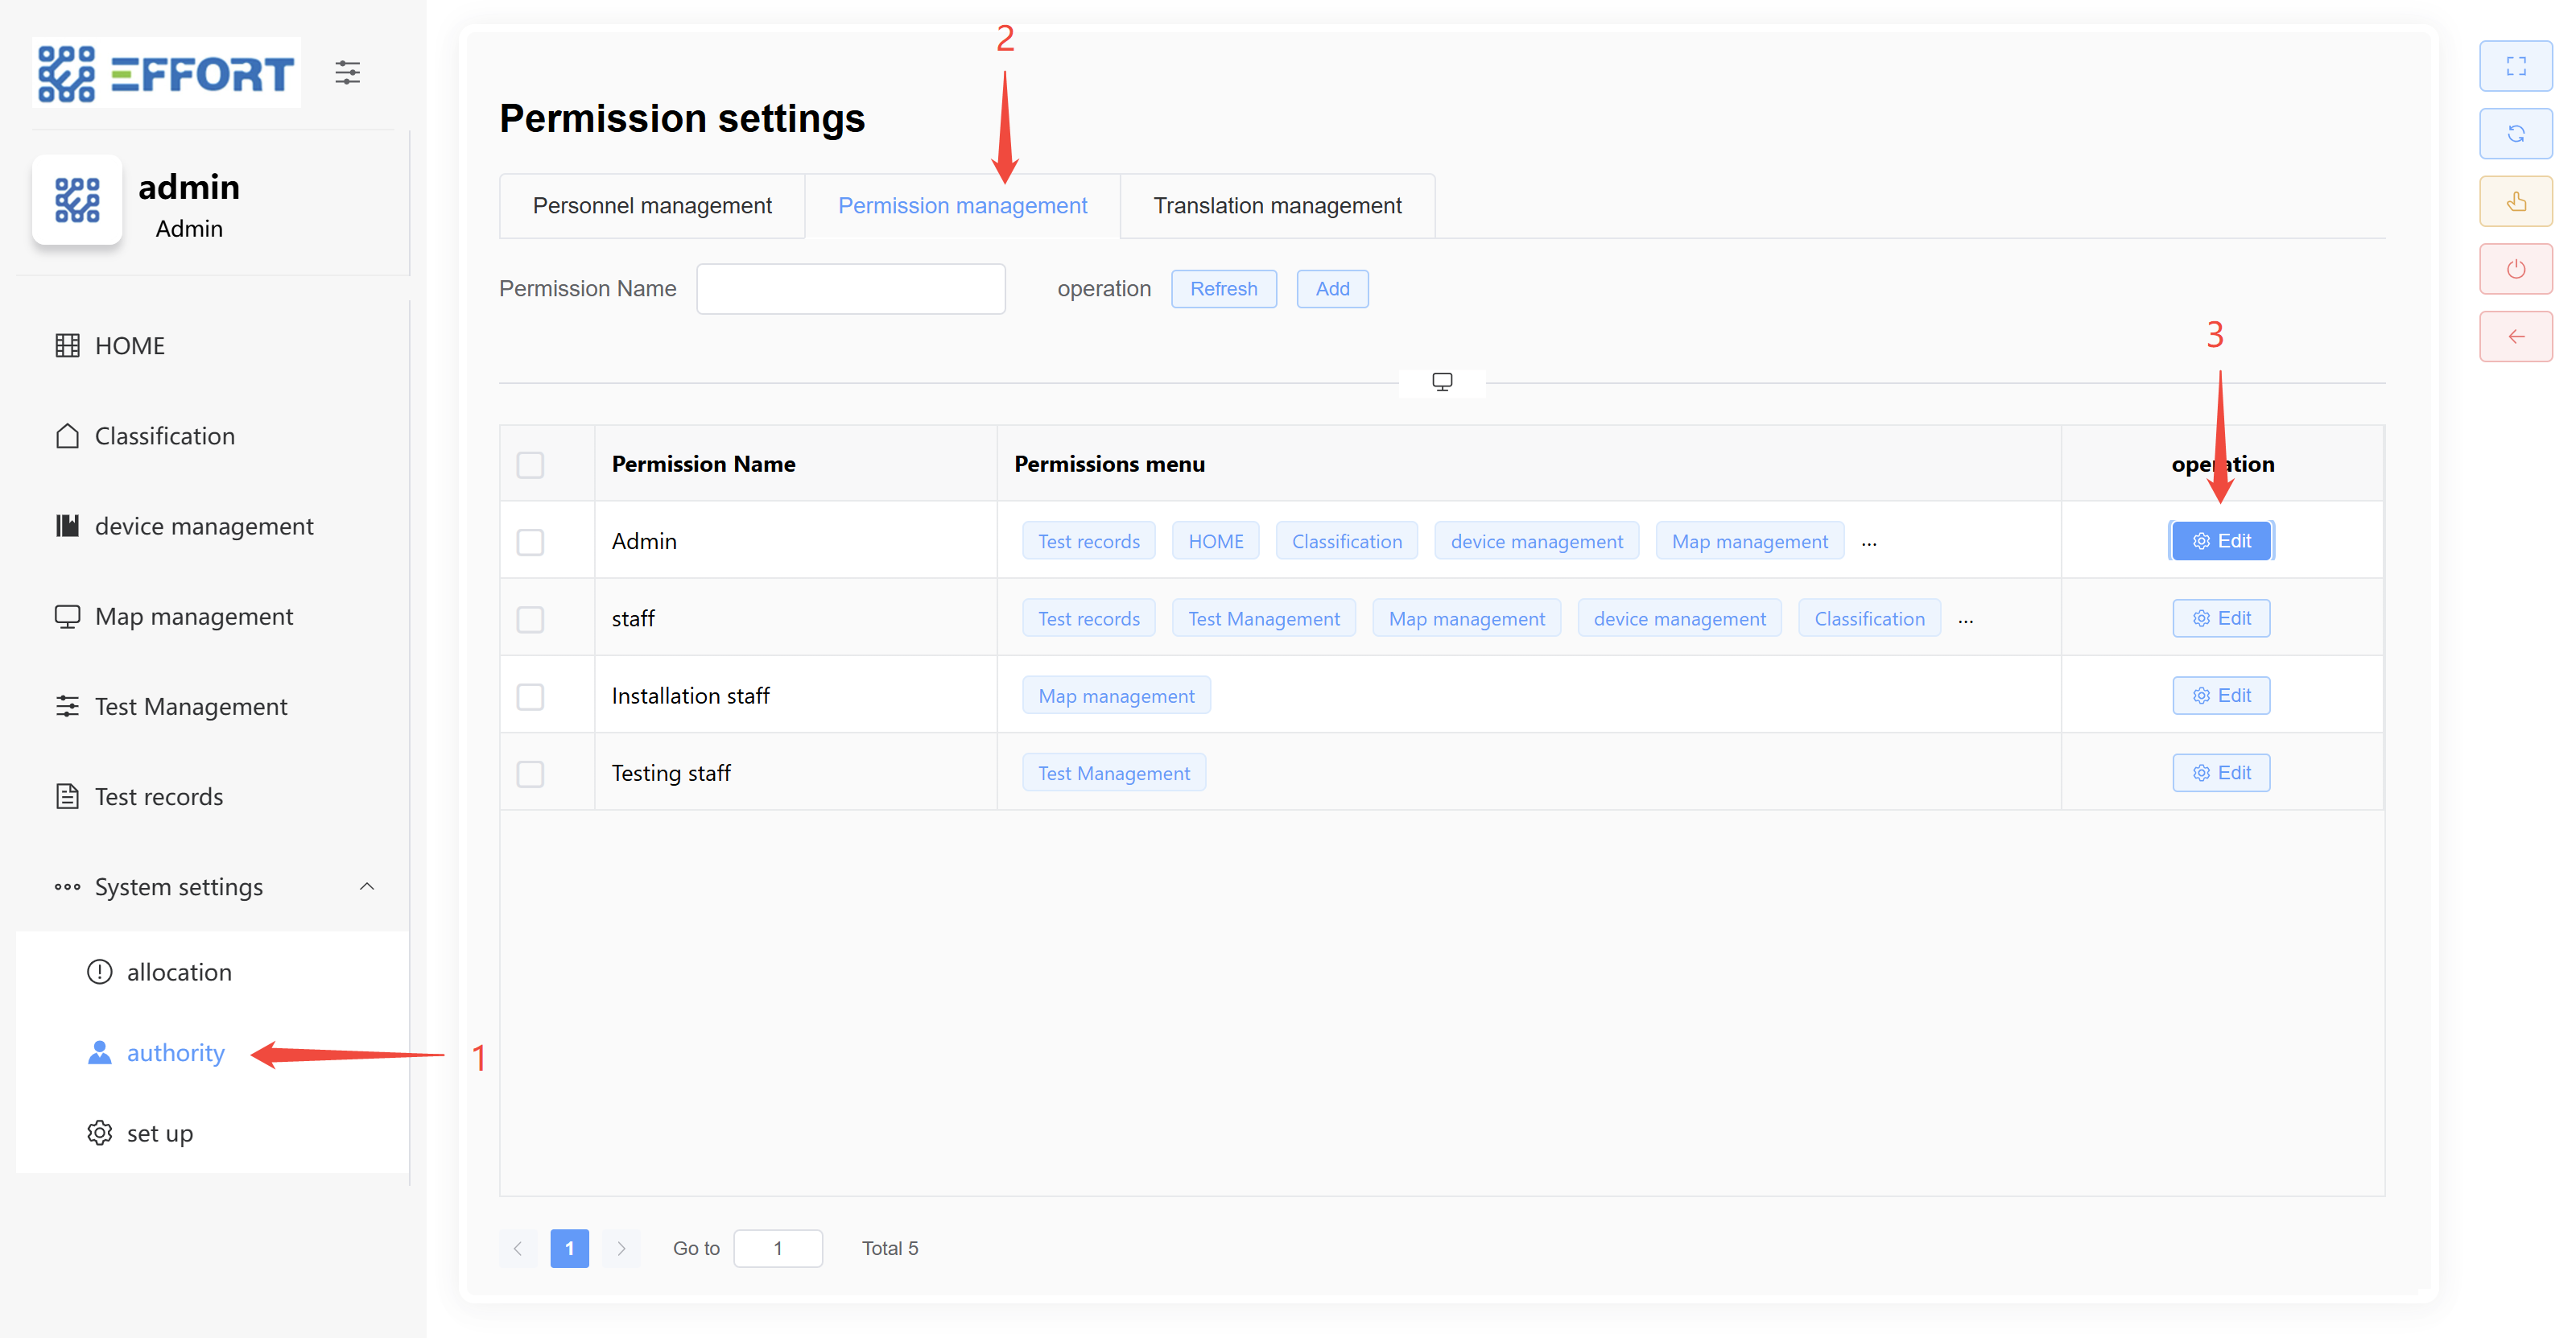
- **权限配置**
1. 步骤 2:点击 Role management,进入权限管理页面
2. 方框 B:权限的基础信息:权限名、权限菜单、权限行内操作
3. 方框 A:新增权限按钮
[](http://13.222.61.26:6875/uploads/images/gallery/2026-01/VKJimage.png)
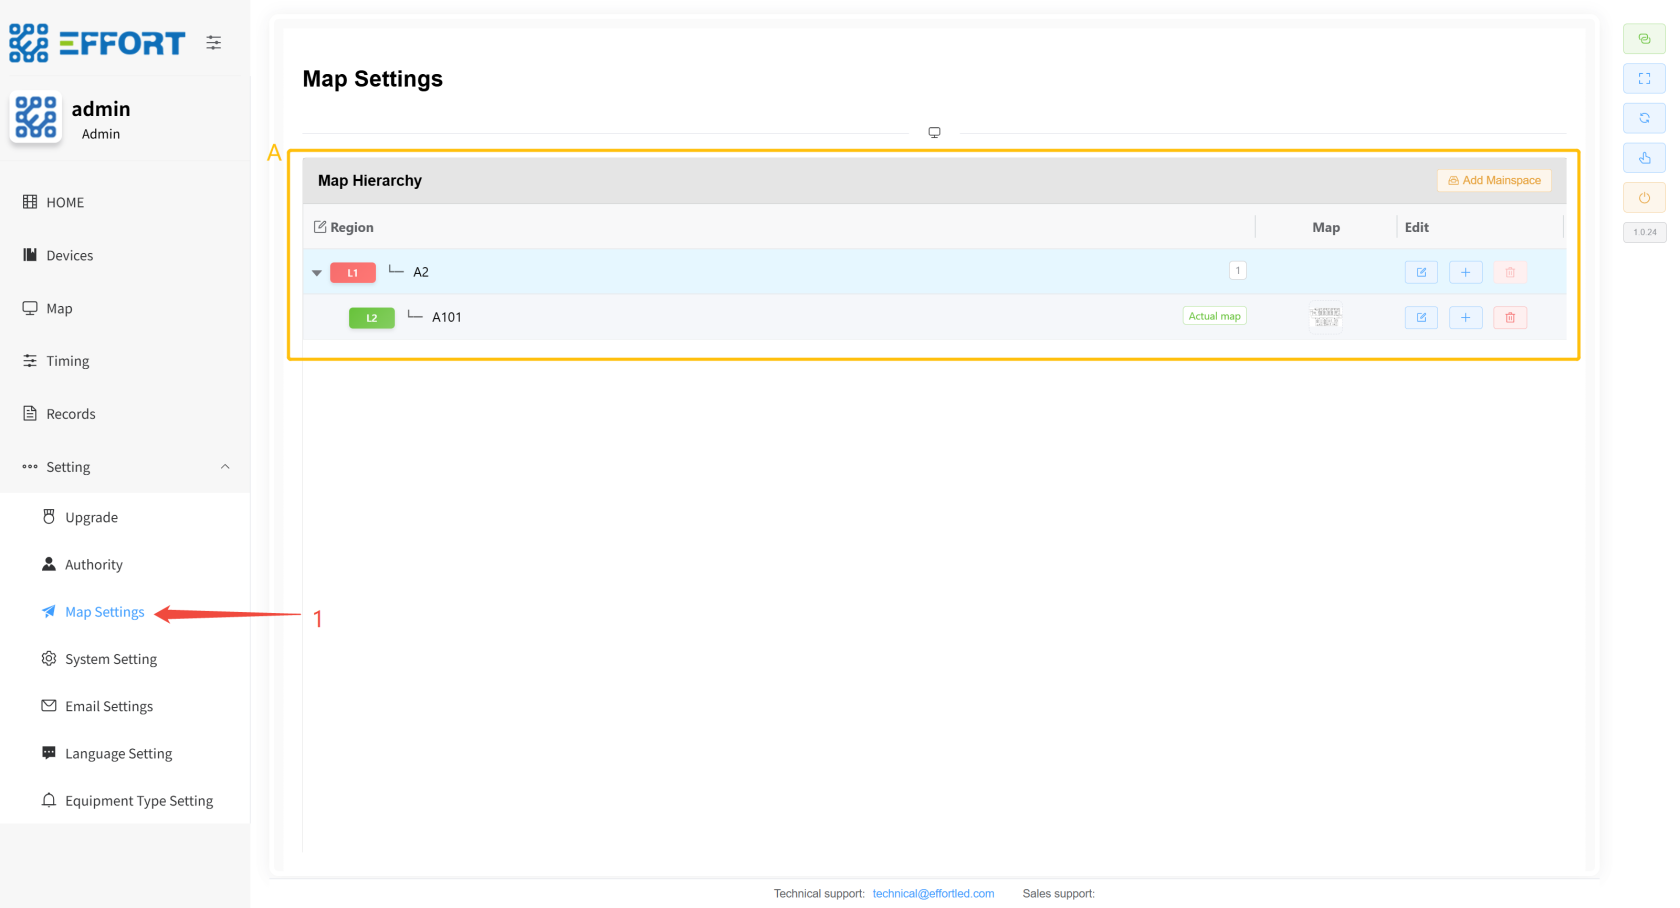
#### **2.2.6.3 Map Settings**
1. 步骤 1:点击 Settings / Map Settings 进入地图管理页面
2. 方框 A:区域基础信息:区域名、区域图片、区域行内操作
[](http://13.222.61.26:6875/uploads/images/gallery/2026-01/malimage.png)
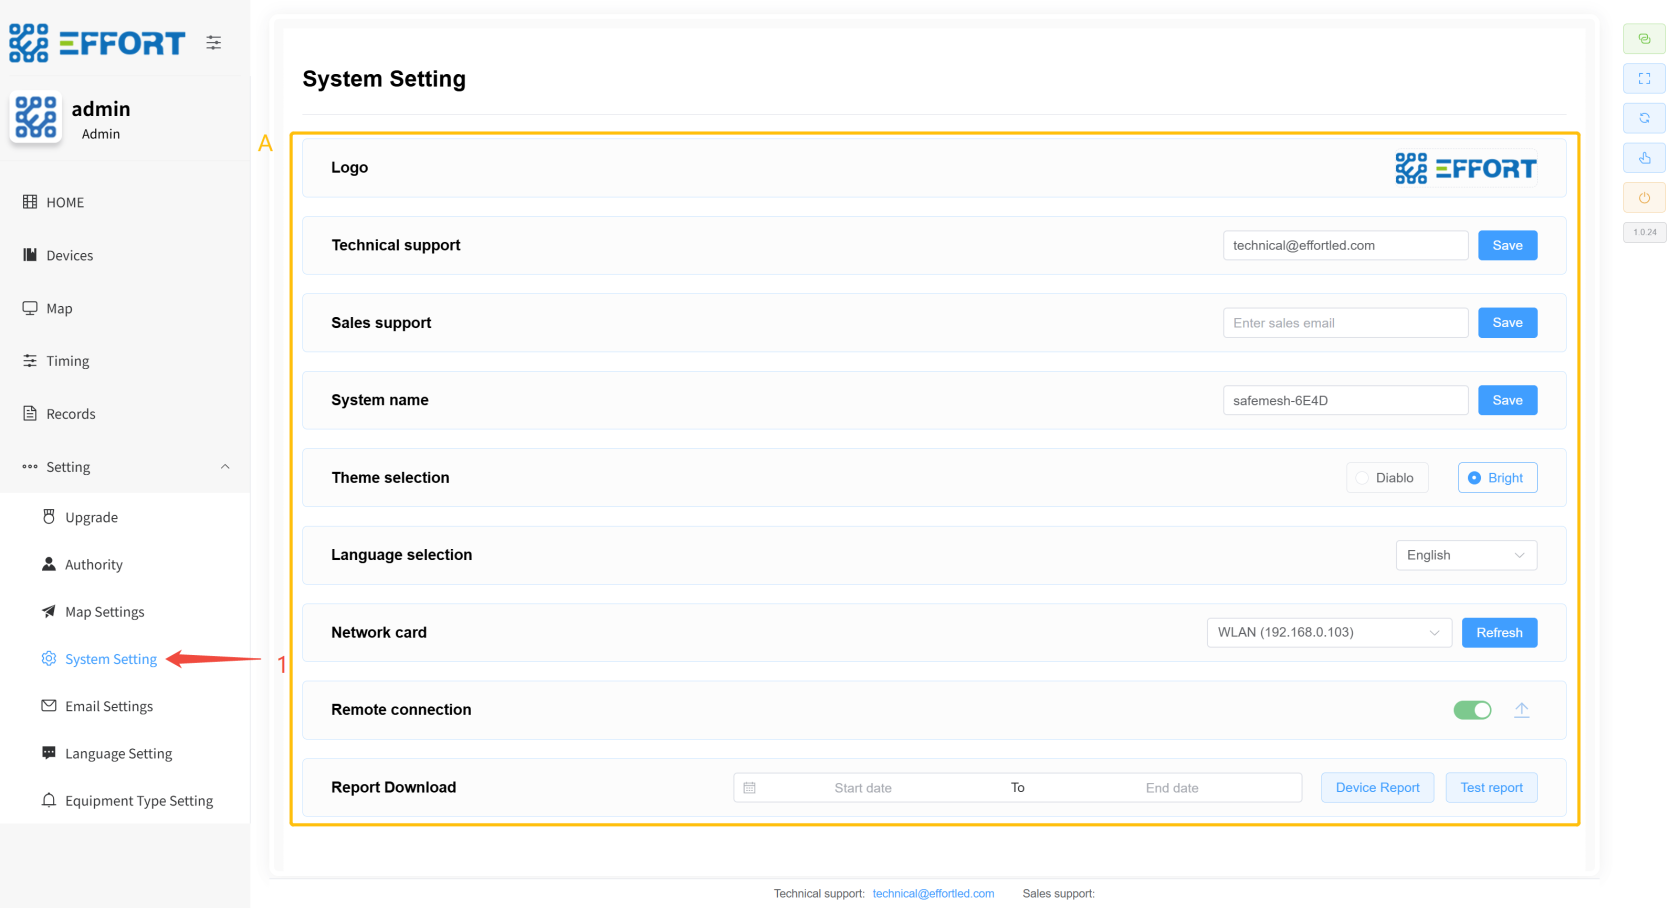
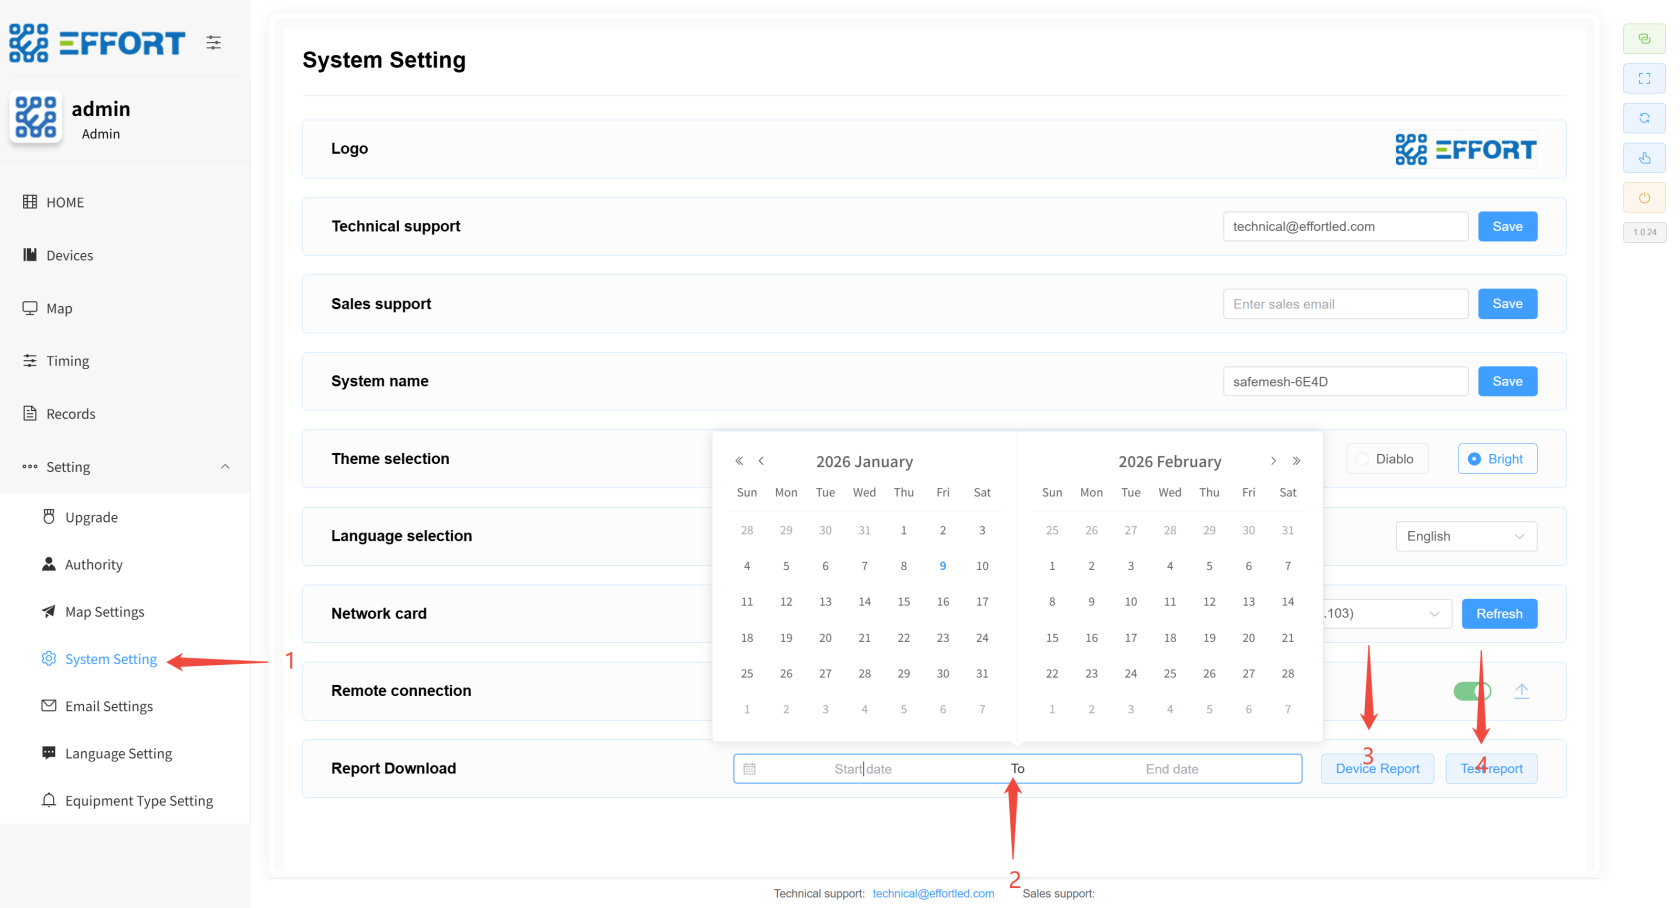
#### **2.2.6.4 System Setting**
1. 步骤 1:点击 Settings / System Setting,进入系统设置页面
2. 方框 A:设置页面包含配置 LOGO、技术支持邮箱、销售支持邮箱、系统名称、主题、语言、网卡、远程连接、下载测试记录报告等功能
[](http://13.222.61.26:6875/uploads/images/gallery/2026-01/UXrimage.png)
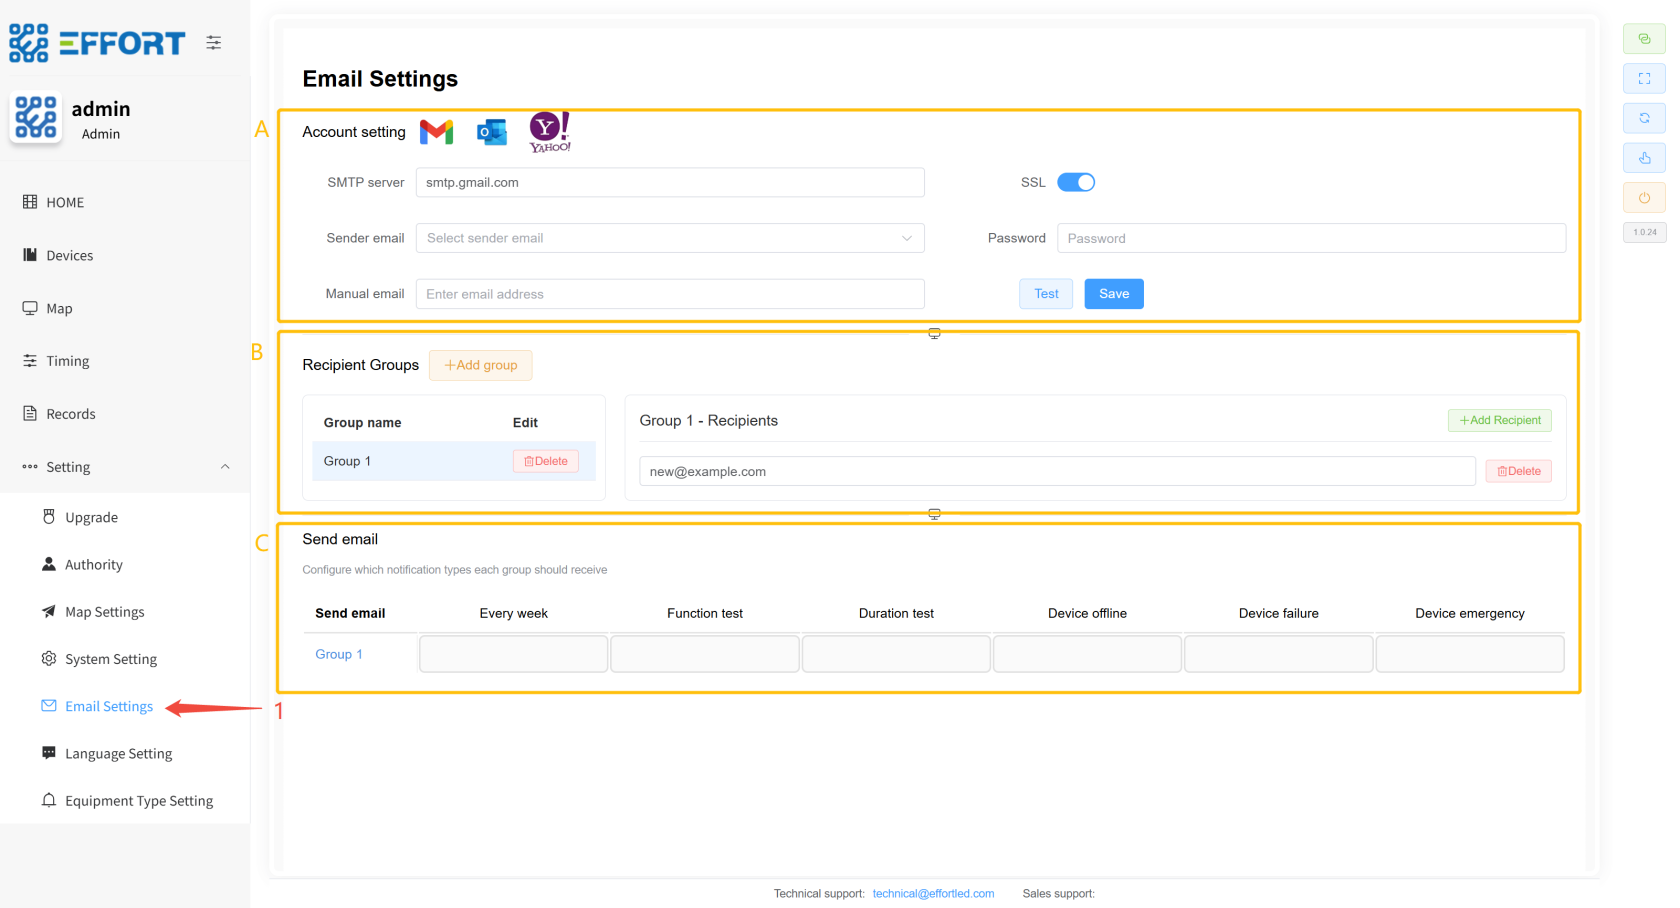
#### **2.2.6.5 Email Setting**
1. 步骤 1:点击 Settings / Email Setting,进入邮箱设置页面
2. 方框 A:配置邮件发送者,选择SMTP服务,选择SSL、输入发送者邮箱地址、输入发送者邮箱地址的应用密码
3. 方框 B:配置邮件接收组,输入接收者的邮件地址
4. 方框 C:配置邮件接收组需要的数据
[](http://13.222.61.26:6875/uploads/images/gallery/2026-01/St1image.png)
---
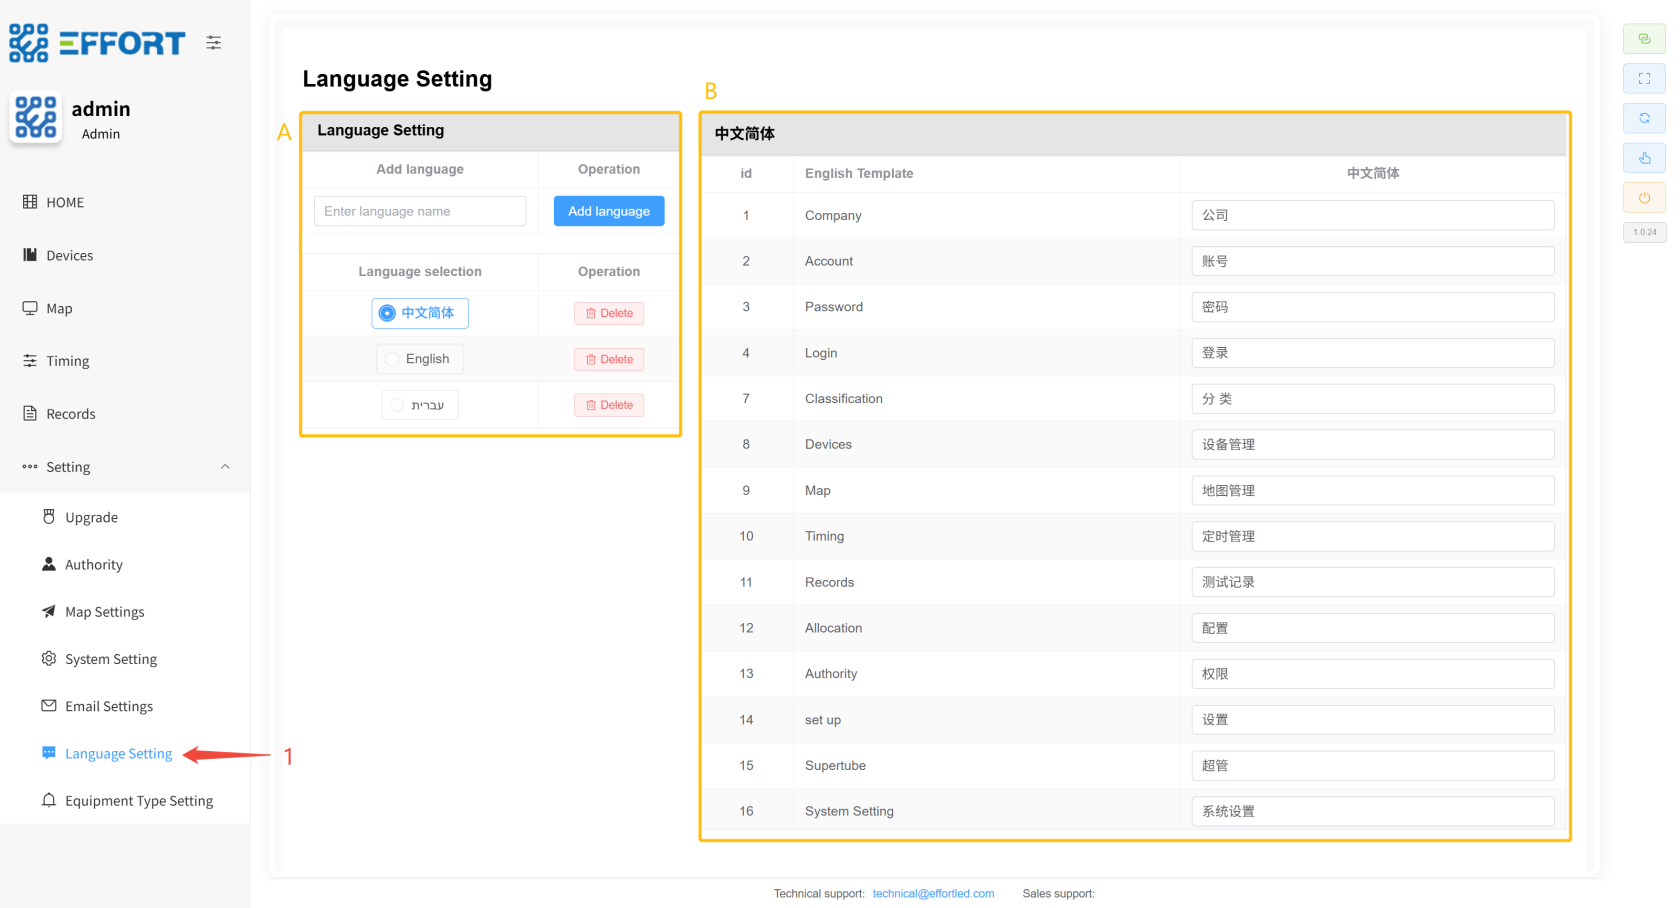
#### **2.2.6.6 Language Setting**
1. 步骤 1:点击 Settings / Language Setting进入翻译管理页面
2. 方框 A:语言管理的操作栏:语言新增按钮、语言选择、语言删除
3. 方框 B:语言表的基础信息:序号、英文模板、左侧选择语言显示
[](http://13.222.61.26:6875/uploads/images/gallery/2026-01/aPeimage.png)
#### **2.2.6.7 Equipment Type Setting**
1. 步骤 1:点击 Settings /Equipment Type Management,进入设备分类管理页面
2. 方框 A:设备分类基础信息:排序、分类名称、分类图标、分类行内操作
3. 方框 B:新设备类型增按钮
[](http://13.222.61.26:6875/uploads/images/gallery/2026-01/Ge7image.png)
# 3.用户管理 ⚙️
初始账号:admin 初始密码:123456 初始角色:admin
用户登录后只能看到自己角色的页面,如果该角色没有此页面的权限,你将不会在系统上看到这个页面。
## **3.1 新增角色**
1. 步骤 1:进入 Authority
2. 步骤 2:进入 Role management
3. 步骤 3:点击 Add
4. 步骤 4:为新权限命名
5. 步骤 5:选择具体权限
6. 步骤 6:点击确认,新增完成
[](http://13.222.61.26:6875/uploads/images/gallery/2026-01/AdHimage.png)
## **3.2 修改角色**
1. 步骤 1:进入 Authority
2. 步骤 2:进入 Account management
3. 步骤 3:点击 Edit
4. 步骤 4:修改角色名字
5. 步骤 5:修改具体权限
6. 步骤 6:点击确认,修改完成
---
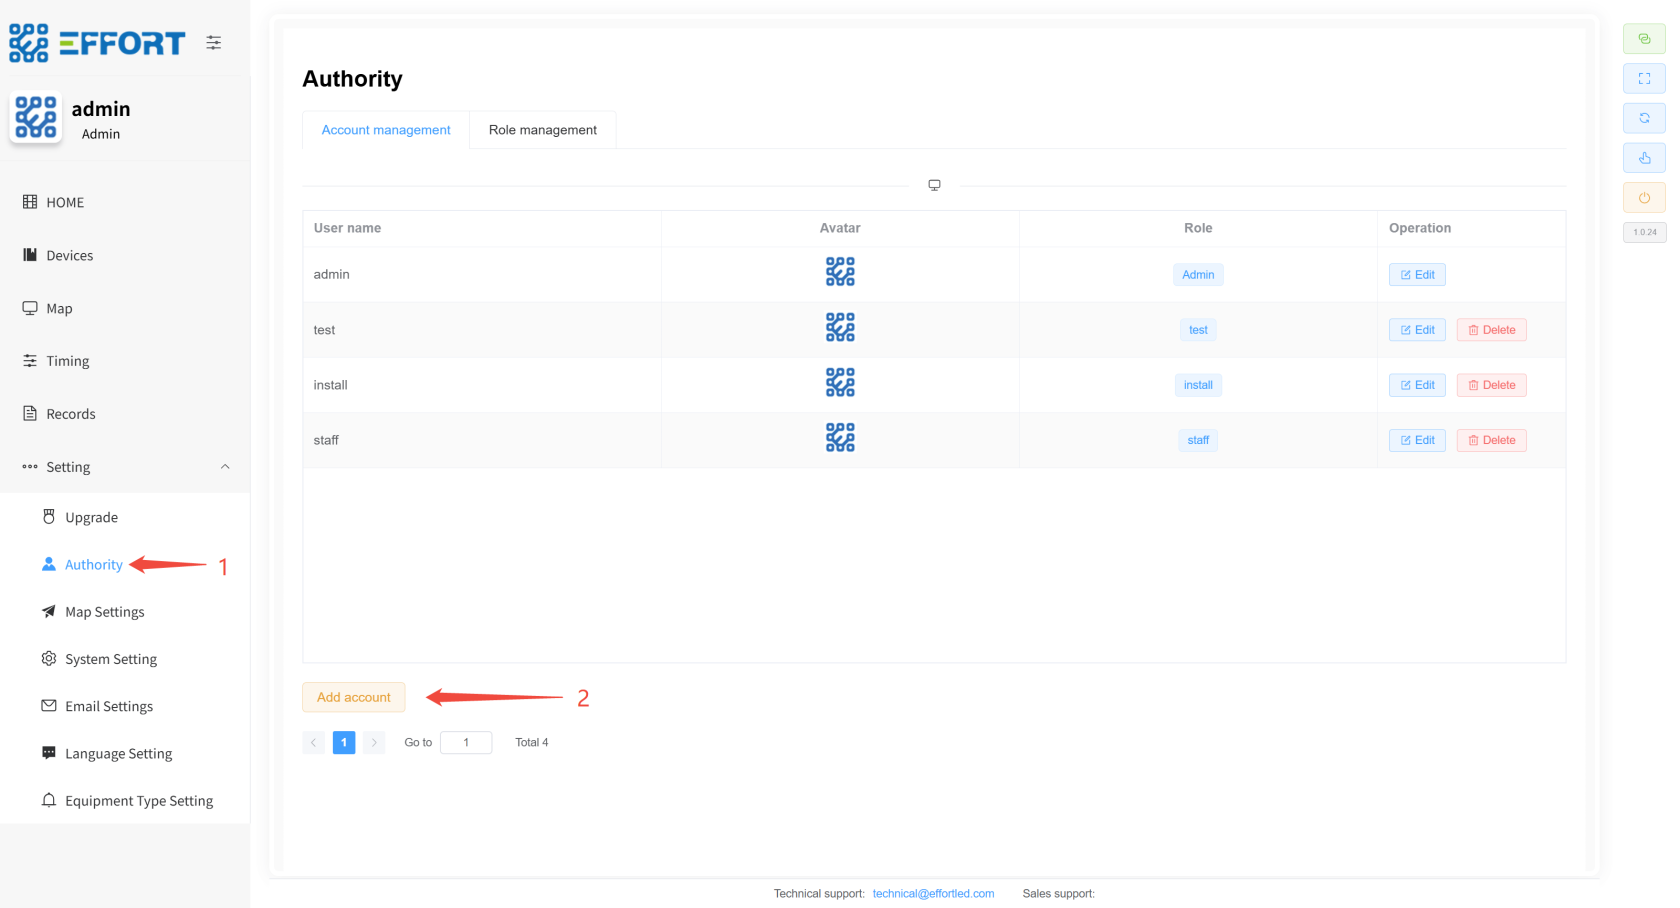
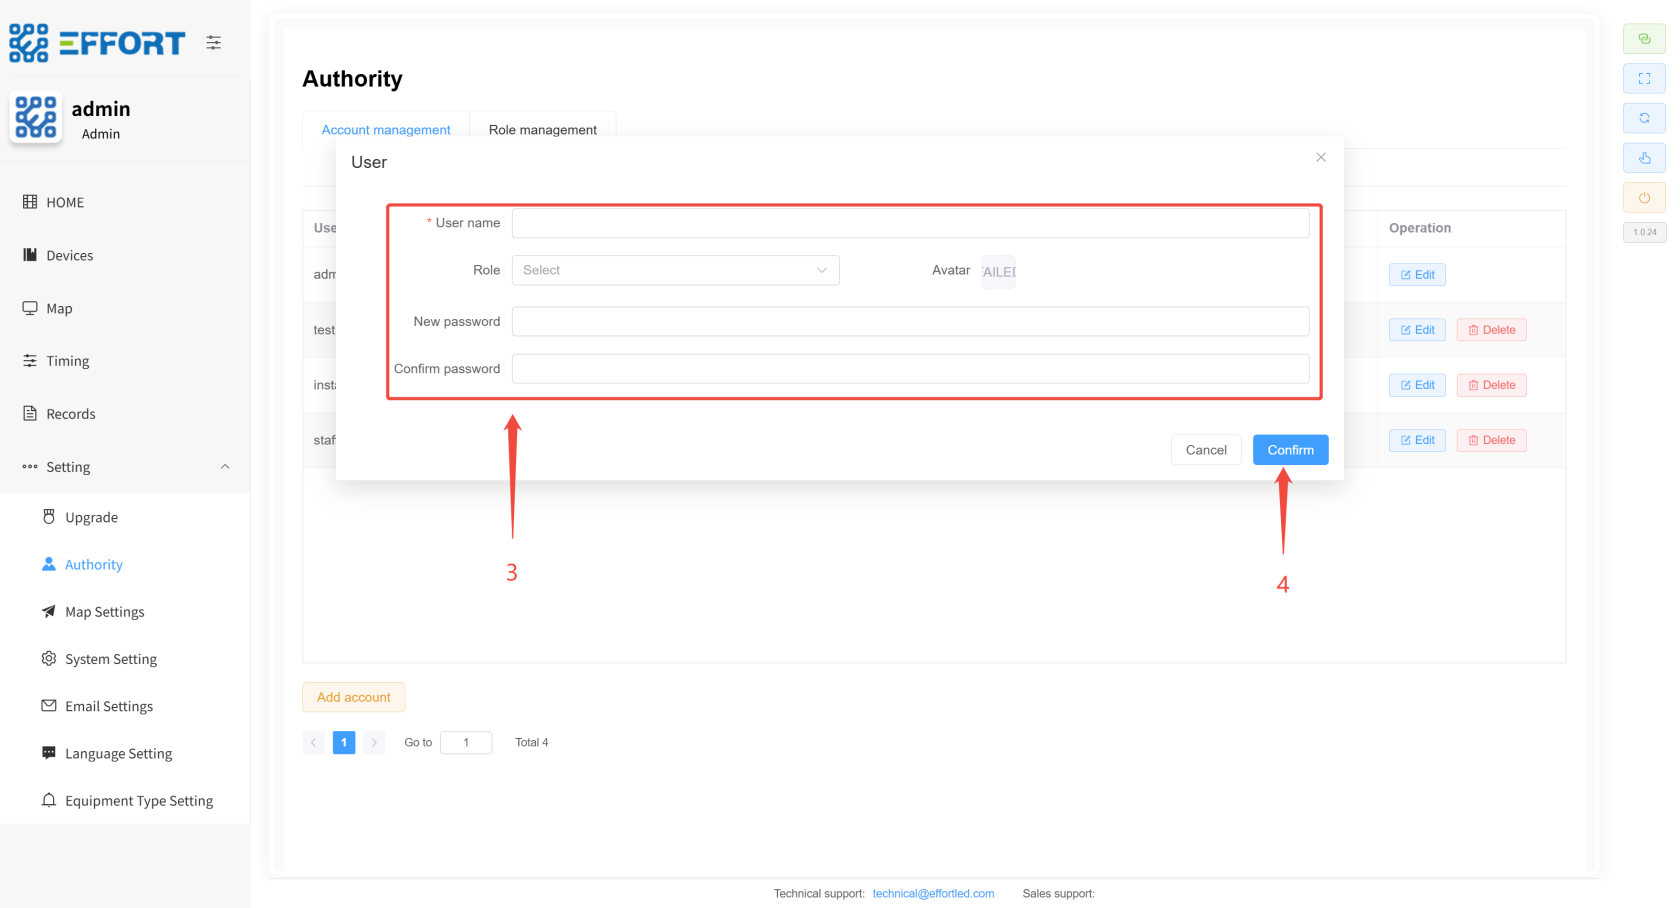
## **3.3 新增用户**
1. 步骤 1:进入 authority
2. 步骤 2:点击 Add
3. 步骤 3:配置相关参数
4. 步骤 4:点击确认,新增完成
[](http://13.222.61.26:6875/uploads/images/gallery/2026-01/lz1image.png)
[](http://13.222.61.26:6875/uploads/images/gallery/2026-01/AEqimage.png)
---
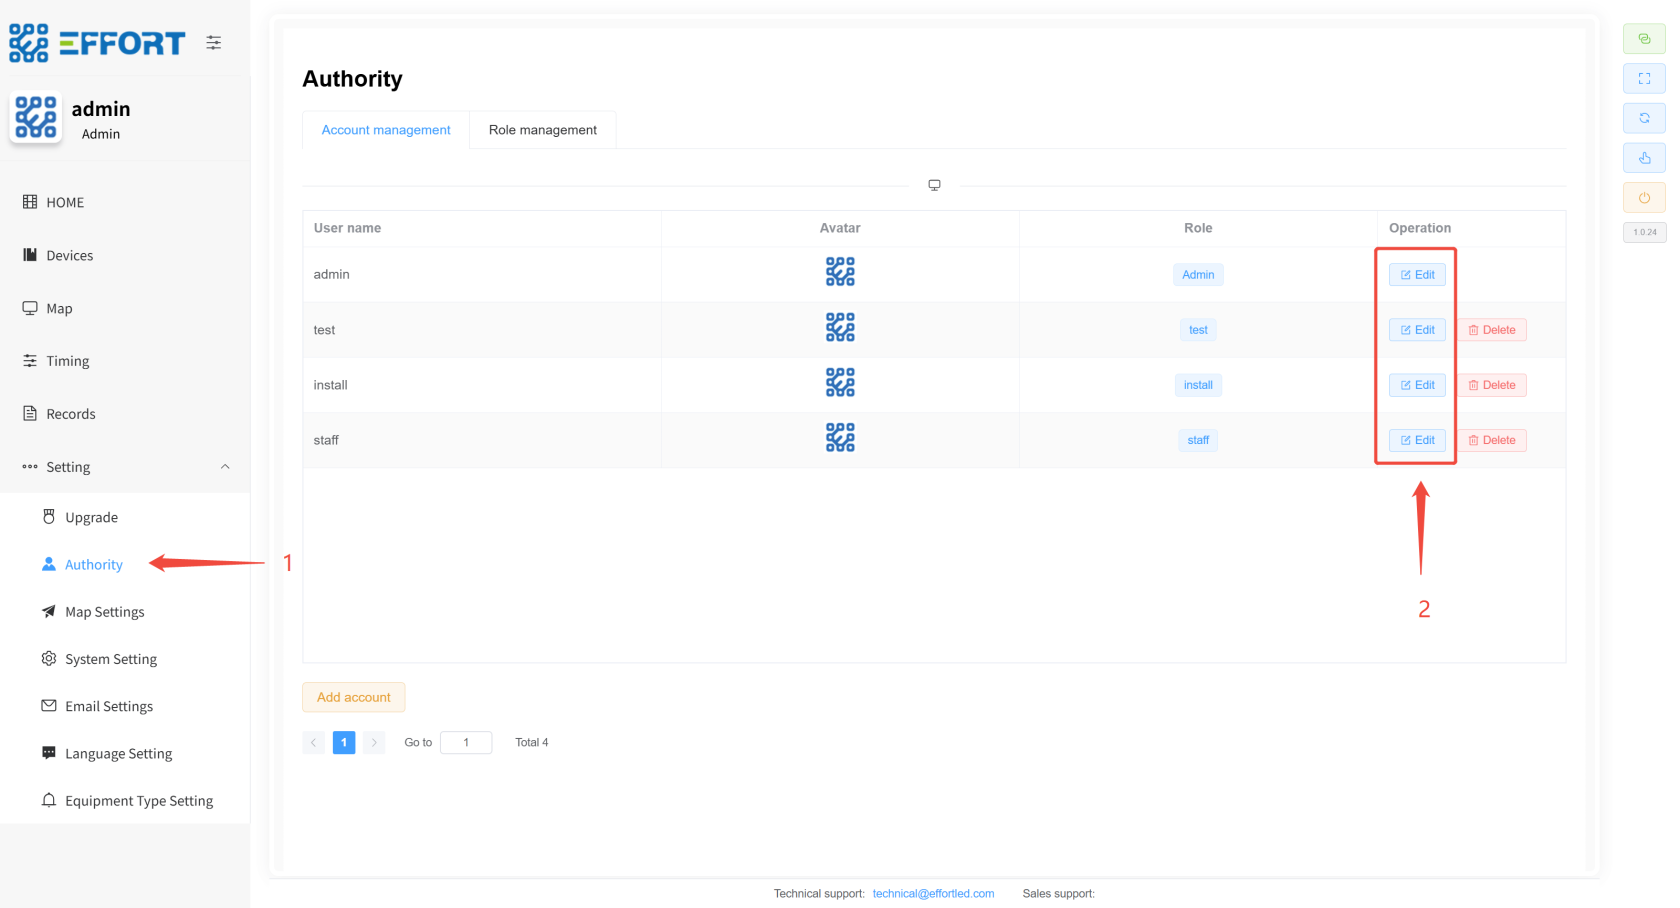
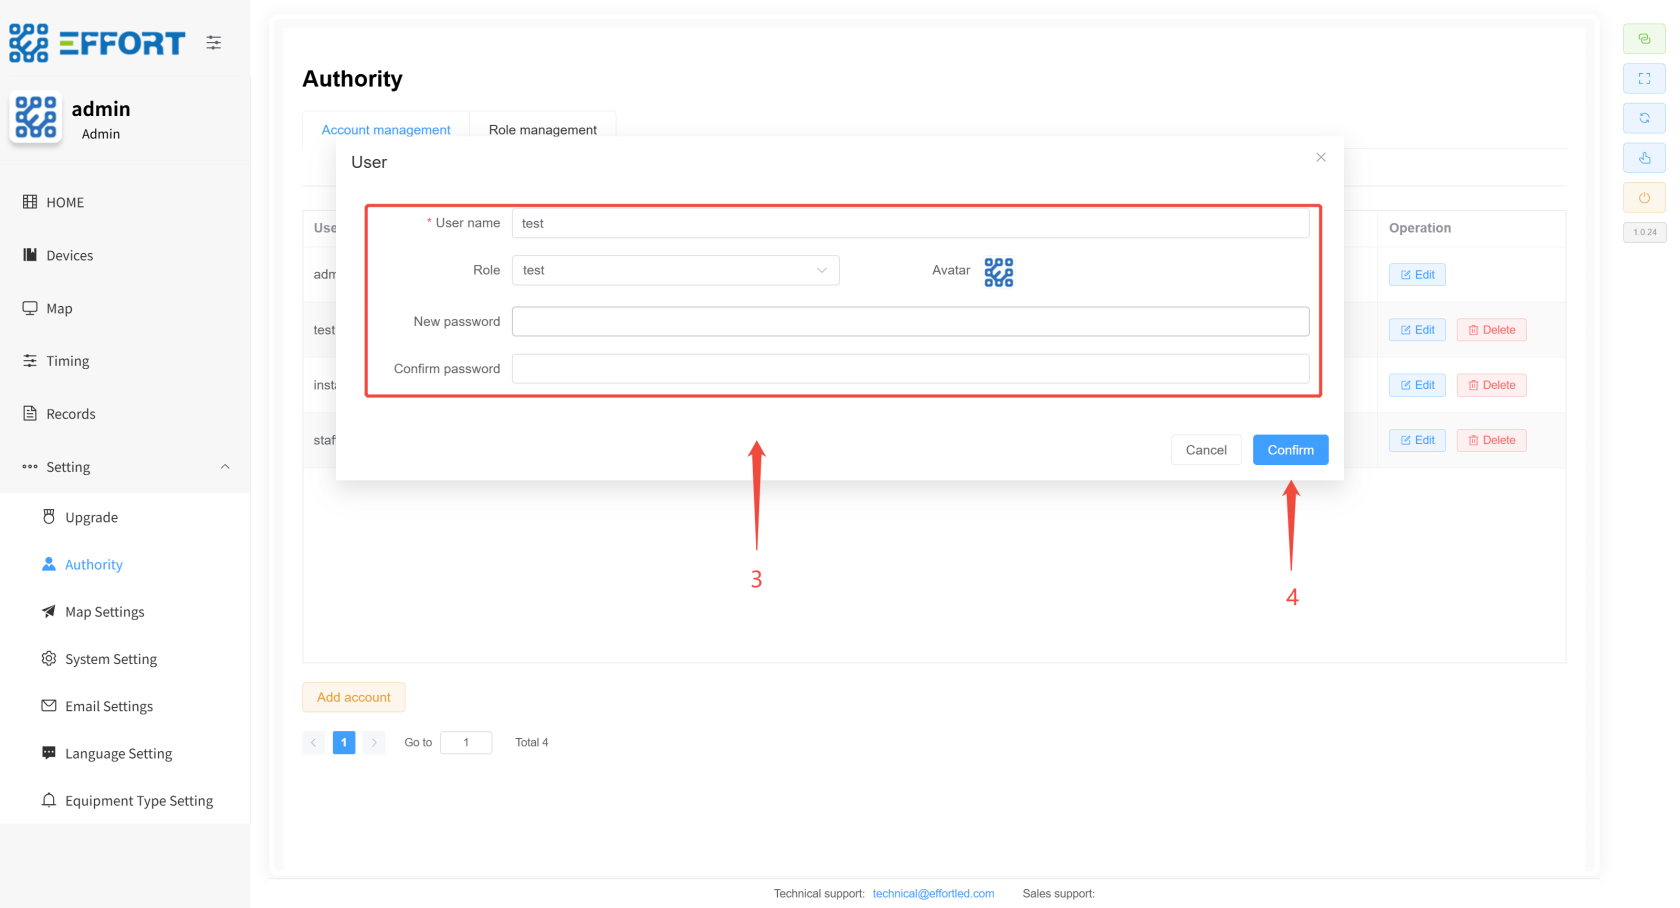
## **3.4 修改用户**
1. 步骤 1:进入 Authority
2. 步骤 2:点击 Edit
3. 步骤 3:修改相关参数
4. 步骤 4:点击确认,修改完成
[](http://13.222.61.26:6875/uploads/images/gallery/2026-01/8Gdimage.png)
[](http://13.222.61.26:6875/uploads/images/gallery/2026-01/yV4image.png)
# **4. 工作流描述**
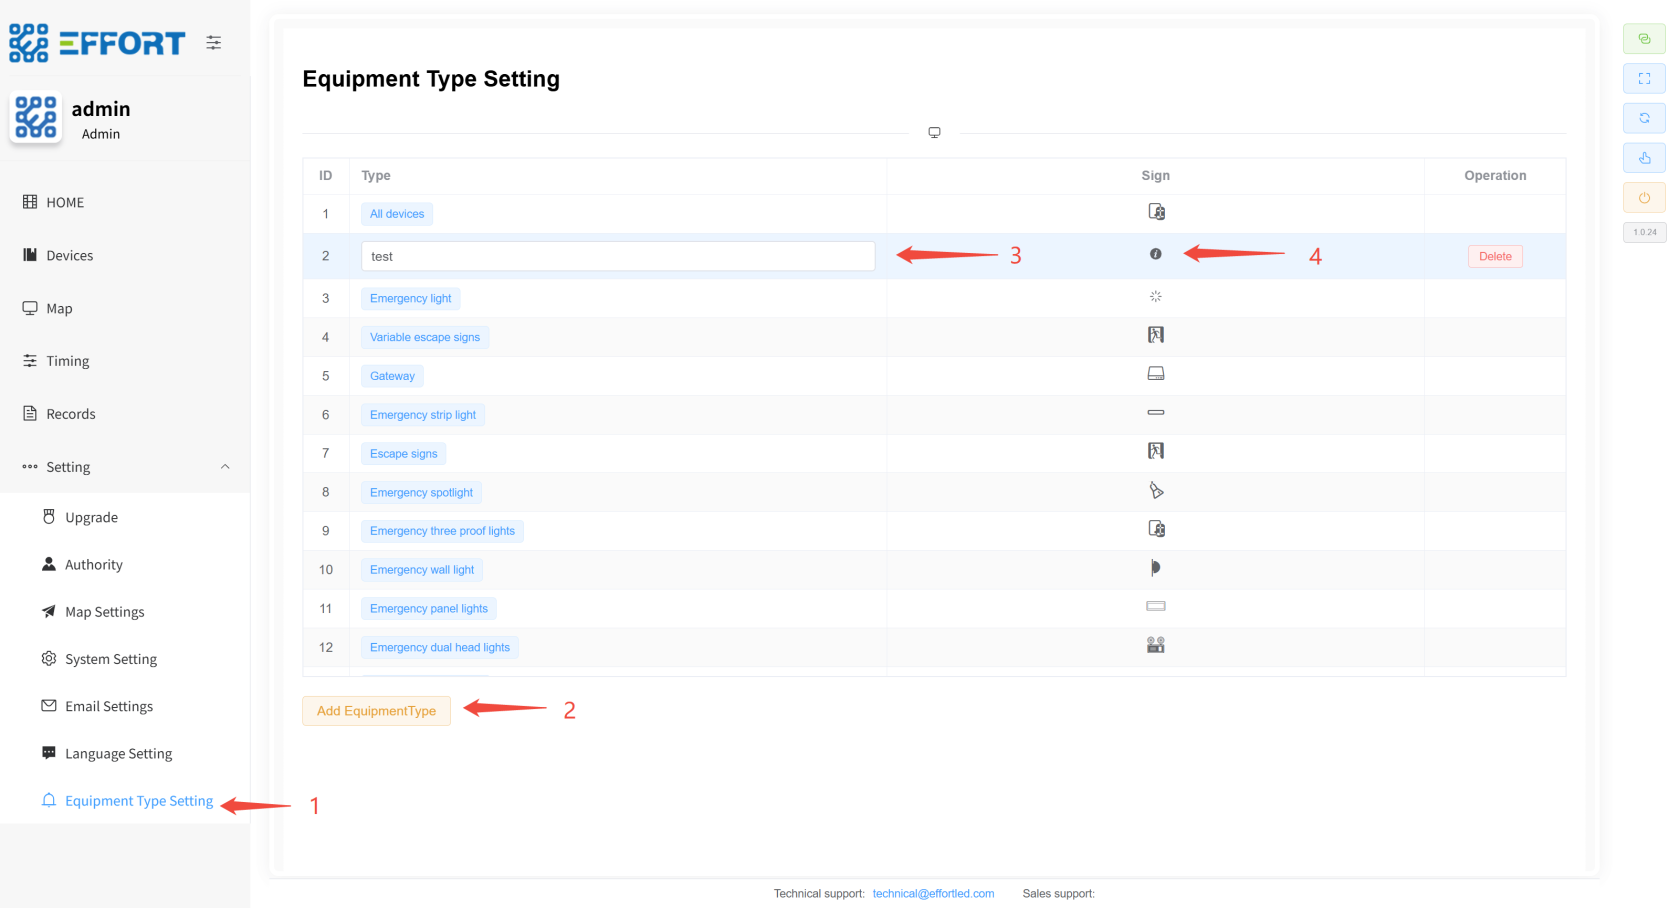
## **4.1 新增设备分类 ⚙️**
1. 步骤 1:点击 Equipment Type Setting进入设备类型管理
2. 步骤 2:然后点击 Add EquipmentType,添加新的设备分类
3. 步骤 3:点击分类名,修改分类名称
4. 步骤 4:在 Sign 区域,选择图标,配置完成
[](http://13.222.61.26:6875/uploads/images/gallery/2026-01/R5himage.png)
---
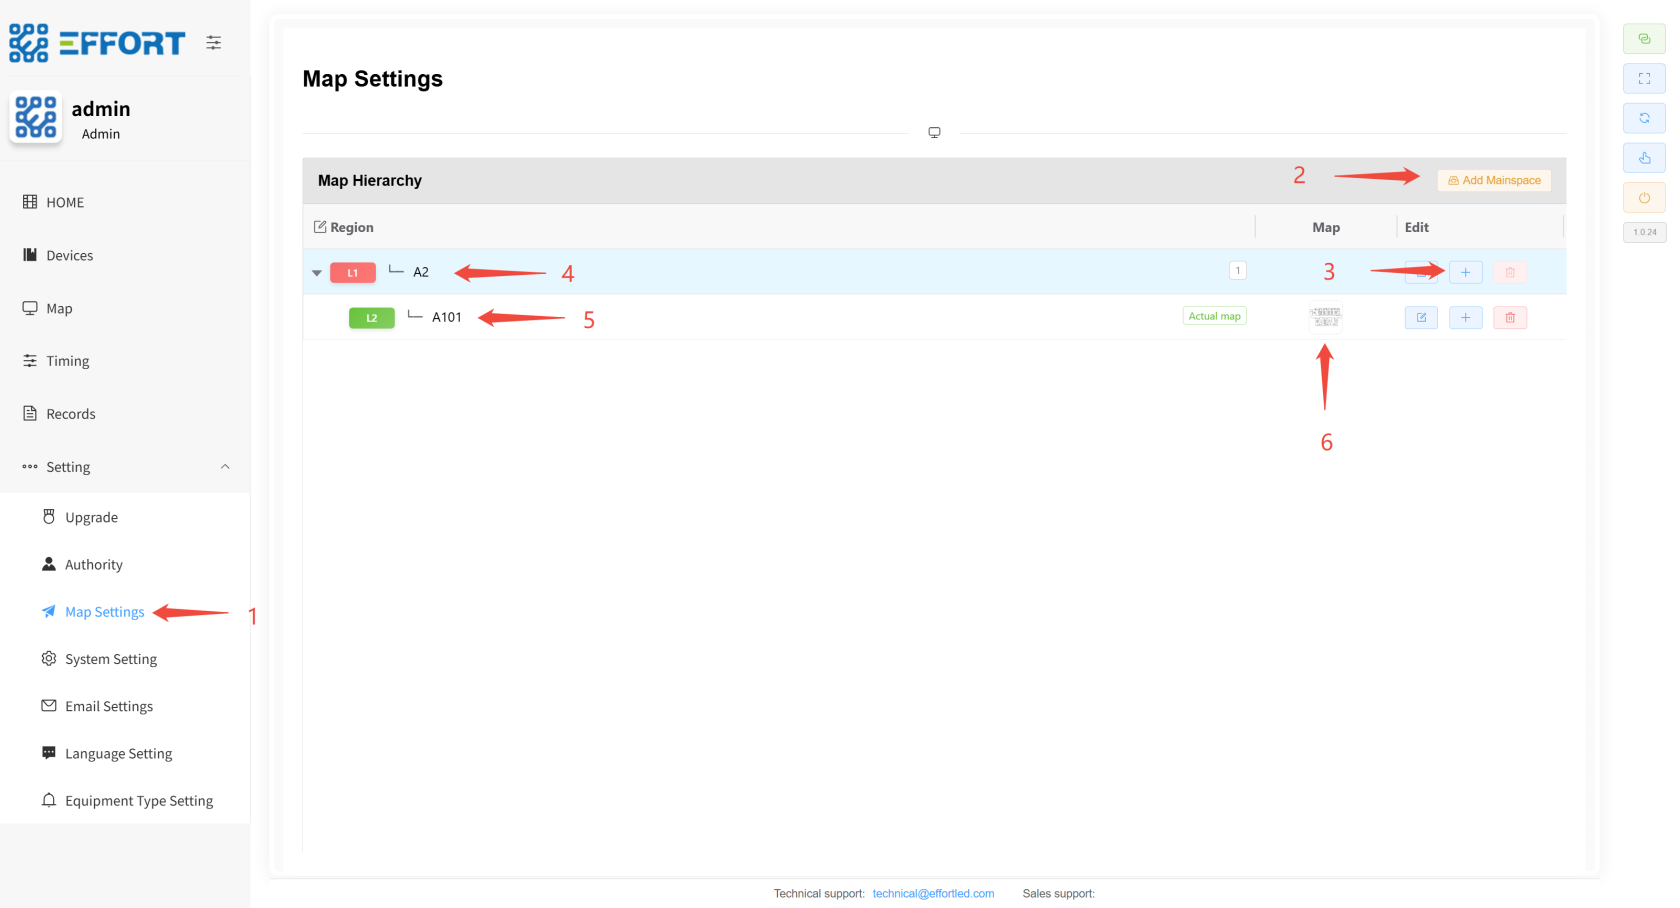
## **4.2 导入地图(产品导入指引已有)⚙️**
1. 步骤 1:再点击 map Settings进入地图管理页面
2. 步骤 2:点击 Add Mainspace,添加 一级区域
3. 步骤 3:然后点击 "+",添加 二级区域,可以继续向下添加......
4. 步骤 4、5:点击区域名,修改区域名称
5. 步骤 6:在**最后一级**区域,上传区域地图,配置完成
---
[](http://13.222.61.26:6875/uploads/images/gallery/2026-01/G8timage.png)
## **4.3 导入网关、设备 👤**
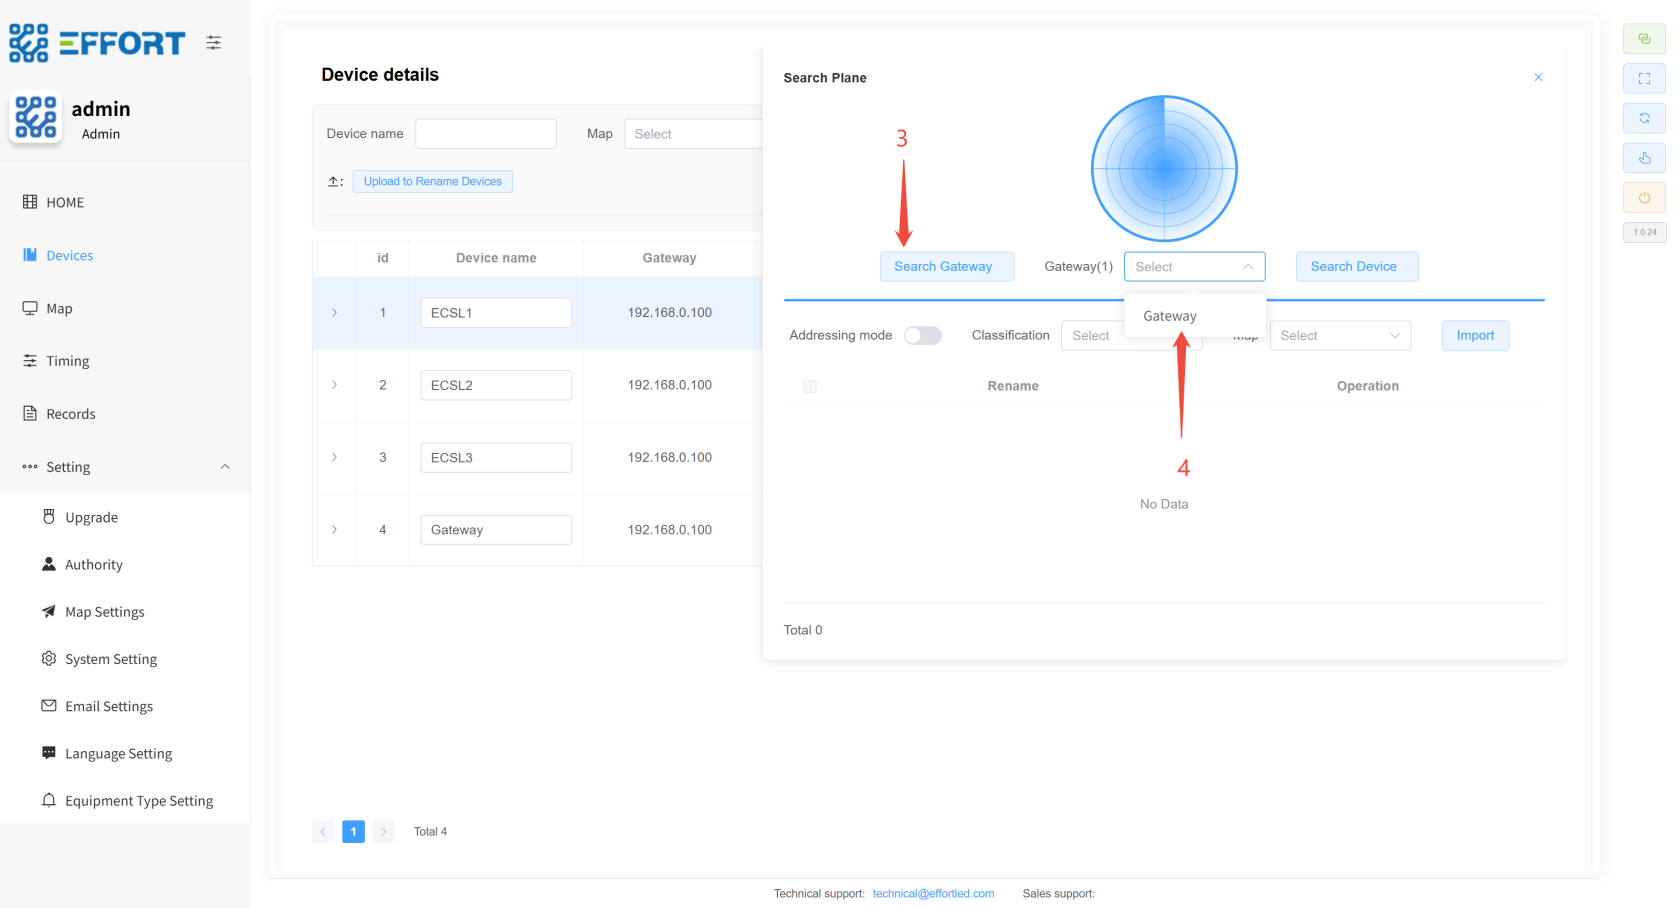
- **网关导入步骤**
1. 步骤 1:进入 Device
2. 步骤 2:点击 Search Device 打开 Search Plane
3. 步骤 3:点击 Search Gateway,等待 30 秒左右
4. 步骤 4:点击选中搜索出来的网关
[](http://13.222.61.26:6875/uploads/images/gallery/2026-01/5bOimage.png)
[](http://13.222.61.26:6875/uploads/images/gallery/2026-01/bs9image.png)
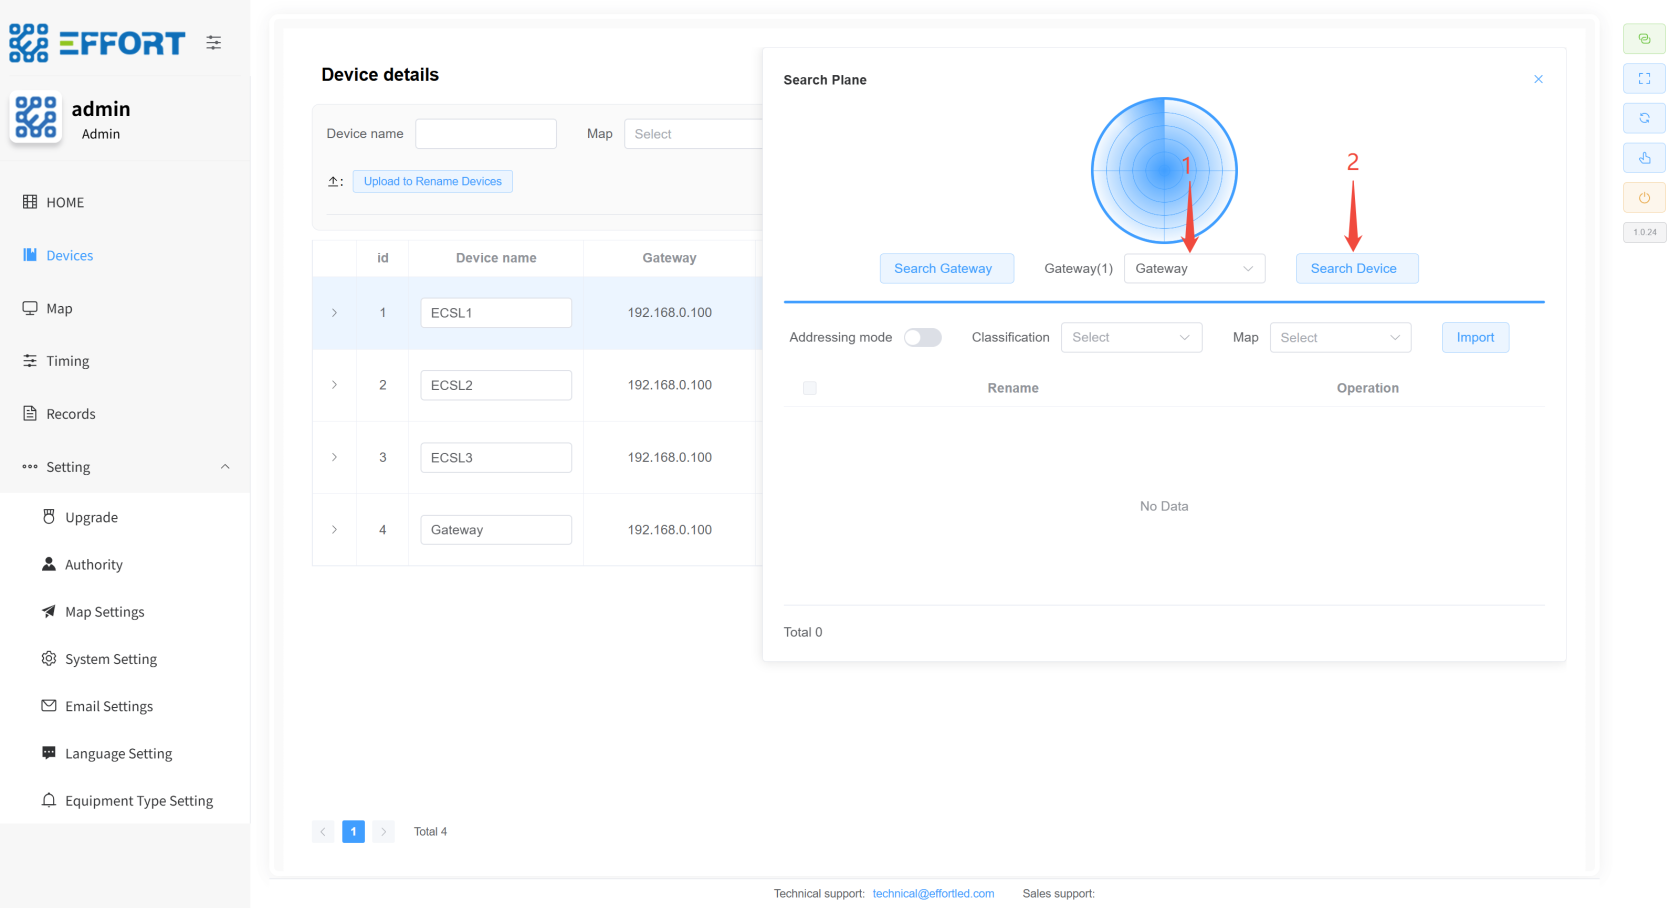
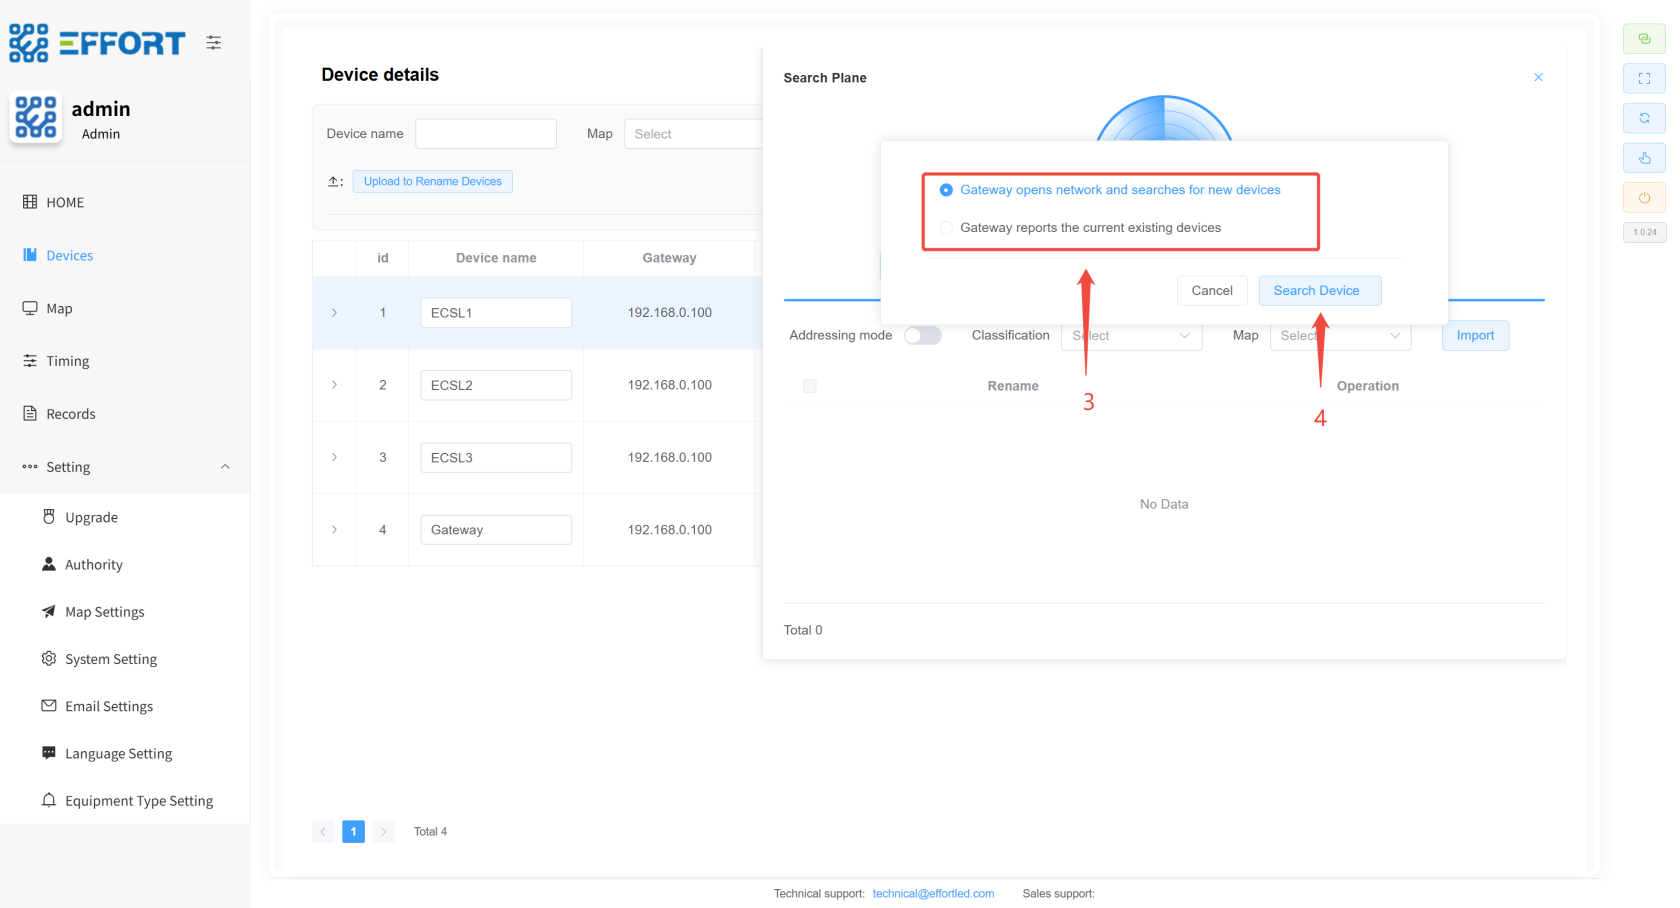
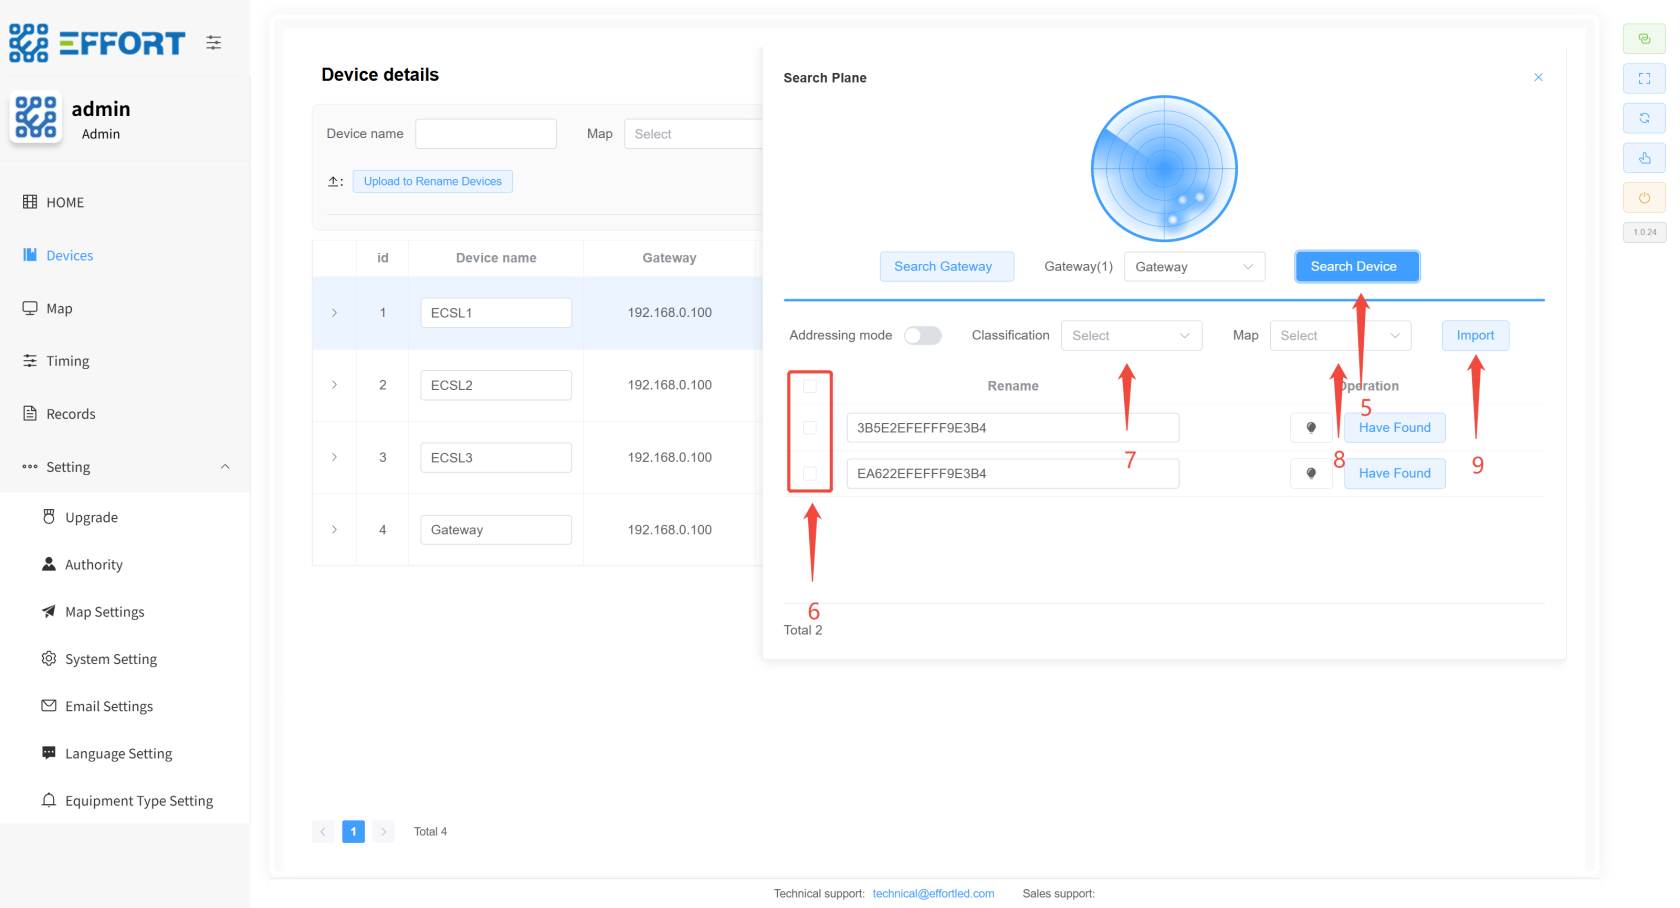
- **设备导入步骤**
1. 步骤 1:先选中网关
2. 步骤 2:点击 Search Device
3. 步骤 3:选择搜索模式
4. 步骤 4:点击Search Device
5. 步骤 5:搜索完毕后再次点击Search Device停止搜索
6. 步骤 6:选择设备
7. 步骤 7:选择设备分类
8. 步骤 8:选择区域
9. 步骤 9:点击导入
[](http://13.222.61.26:6875/uploads/images/gallery/2026-01/Rw5image.png)
[](http://13.222.61.26:6875/uploads/images/gallery/2026-01/37Himage.png)
[](http://13.222.61.26:6875/uploads/images/gallery/2026-01/Vwaimage.png)
---
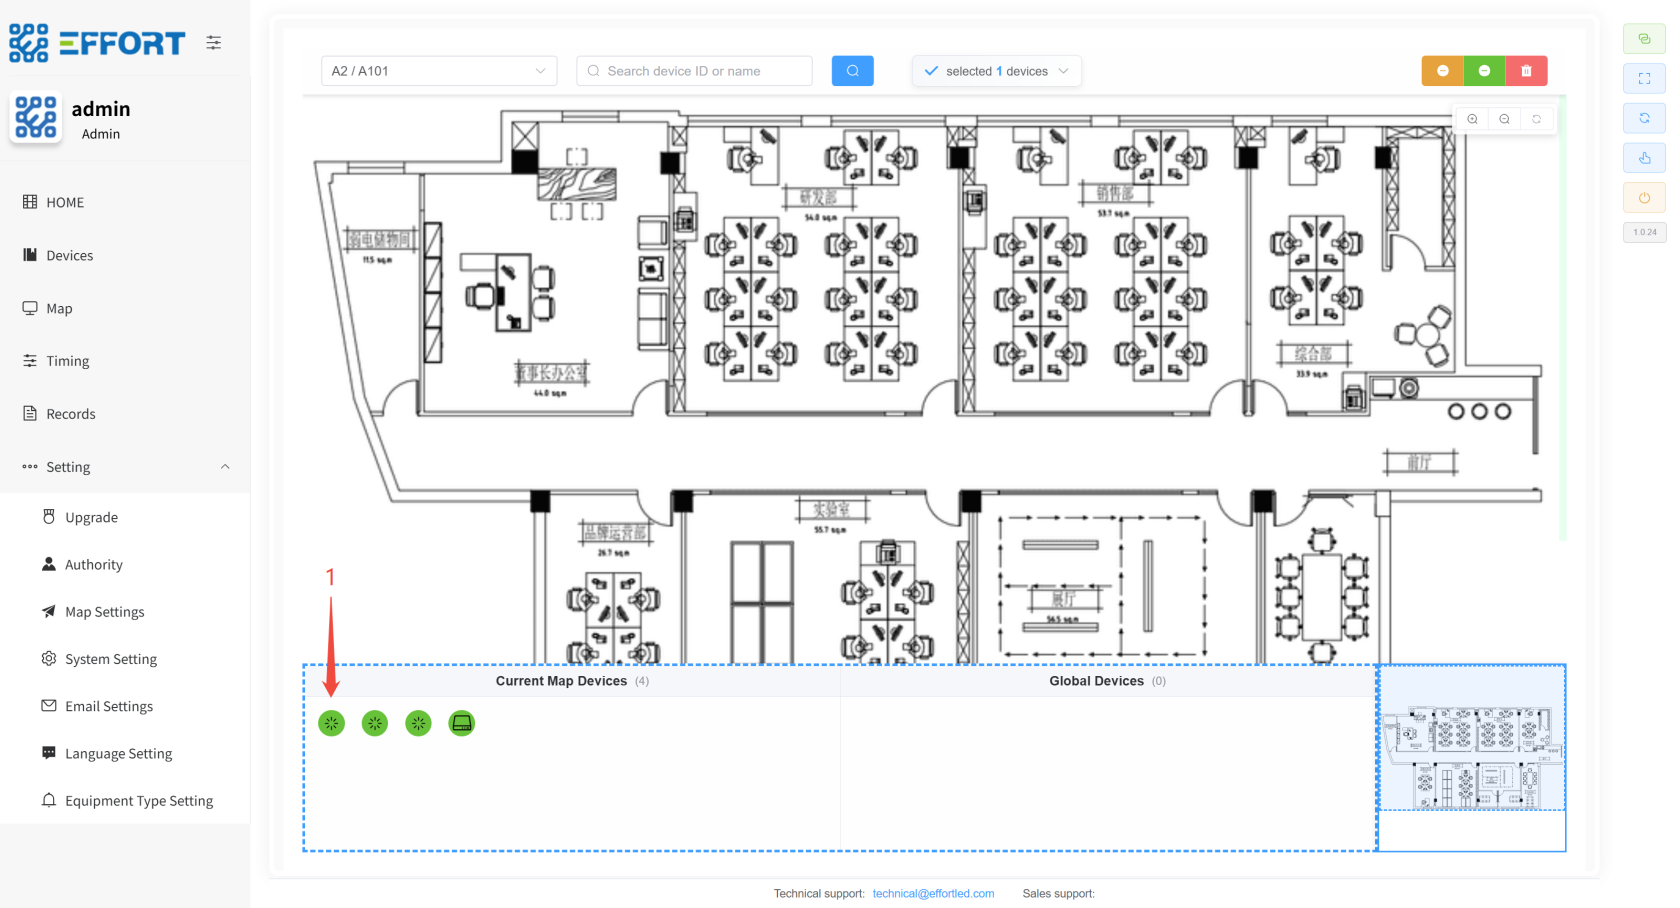
## **4.4 设备放置至地图 👤**
步骤 1:左键按住设备,将其拖入地图
[](http://13.222.61.26:6875/uploads/images/gallery/2026-01/B35image.png)
---
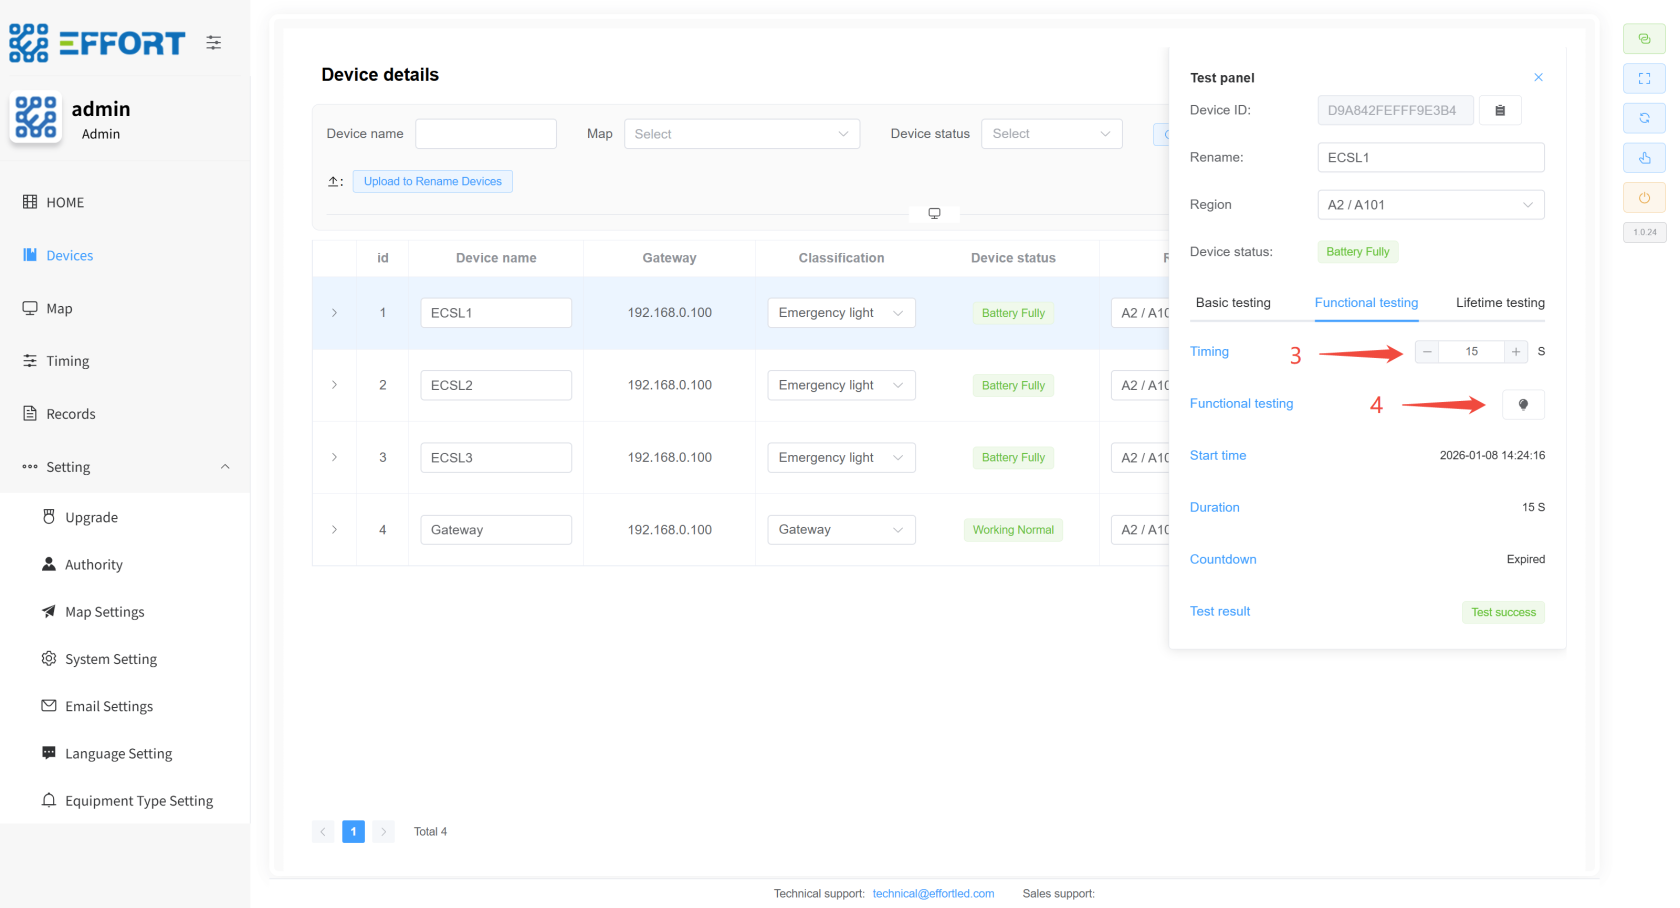
## **4.5 临时功能检、寿命检 👤**
- **临时功能检步骤**
1. 步骤 1:进入 Devices
2. 步骤 2:点击进入 Test Panel
3. 步骤 3:配置持续时间
4. 步骤 4:点击图标进入临时功能检
[](http://13.222.61.26:6875/uploads/images/gallery/2026-01/K8Dimage.png)
[](http://13.222.61.26:6875/uploads/images/gallery/2026-01/or0image.png)
- **临时寿命检步骤**
1. 步骤 1:进入 Lifetime testing
2. 步骤 2:配置持续时间
3. 步骤 3:点击图标进入临时寿命检
[](http://13.222.61.26:6875/uploads/images/gallery/2026-01/2CXimage.png)
## **4.6 定时功能检、寿命检 👤**
1. 步骤 1:进入 Timing
2. 步骤 2:点击Batch Configure Test Time按钮
3. 步骤 3:选中需要设置定时的设备
4. 步骤 4:配置定时相关参数
5. 步骤 5:点击 Start setting,配置完成
---
[](http://13.222.61.26:6875/uploads/images/gallery/2026-01/xDXimage.png)
[](http://13.222.61.26:6875/uploads/images/gallery/2026-01/accimage.png)
## **4.7 测试报告下载 ⚙️**
1. 步骤 1:进入 System Setting
2. 步骤 2:点击选择日期
3. 步骤 3:点击下载 device Report
4. 步骤 4:点击下载 test Report
---
[](http://13.222.61.26:6875/uploads/images/gallery/2026-01/YsZimage.png)
## **4.8 切换语言 ⚙️**
1. 步骤 1:点击 System Setting ,进入系统设置页面
2. 步骤 2:点击选择框,切换语言
[](http://13.222.61.26:6875/uploads/images/gallery/2026-01/JuUimage.png)
---
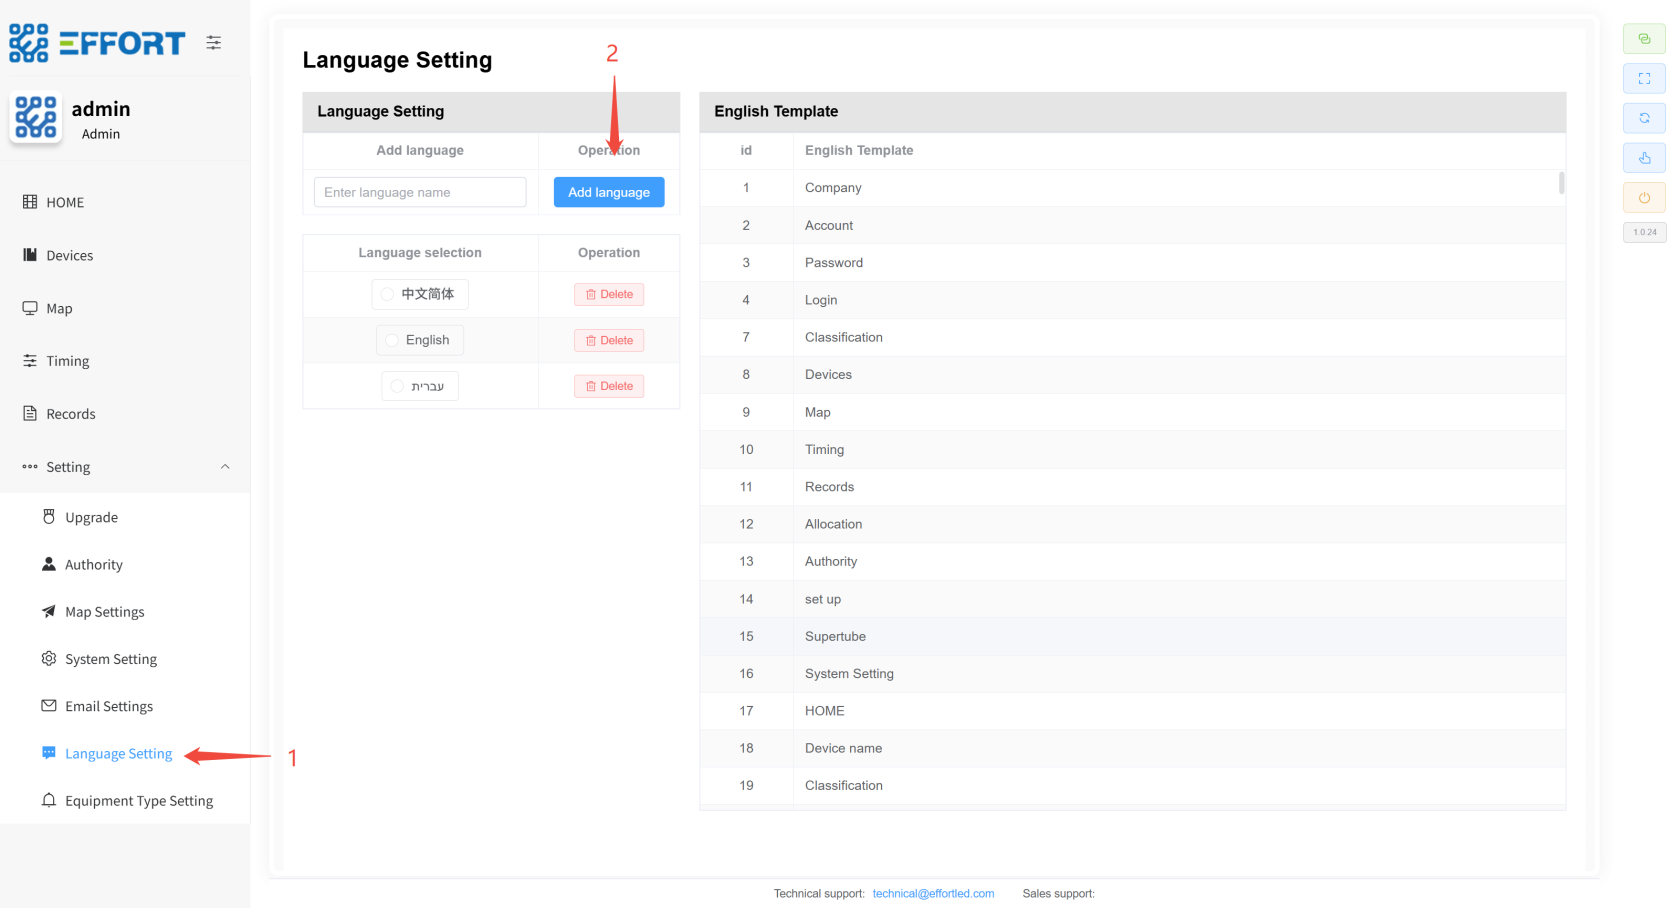
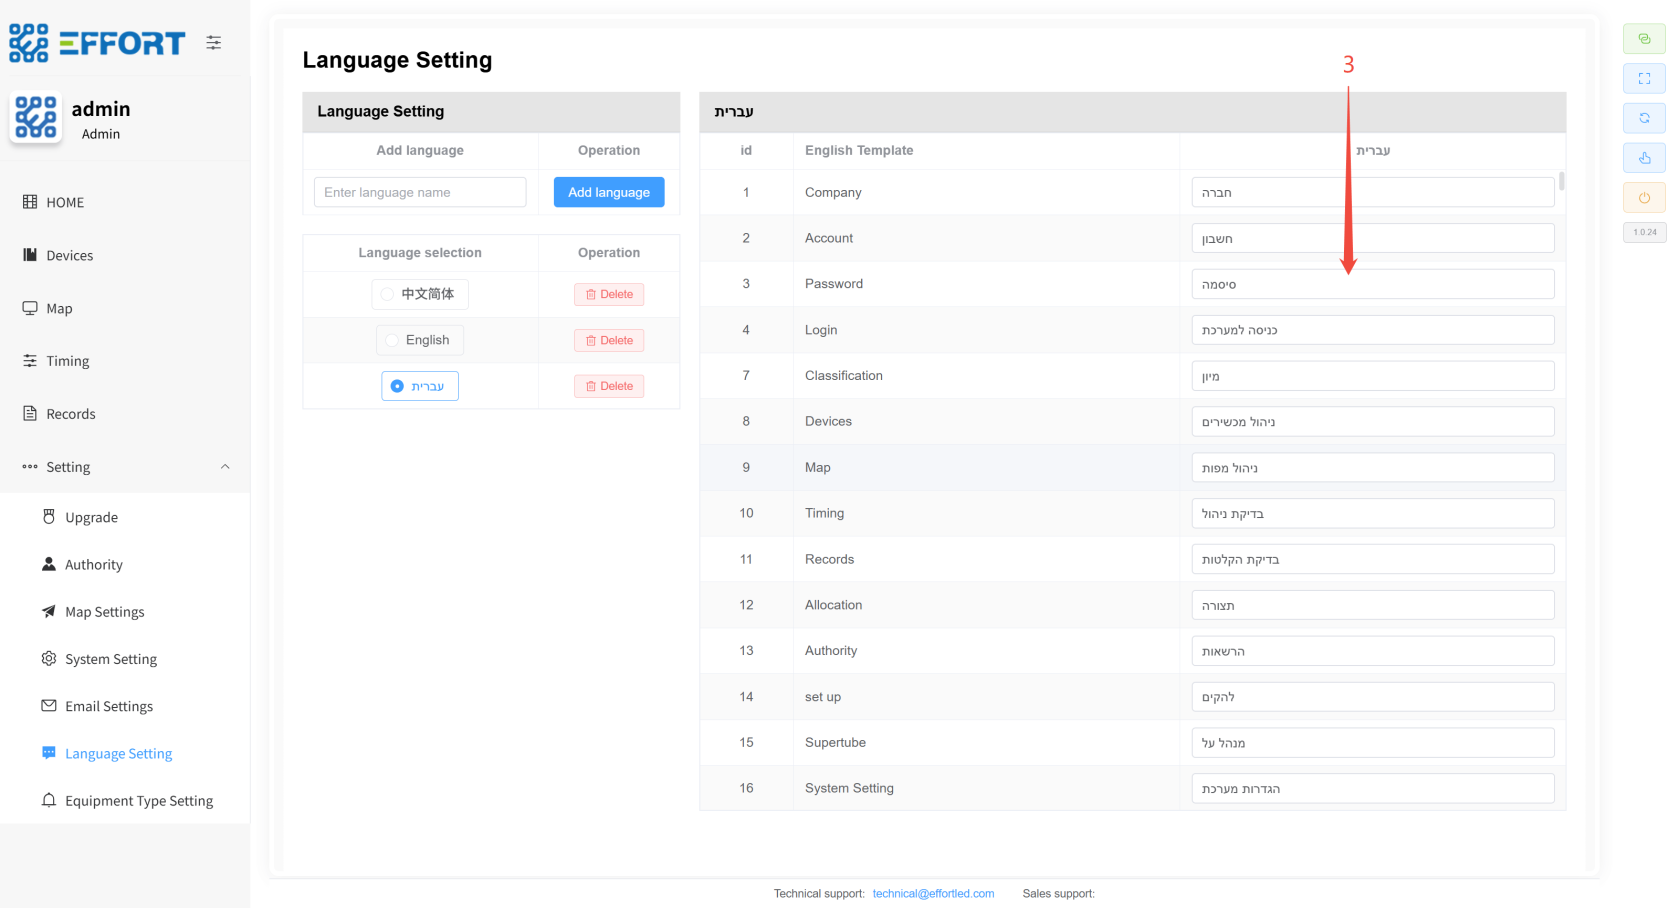
## **4.9 配置自定义语言 ⚙️**
1. 步骤 1:点击 Language management,进入翻译管理页面
2. 步骤 2:点击 Add language新增一种语言模板,或者选择现有的语言模板
3. 步骤 3:根据模板语言 English Template,修改实际显示语言
[](http://13.222.61.26:6875/uploads/images/gallery/2026-01/xzsimage.png)
[](http://13.222.61.26:6875/uploads/images/gallery/2026-01/1xvimage.png)
---
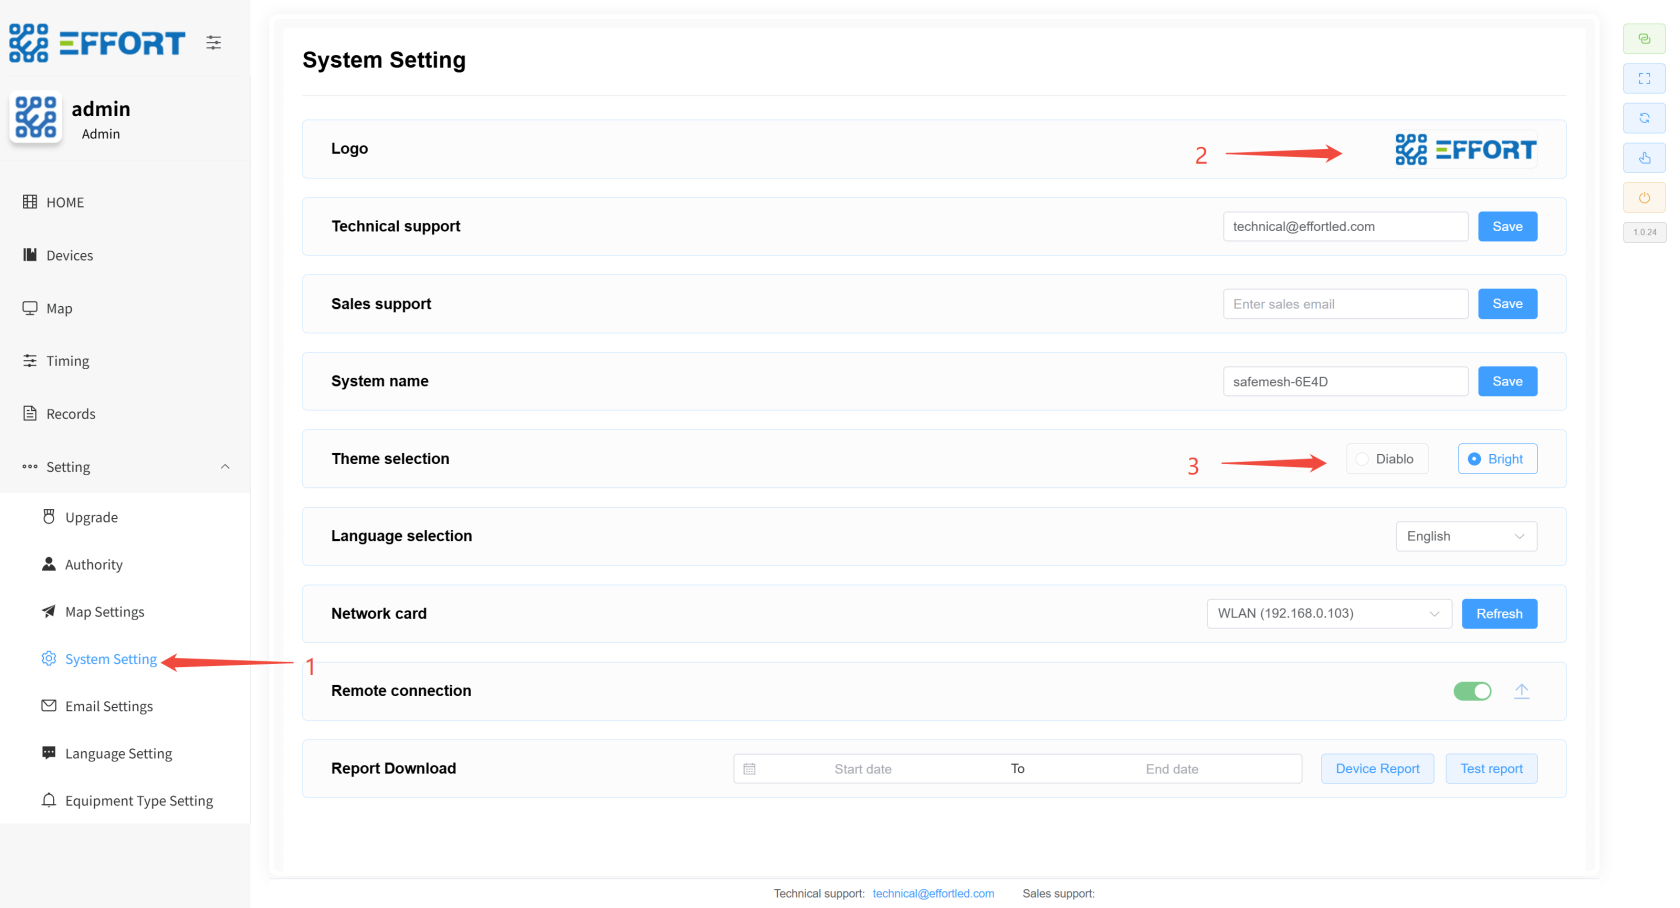
## **4.10 设置 LOGO、主题 ⚙️**
1. 步骤 1:点击 System setting 进入系统设置界面
2. 步骤 2:点击图片,上传新系统 LOGO
3. 步骤 3:点击主题选框,切换主题
[](http://13.222.61.26:6875/uploads/images/gallery/2026-01/biqimage.png)
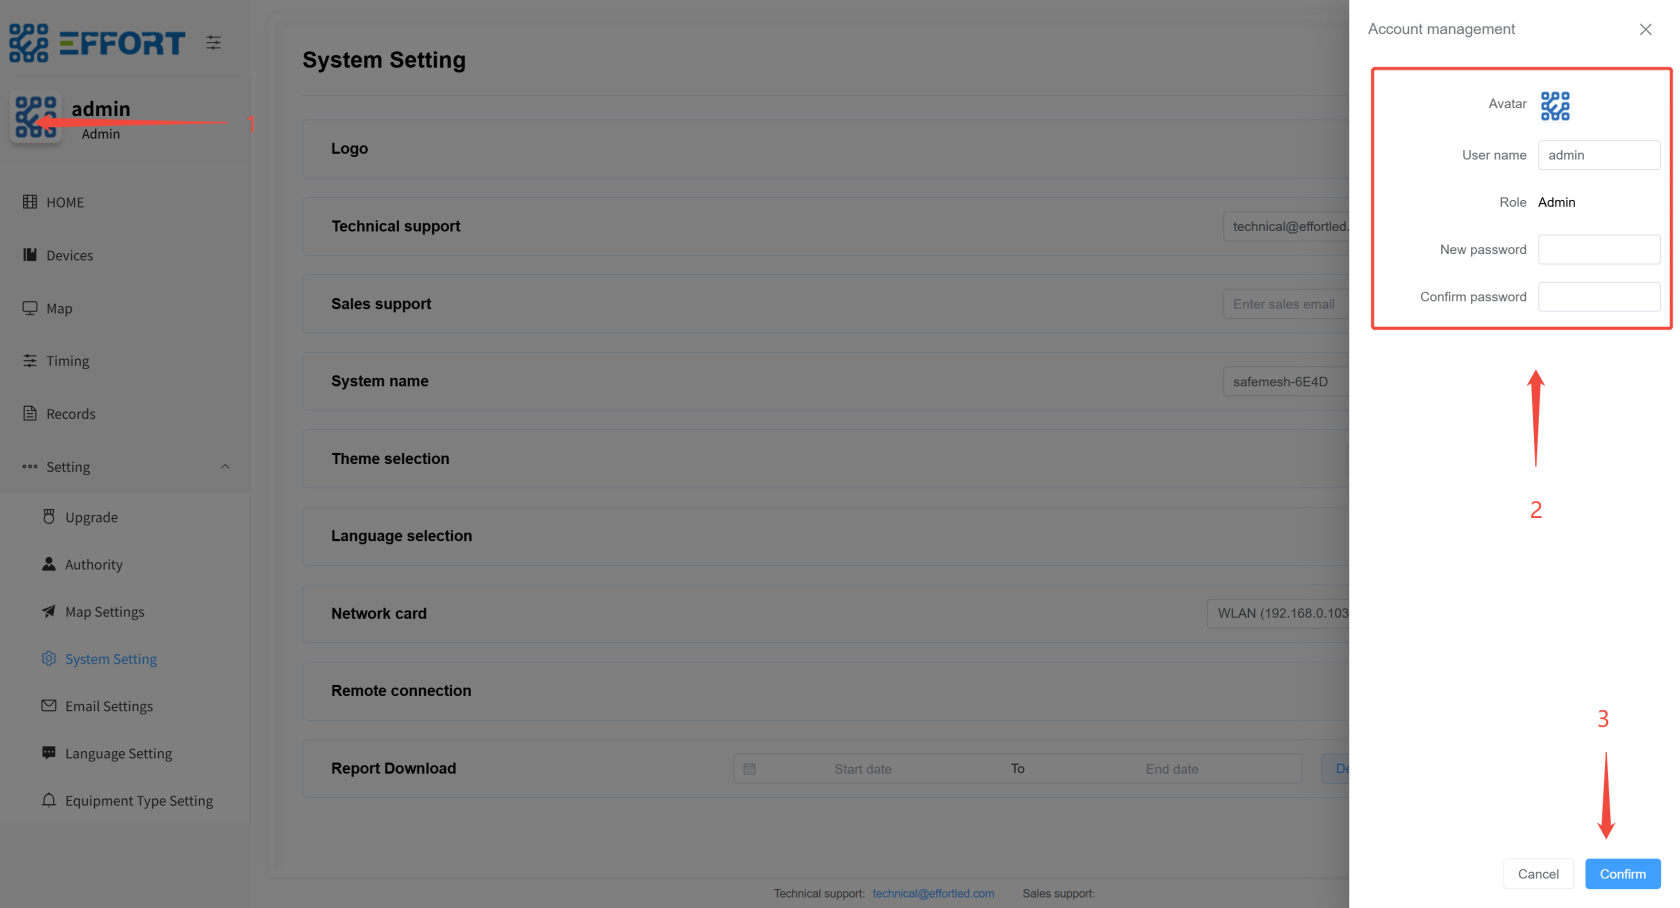
## **4.11 修改个人信息 👤**
1. 步骤 1:点击个人头像
2. 步骤 2:输入个人信息
3. 步骤 3:点击确定,修改个人信息
---
[](http://13.222.61.26:6875/uploads/images/gallery/2026-01/astimage.png)
## **4.12 网关固件升级 ⚙️**
1. 步骤 1:点击 Upgrade 进入固件升级页面
2. 步骤 2:点击上传新版本的固件文件
3. 步骤 3:选择要升级的网关
4. 步骤 4:点击 Start Upgrade,等待升级完成
[](http://13.222.61.26:6875/uploads/images/gallery/2026-01/txiimage.png)
---
## **4.13 二维码定位 👤**
1. 步骤 1:将表格传输到系统所在的电脑
2. 步骤 2:进入系统 device management 页面点击 choose file 导入刚刚的表格,设备重命名完成
[](http://13.222.61.26:6875/uploads/images/gallery/2026-01/Gjsimage.png)
