VI. Software User Operation and System Administration Manual
---
> **This document is a manual for software user operation and system administration for the SafeMesh system**
> **Adaptation system version**: V1.0.0
> **Document version**: V1.0
> **Release date**: January 1, 2026
> **Published by**: EFFORT
---
# Document Revision Records
| Version number | Revision date | Summary of revisions | Reviser | Reviewer |
|---|
| V1.0 | 2026-1-1 | Initial release | JLJ | Shyne |
# Dual-Role Navigation
- **👤 Operation section**
- **⚙️ Manage the chapter**
- **General Appendix**
# 1. Preface
## 1.1 Document Objectives
- Let the system user know how to operate the system
## 1.2 Target Audience
- System users
## 1.3 Document Scope
- Steps to use system functions
## 1.4 Related Documentation
- Prerequisite Documentation: System Overview and Installation Guide (Must-Read)
- Related documents: "Product Introduction Guidelines" and "End Product Manual"
## 1.5 Document Architecture
## 1.6 Role Permission Matrix
| Functional modules | Operate user permissions | Admin permissions |
|---|
| Device status view | ✔️ | ✔️ |
| User permission modifications | ✘ | ✔️ |
| User account management | ✘ | ✔️ |
## 1.7 Symbology
- ▶️ Indicates the start of the operation step
- ⚠️ Indicates key considerations
# 2. Basic Operation 👤
## 2.1 Quick Guide to Workbenches
| page | Introduction |
| Home | The system is large |
| Device management | Device details table |
| Map management | Area details page |
| Timing | Timed Test Rule Settings page |
| Test Info | Test Log page |
| Setting/Upgrade | Gateway upgrade page |
| Setting/Authority | Account configuration and permission configuration page |
| Setting/Map Settings | Map configuration page |
| Setting/System Setting | System Settings page |
| Setting/Email Settings | Message configuration page |
| Setting/Language Settings | Customize the language configuration page |
| Setting/Equipment Type Settings | Device classification configuration page |
## 2.2 Core Function Operation
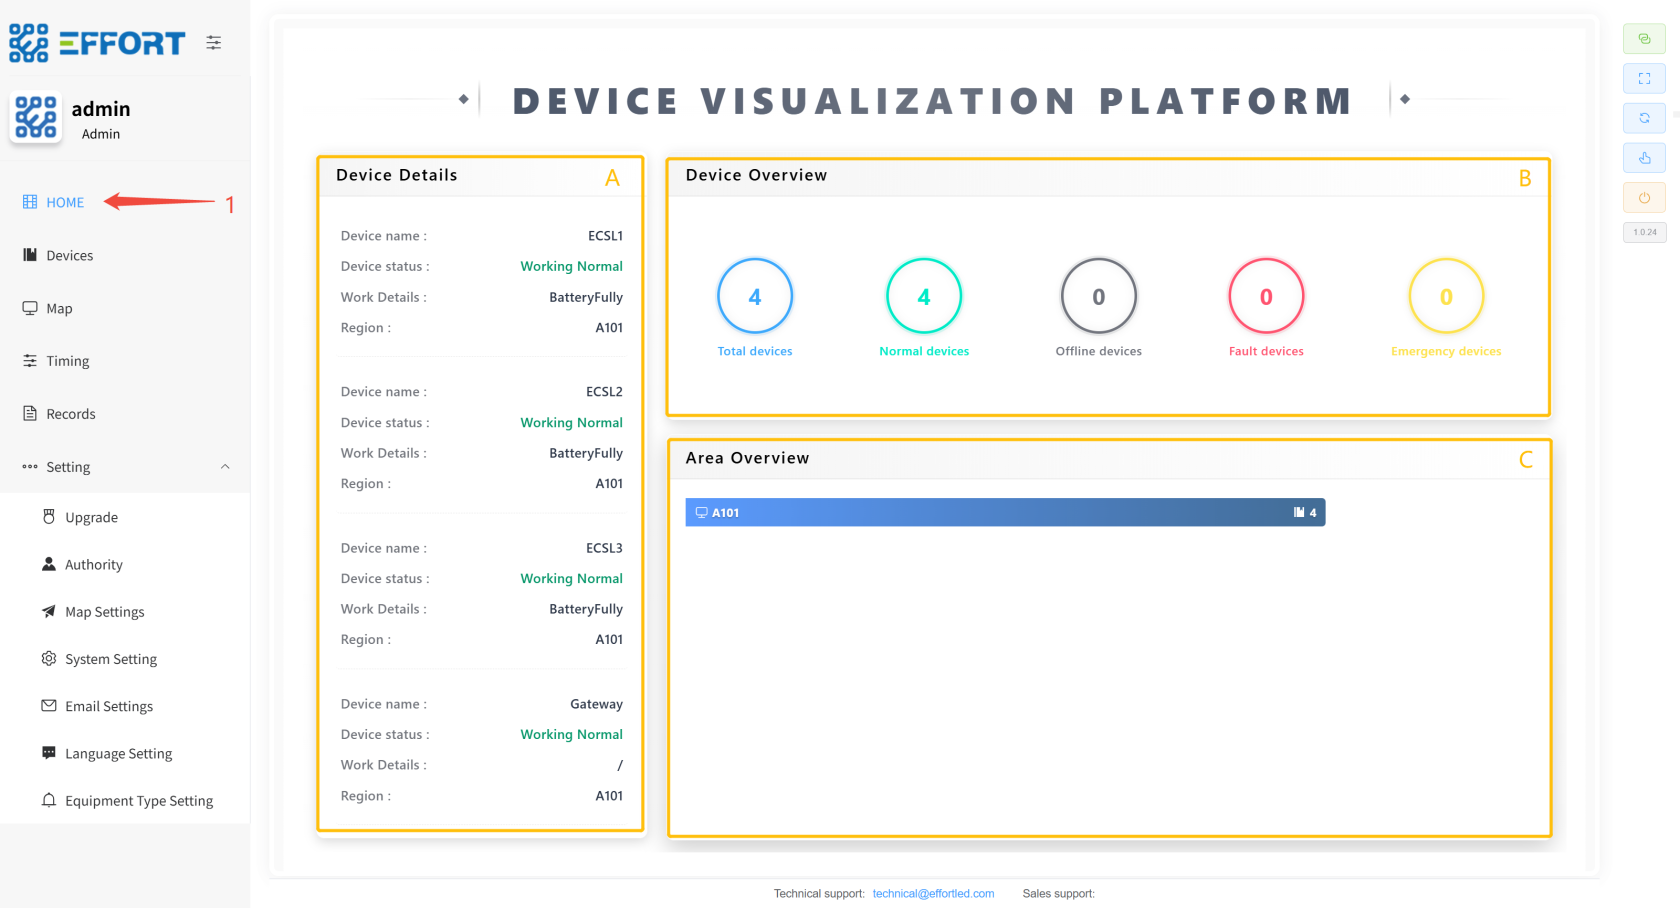
### 2.2.1 HOME
>HOME: Data Dashboard
- Step 1: Click Home to enter the large screen
---
- Box A: Device details: device name, equipment status, work details, and location
- Box B: Equipment Overview quantity information
- Box C: Device area distribution information
[](http://13.222.61.26:6875/uploads/images/gallery/2026-01/image.png)
### 2.2.2 Device
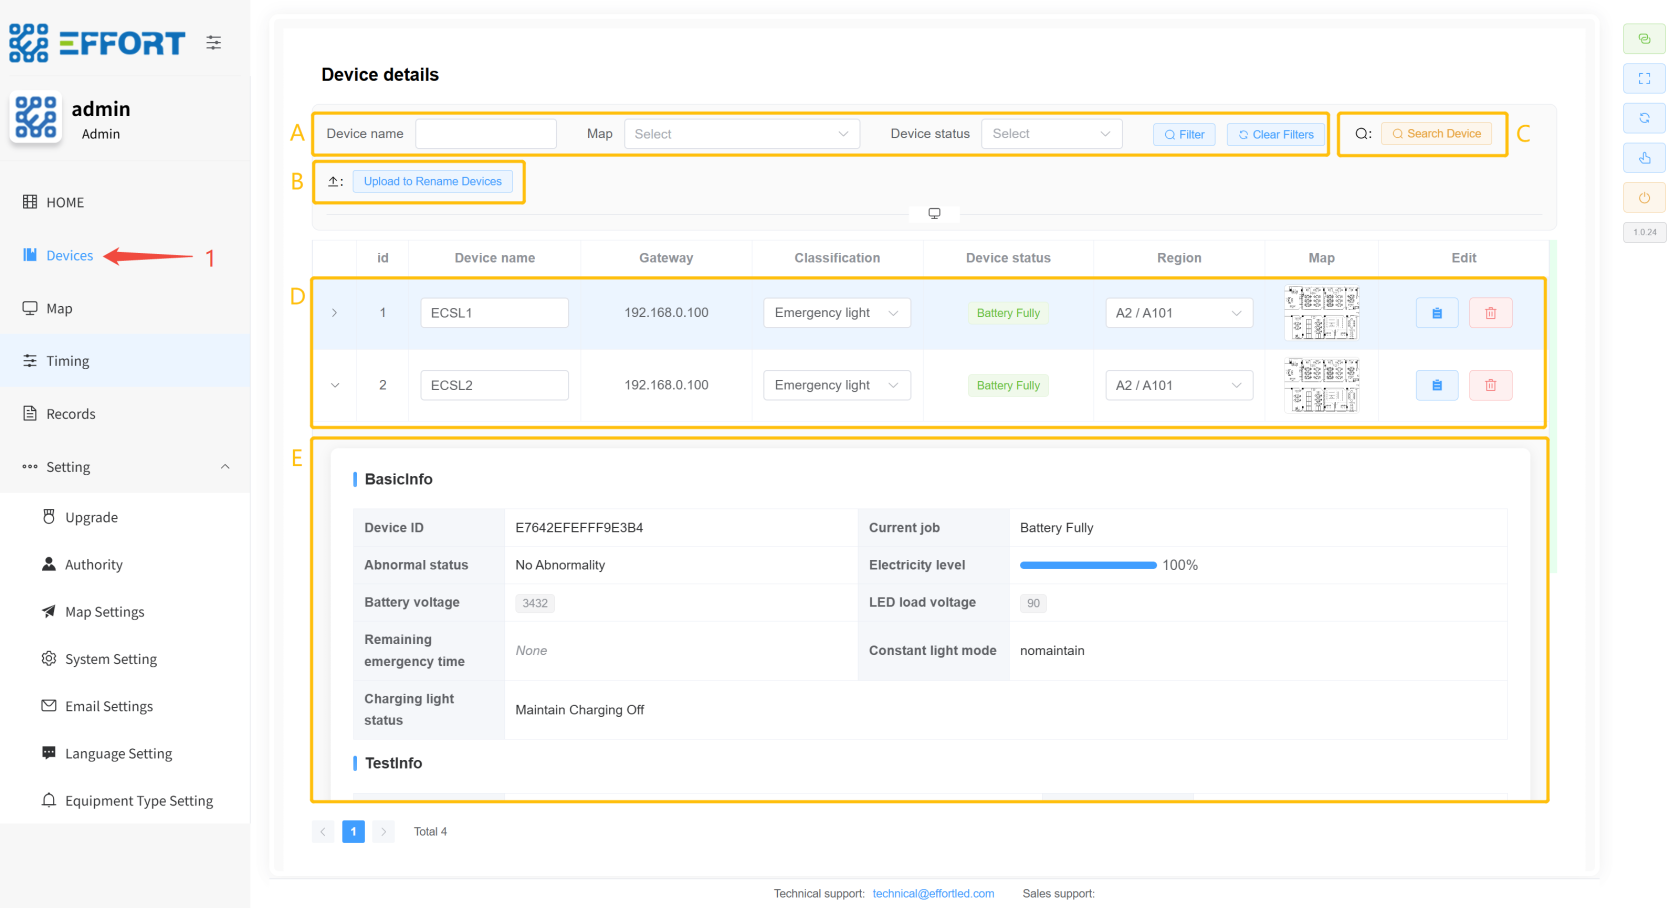
- **Device Details**
> Device Details: Search for gateways, search for devices, device details, device tests, and other function pages
- Step 1: Click on Device to enter
---
- Box A: Device query action bar
- Box B: Upload Device Rename File button
- Box C: Search for device button
- Box D: Basic device information: serial number, device name, gateway, classification, status, and region
- Box E: Device Details: Device ID, Battery, Battery Voltage, Remaining Emergency Time, LED Load Voltage, Last Function Check Result, Number of Function Checks, Last Life Check Result, Number of Life Checks, Time Since Last Life Check, Last Life Check Duration, Maintain Mode, Charging Light Status
[](http://13.222.61.26:6875/uploads/images/gallery/2026-01/2AJimage.png)
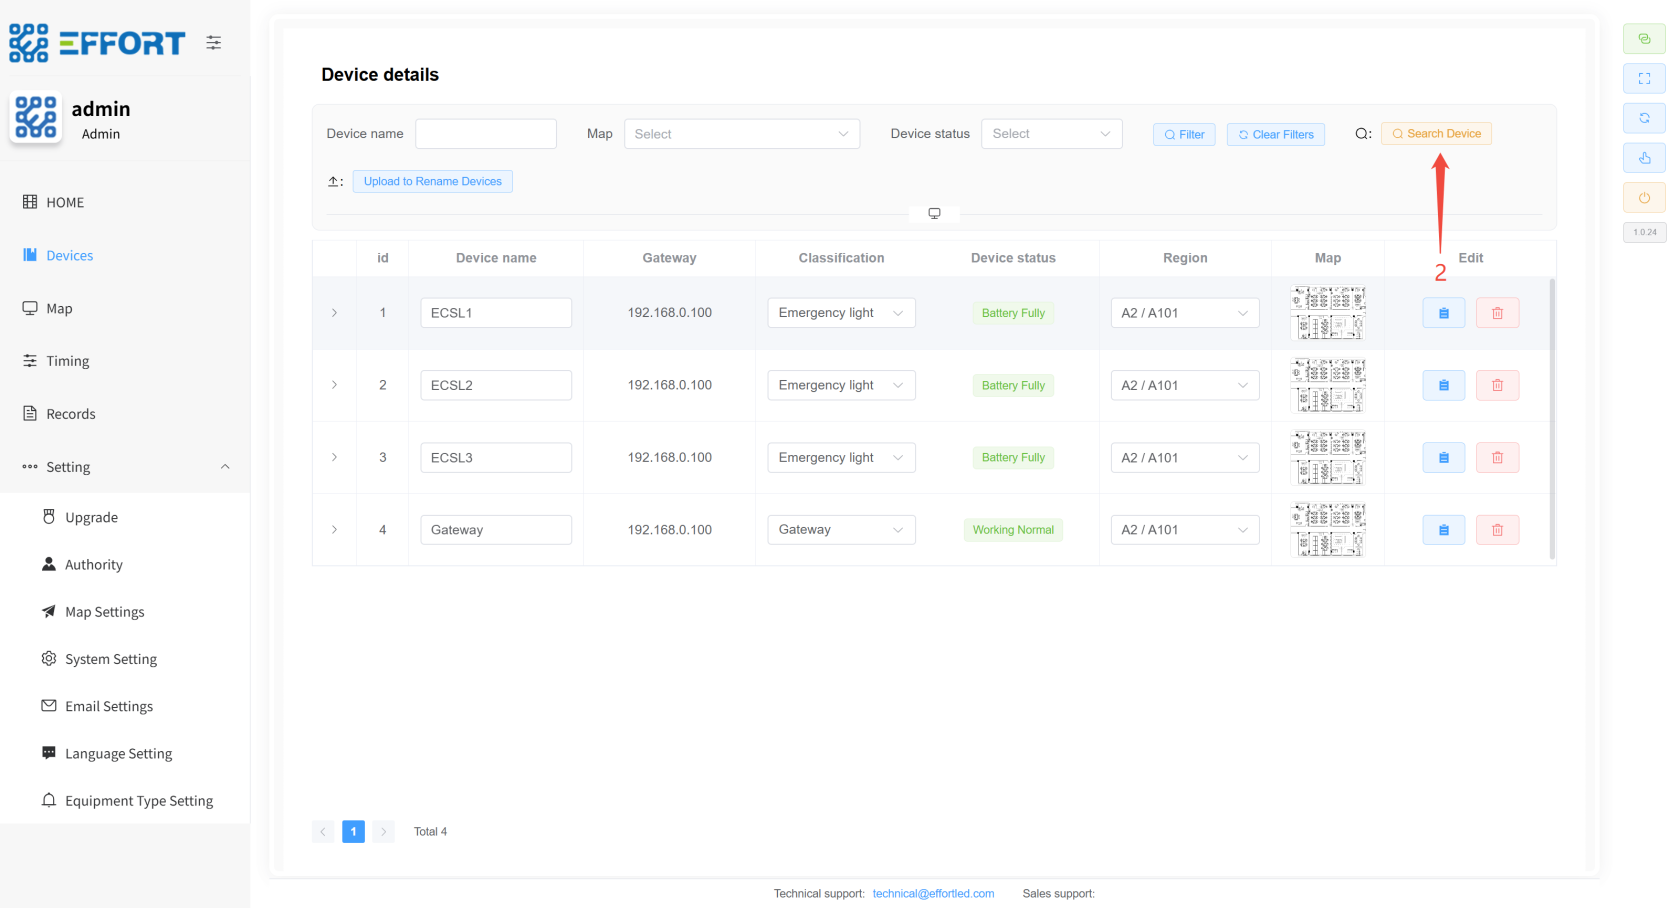
- **Search panel**
>Search Panel: Search gateway, search device
- Step 2: Click the Search Device button
---
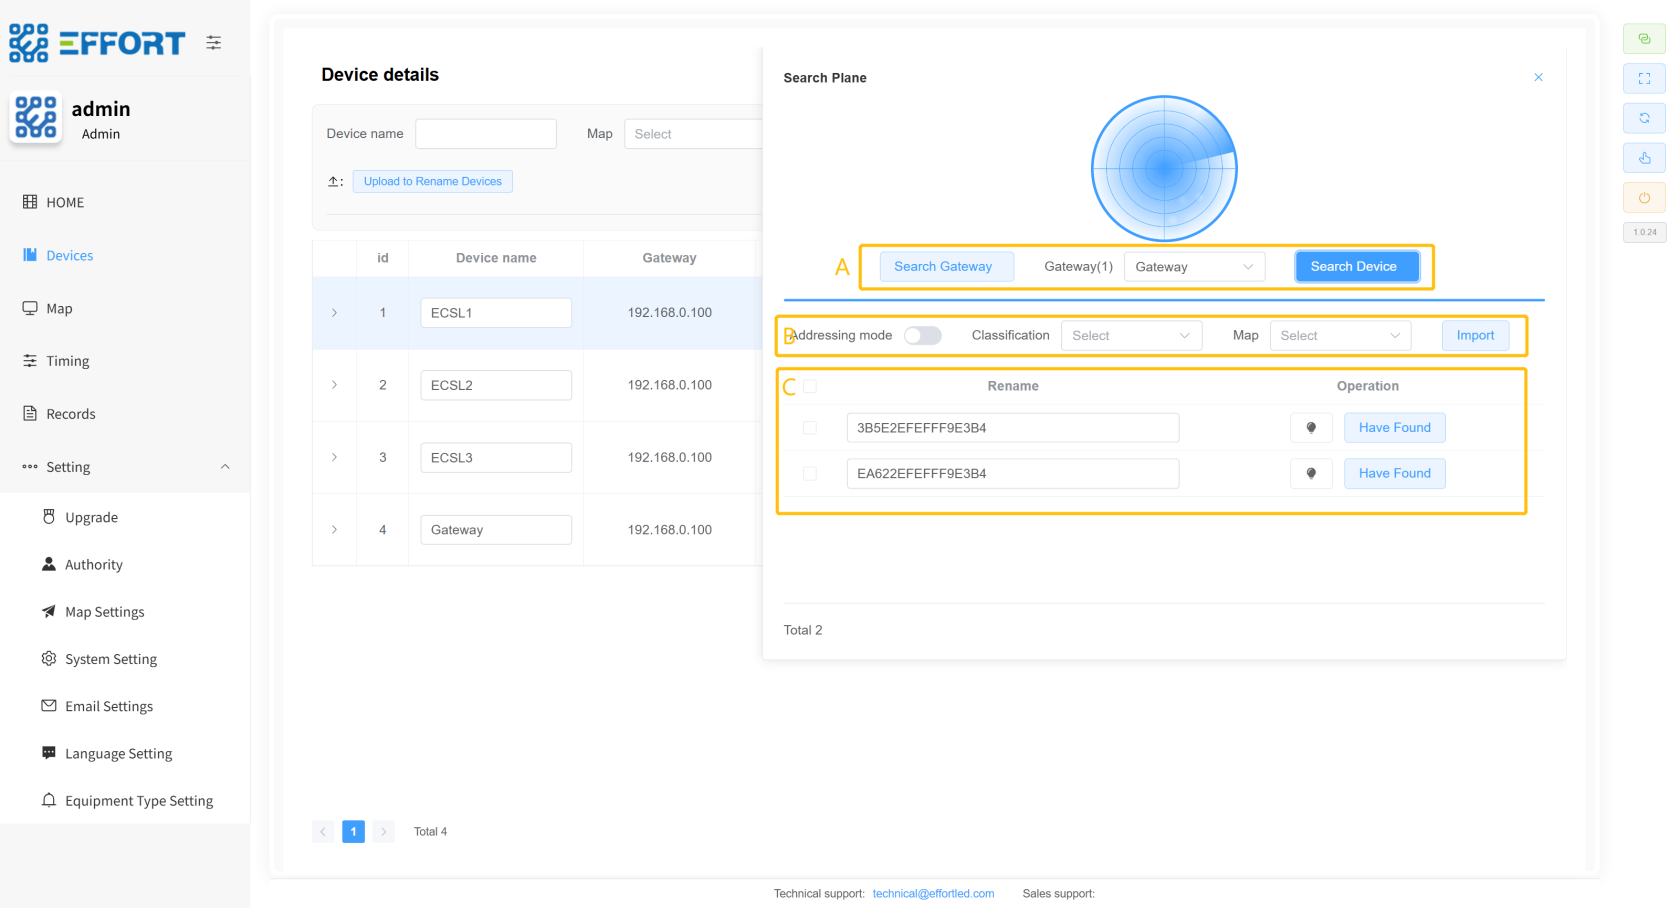
- Box A: Search for gateways, device operation bars
- Box C: Addressing mode switch, device classification, area link, device import button
- Box D: Searched device information: device ID, device in-line operation
[](http://13.222.61.26:6875/uploads/images/gallery/2026-01/NoBimage.png)
[](http://13.222.61.26:6875/uploads/images/gallery/2026-01/c4timage.png)
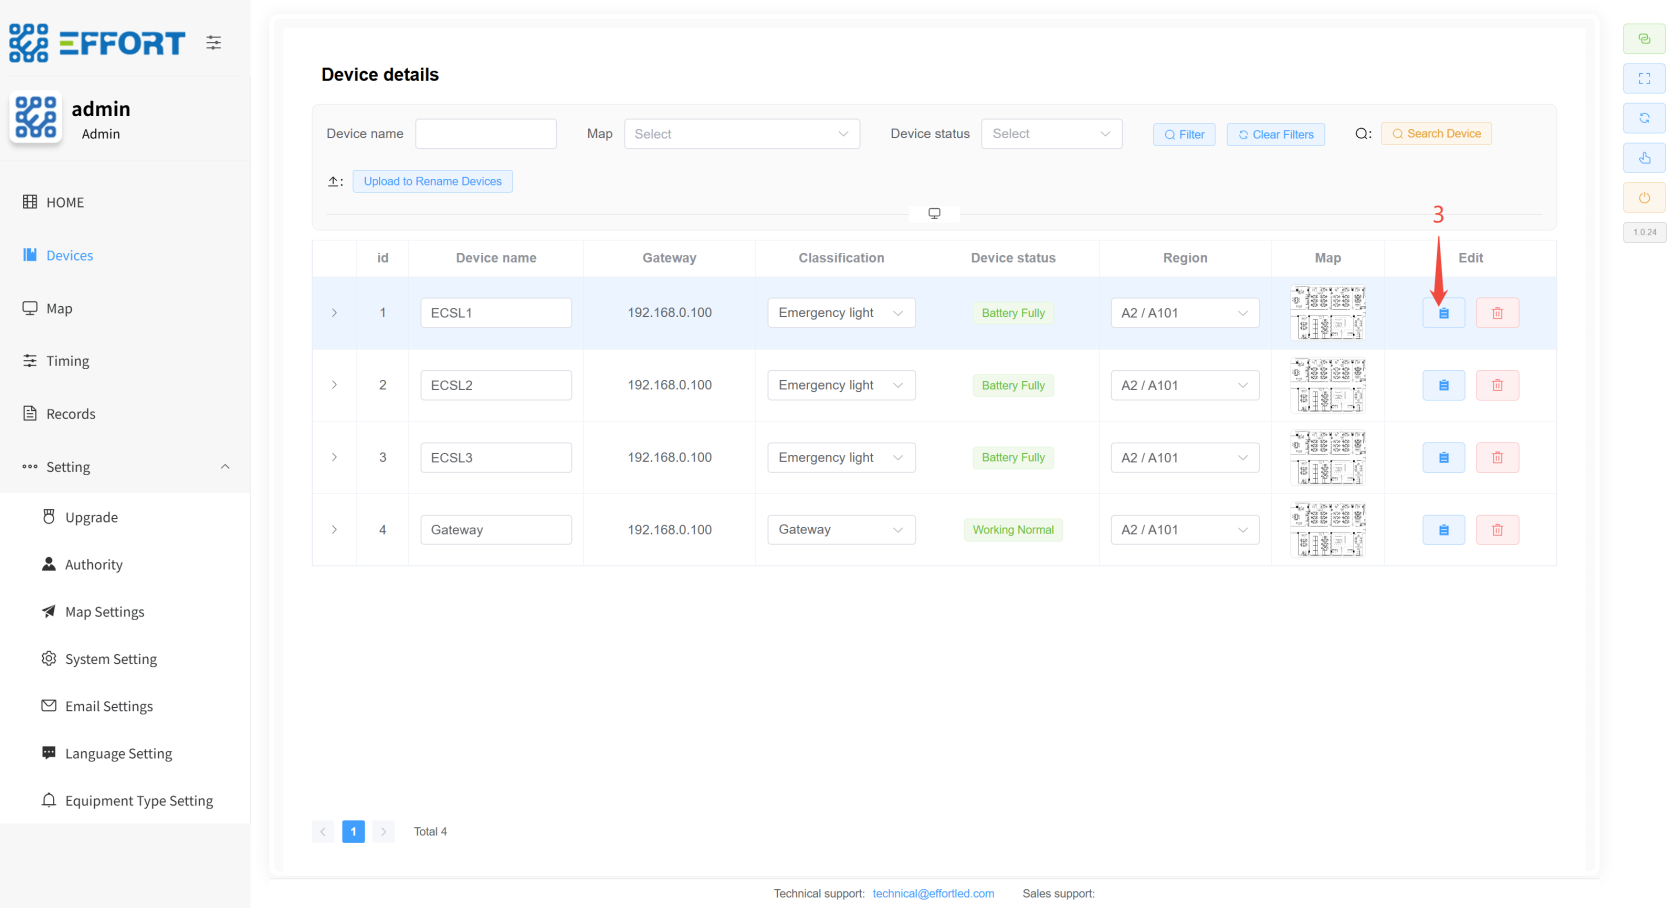
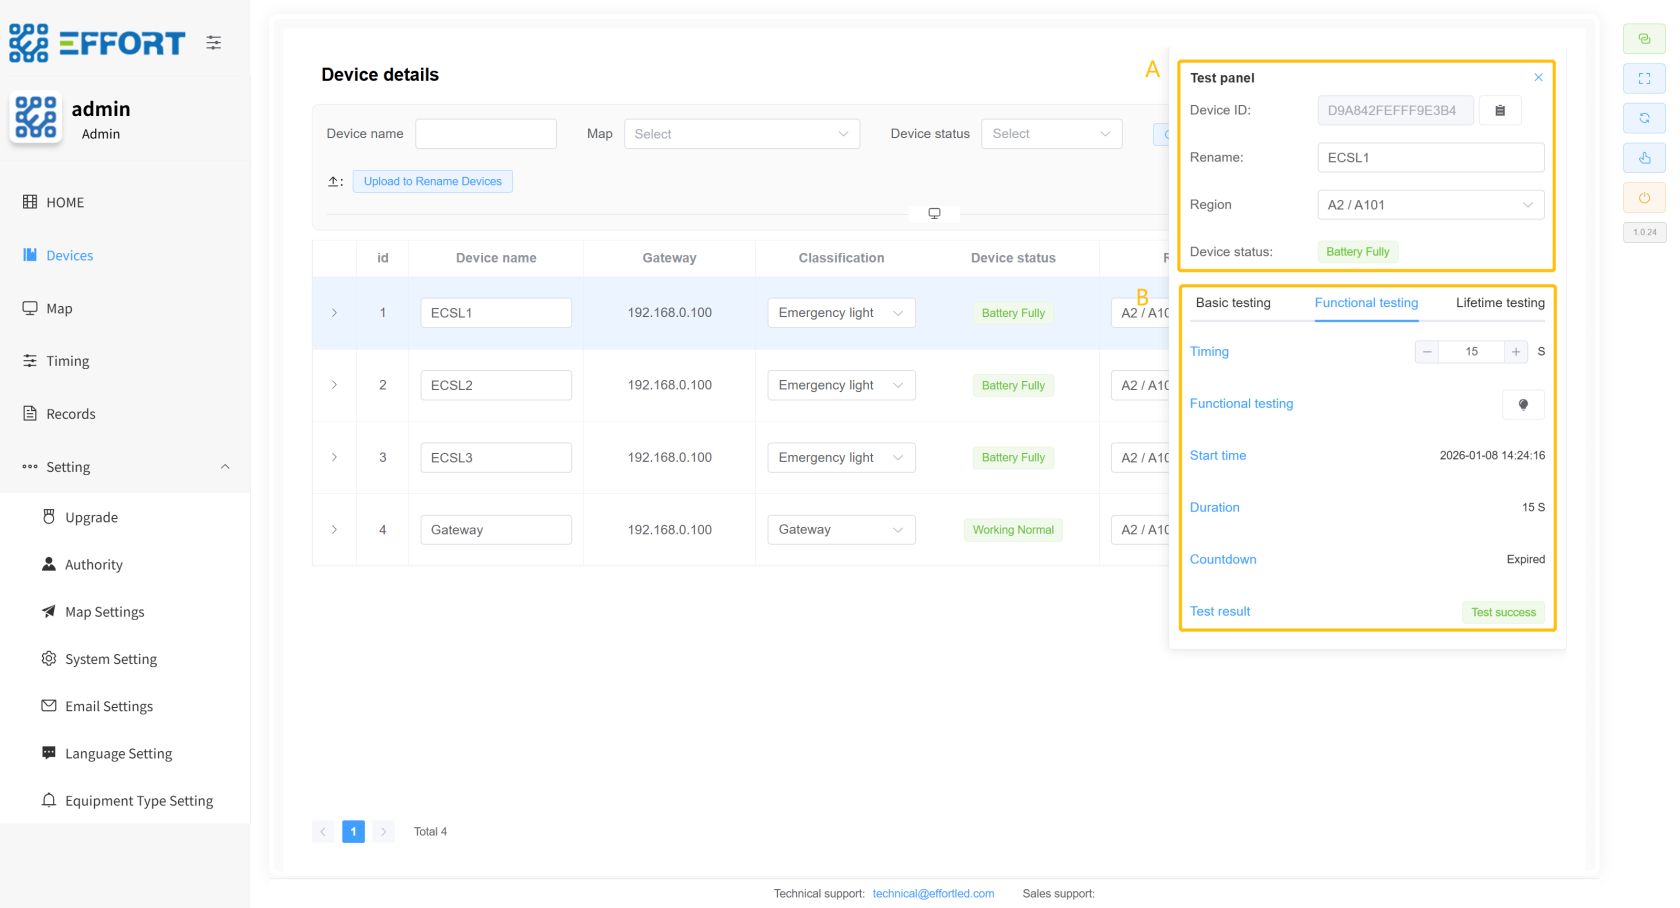
- **
Device detailsTest panel**
>Test Panel:设备详细信息、设备测试
- Step 3: Click the Device Details button
---
- Box A: Device basic information: device ID, rename, region, device status
- Box B: Device Test Control Panel:
1. Basic testing: addressing button, emergency switch, maintain switch
2. Functional testing: Timer time, test button, start time, duration, countdown, test result
3. Lifetime testing: Timer time, test button, start time, duration, countdown, test results
[](http://13.222.61.26:6875/uploads/images/gallery/2026-01/weVimage.png)
[](http://13.222.61.26:6875/uploads/images/gallery/2026-01/Cfoimage.png)
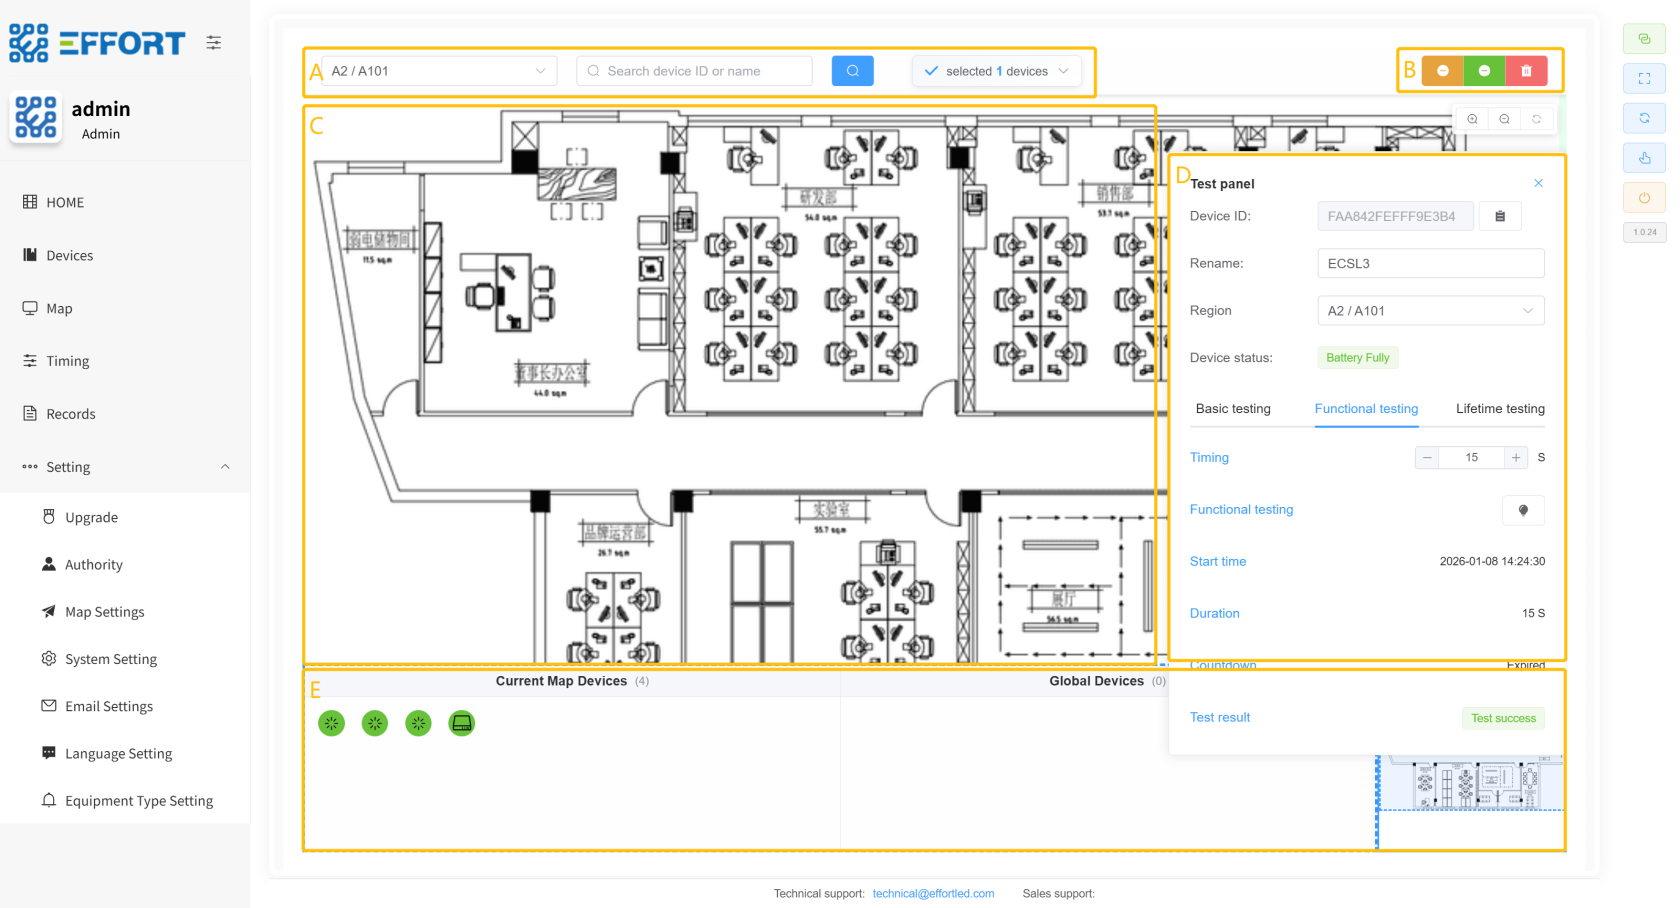
### 2.2.3 Map Management
>Map management: Map management page
- Step 1: Click Map
- Step 2: Tap Area
---
- Box A: Current area, Find device input box, Number of devices selected
- Box B: Uninstall button, unbind button, delete button
- Box C: Area master map
- Box D: Device details panel
- Box E: Current Area Devices, Unassigned Devices, Thumbnails
[](http://13.222.61.26:6875/uploads/images/gallery/2026-01/nZ9image.png)
[](http://13.222.61.26:6875/uploads/images/gallery/2026-01/tvRimage.png)
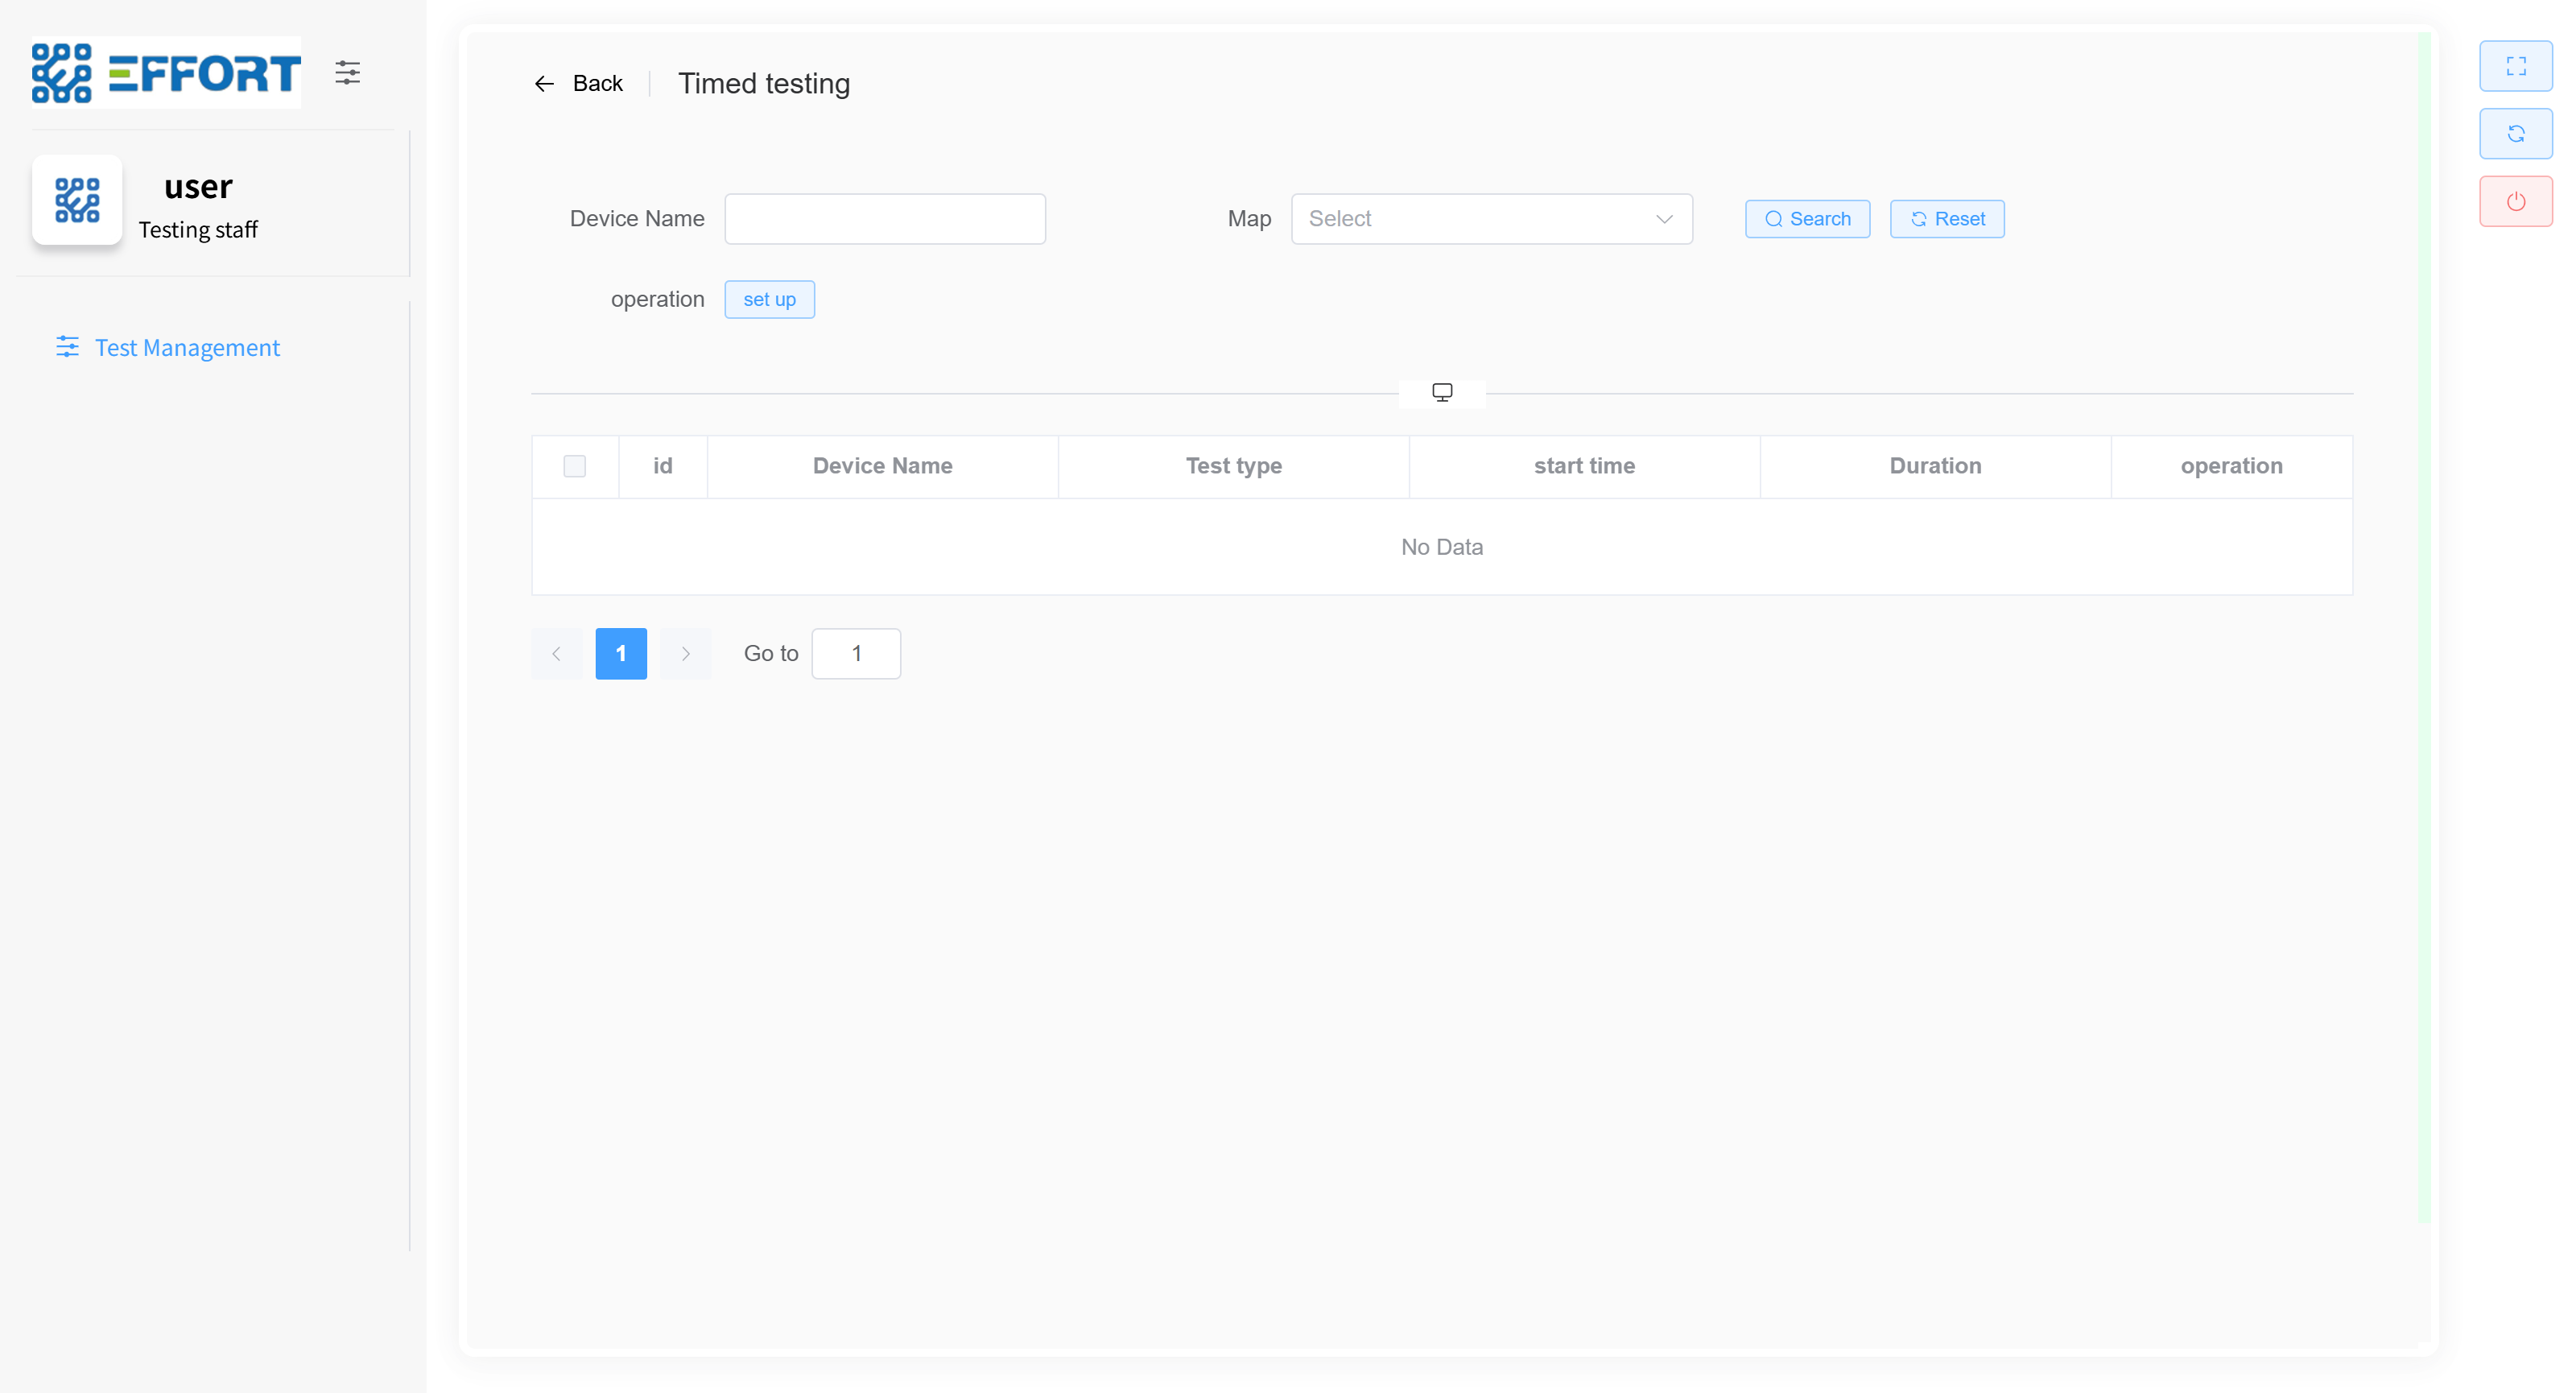
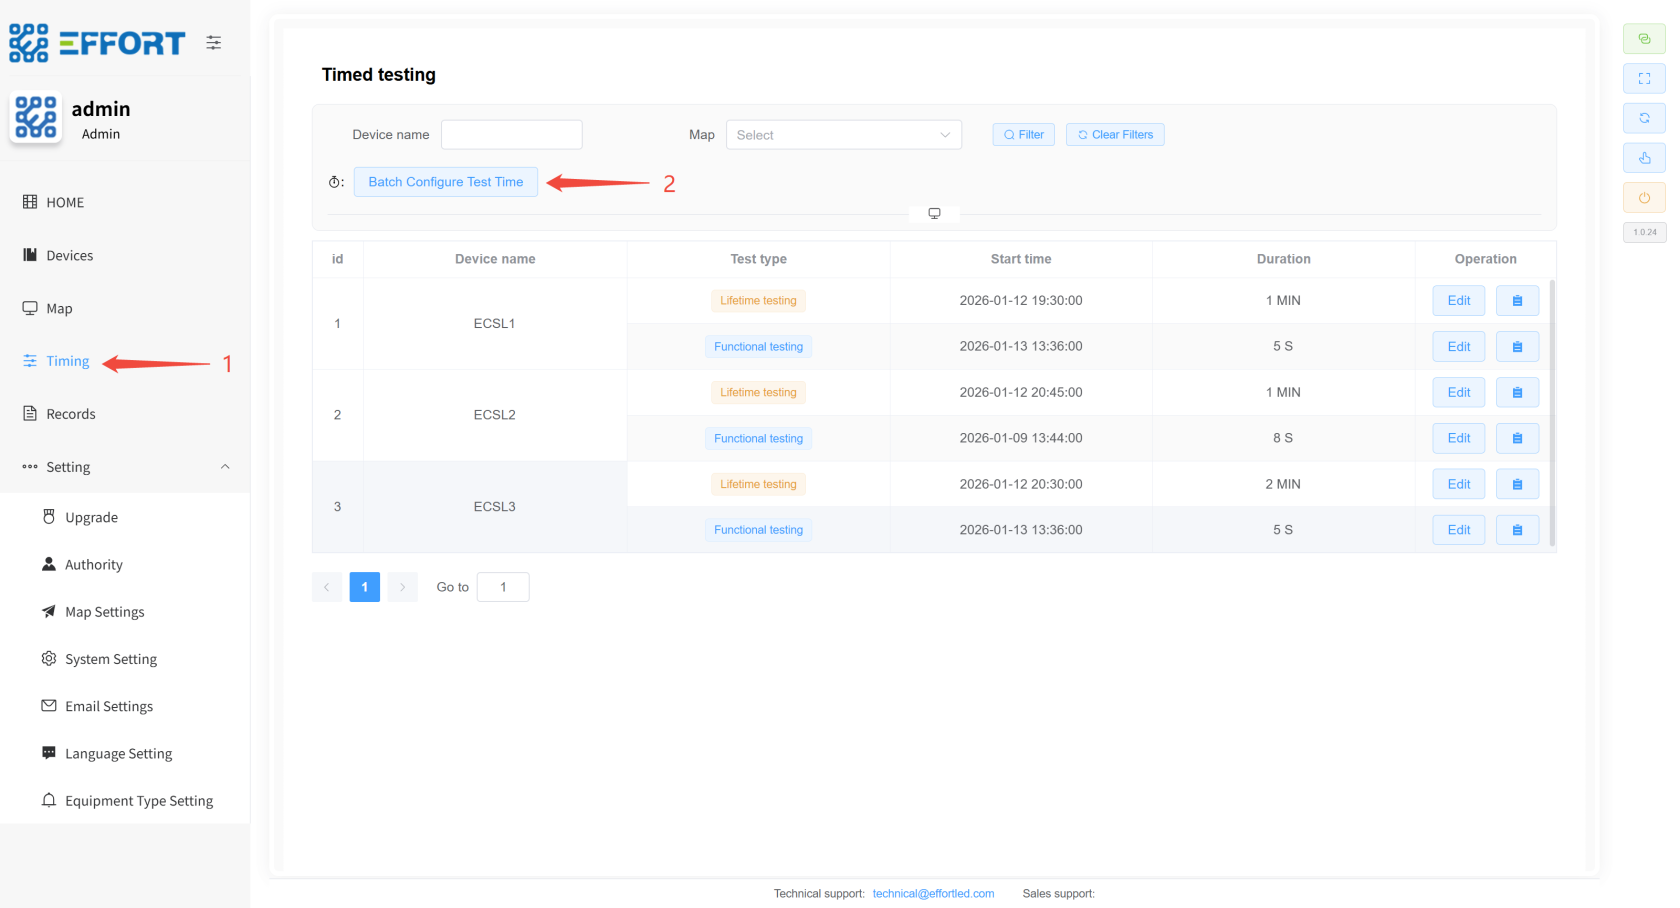
### 2.2.4 Timing
> Timing: Timed test rule settings page
- Step 1: Click Timing
---
- Box A: Timed Rule Search and Action Bar
- Box B: Timing Rule Information Table: Serial Number, Device Name, Test Type, Start Time, Duration, Operation Bar
[](http://13.222.61.26:6875/uploads/images/gallery/2026-01/Zf5image.png)
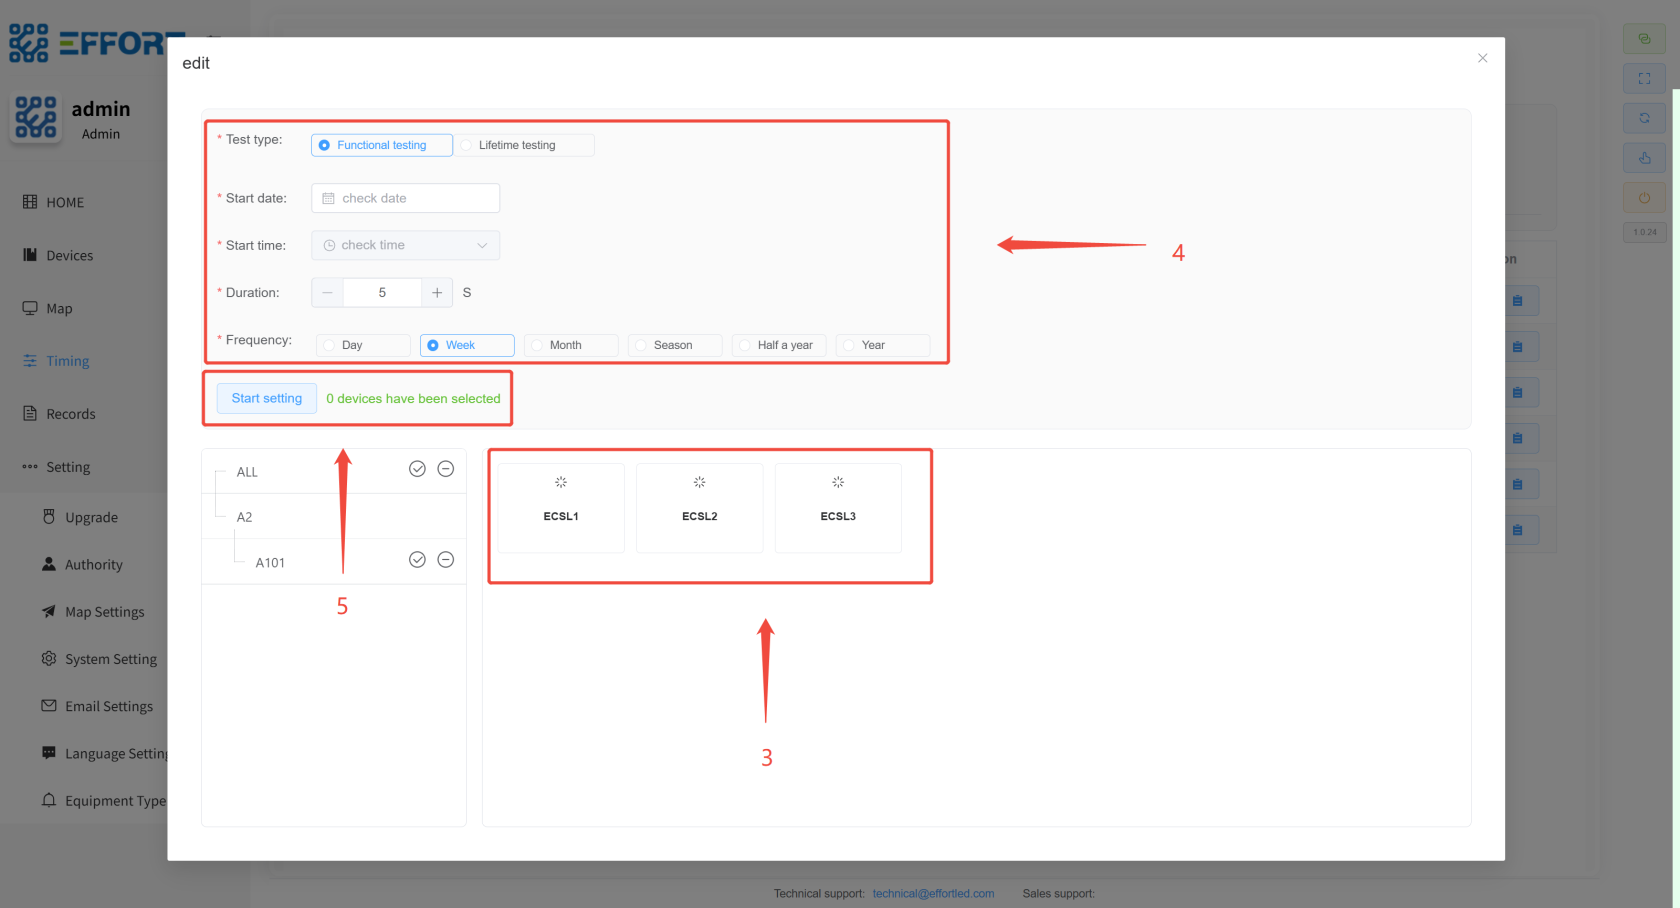
- **Timing rule setting pop-up**
- Step 2: Click Batch Configure Test Time to open the Timing Rule Settings pop-up window
---
- Box A: Timing rule configuration: test type, start date, start time, duration, test frequency
- Box B: Area classification filter to filter the devices on the right
- Box C: List of devices within the left area
[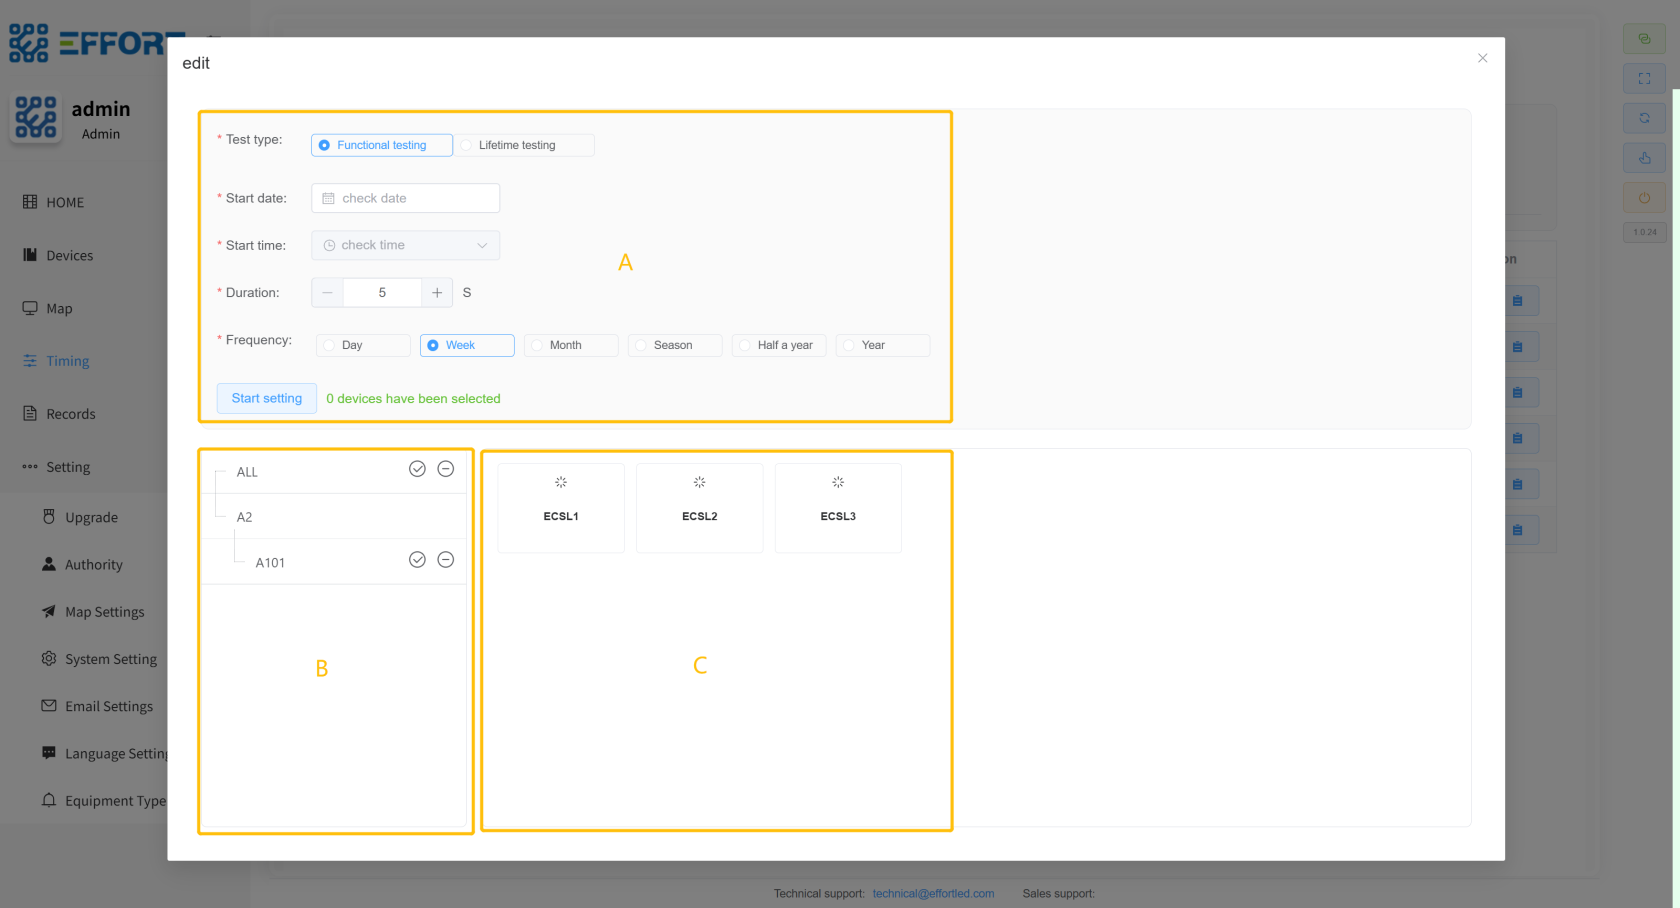](http://13.222.61.26:6875/uploads/images/gallery/2026-01/nL4image.png)
- **A pop-up window for setting a single timing rule**
- Step 3: Click Edit to open the Single Timing Rule Setting pop-up window
---
- Box D: Timing Rule Configuration: Test Type, Start Date, Start Time, Duration, Test Frequency, Current Device
[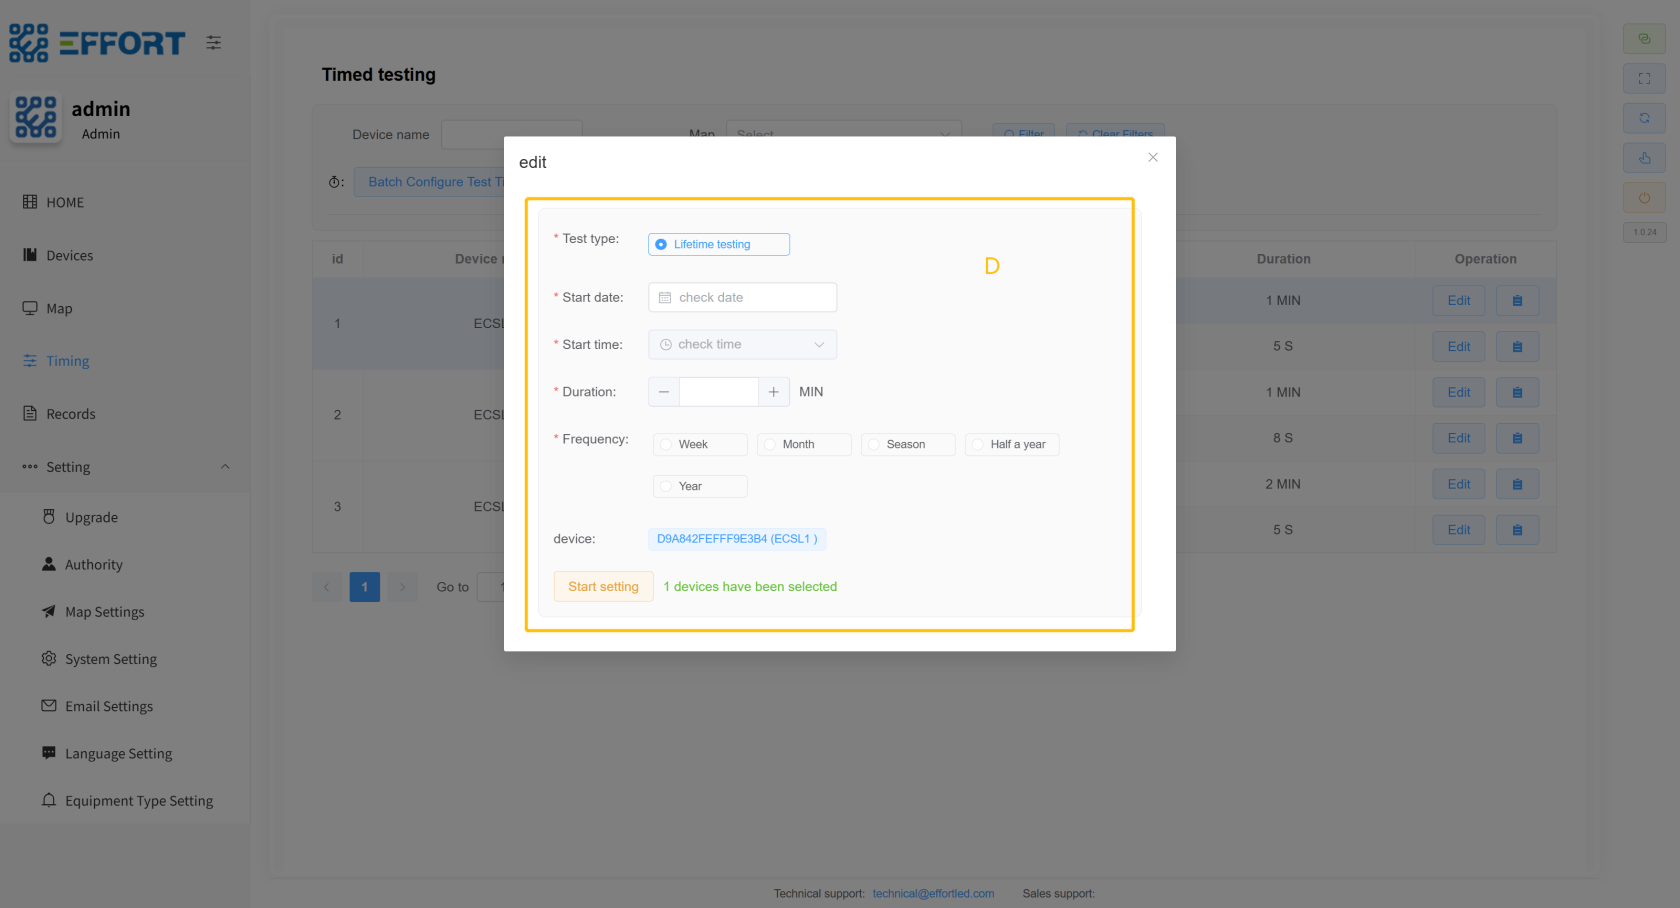](http://13.222.61.26:6875/uploads/images/gallery/2026-01/zmgimage.png)
---
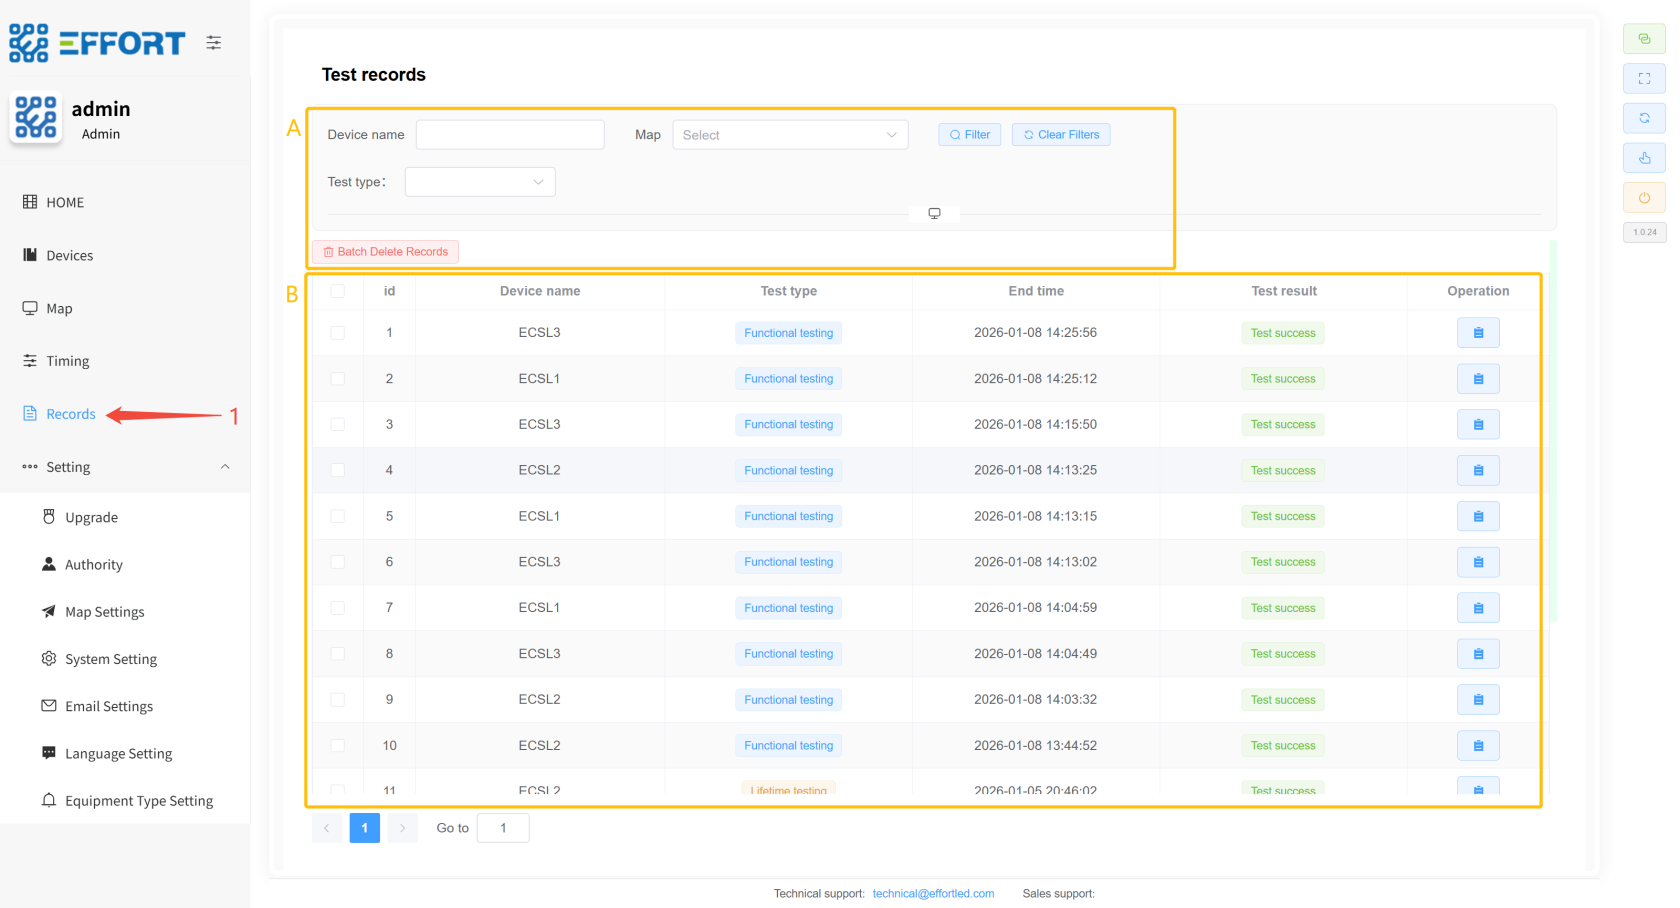
### 2.2.5 Records
> Records: Test Records page
- Step 1: Click on Records
---
- Box A: Test Log Search Action Bar
- Box B: Life Test Record Information Table: Serial Number, Device Name, Test Type, Start Time, End Time, Test Result
[](http://13.222.61.26:6875/uploads/images/gallery/2026-01/YuLimage.png)
---
### 2.2.6 System Settings ⚙️
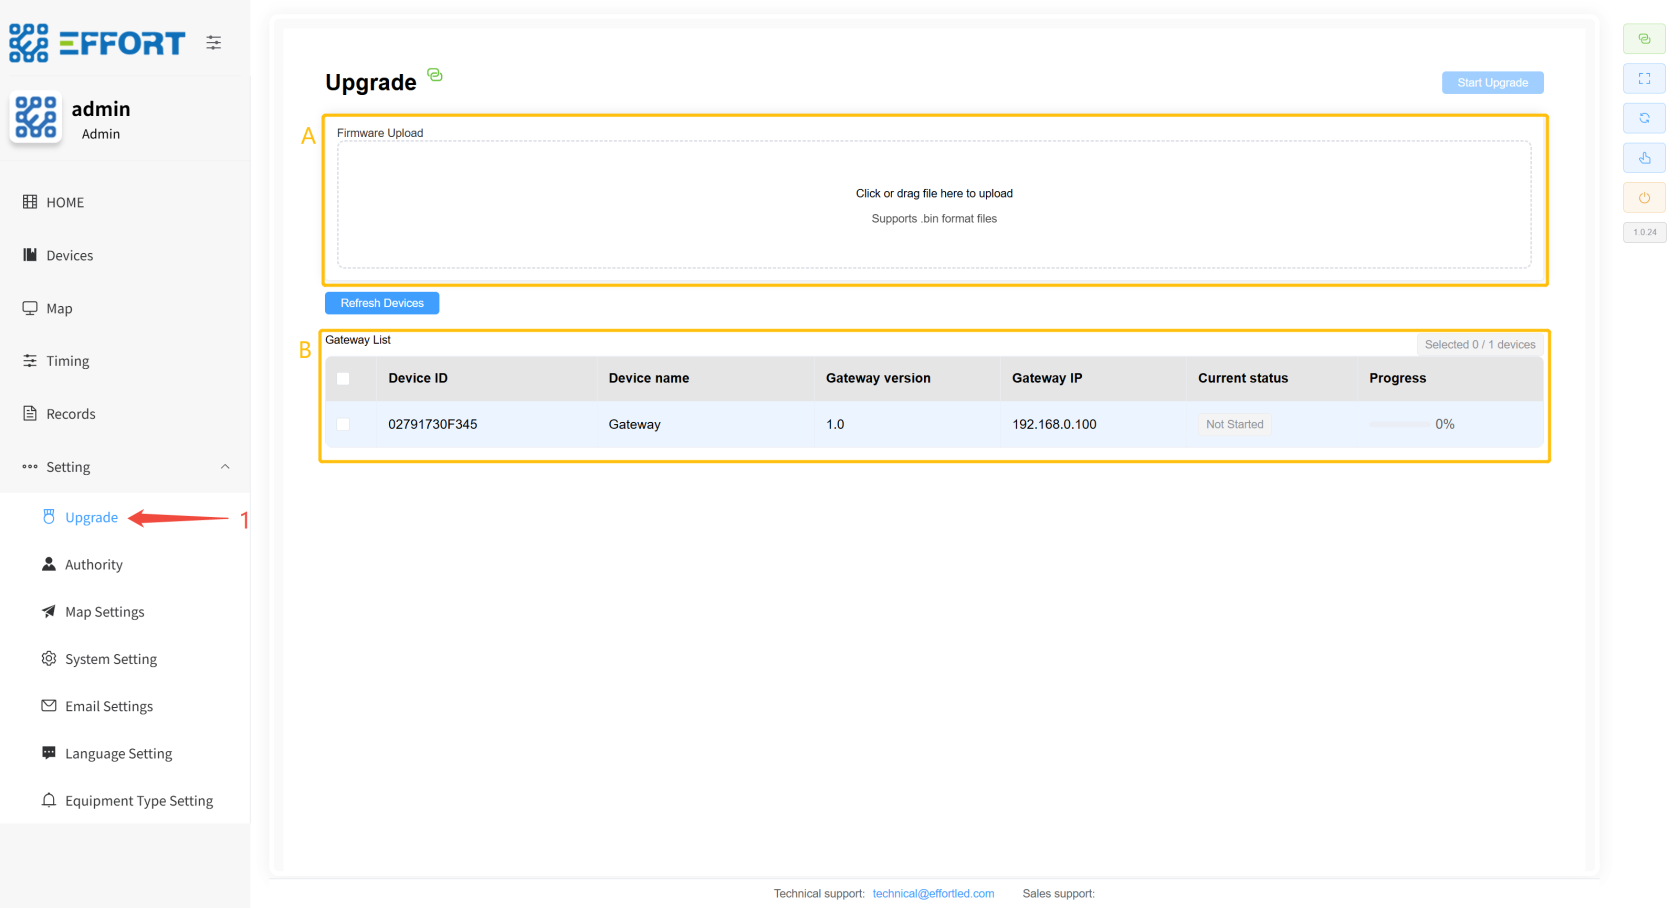
#### 2.2.6.1 Upgrade
>Upgrade: Firmware upgrade page
- Step 1: Click Settings/Upgrade to enter the firmware upgrade page
---
- Box A: Import .bin file
- Box B: Select the gateway for the upgrade
[](http://13.222.61.26:6875/uploads/images/gallery/2026-01/bk7image.png)
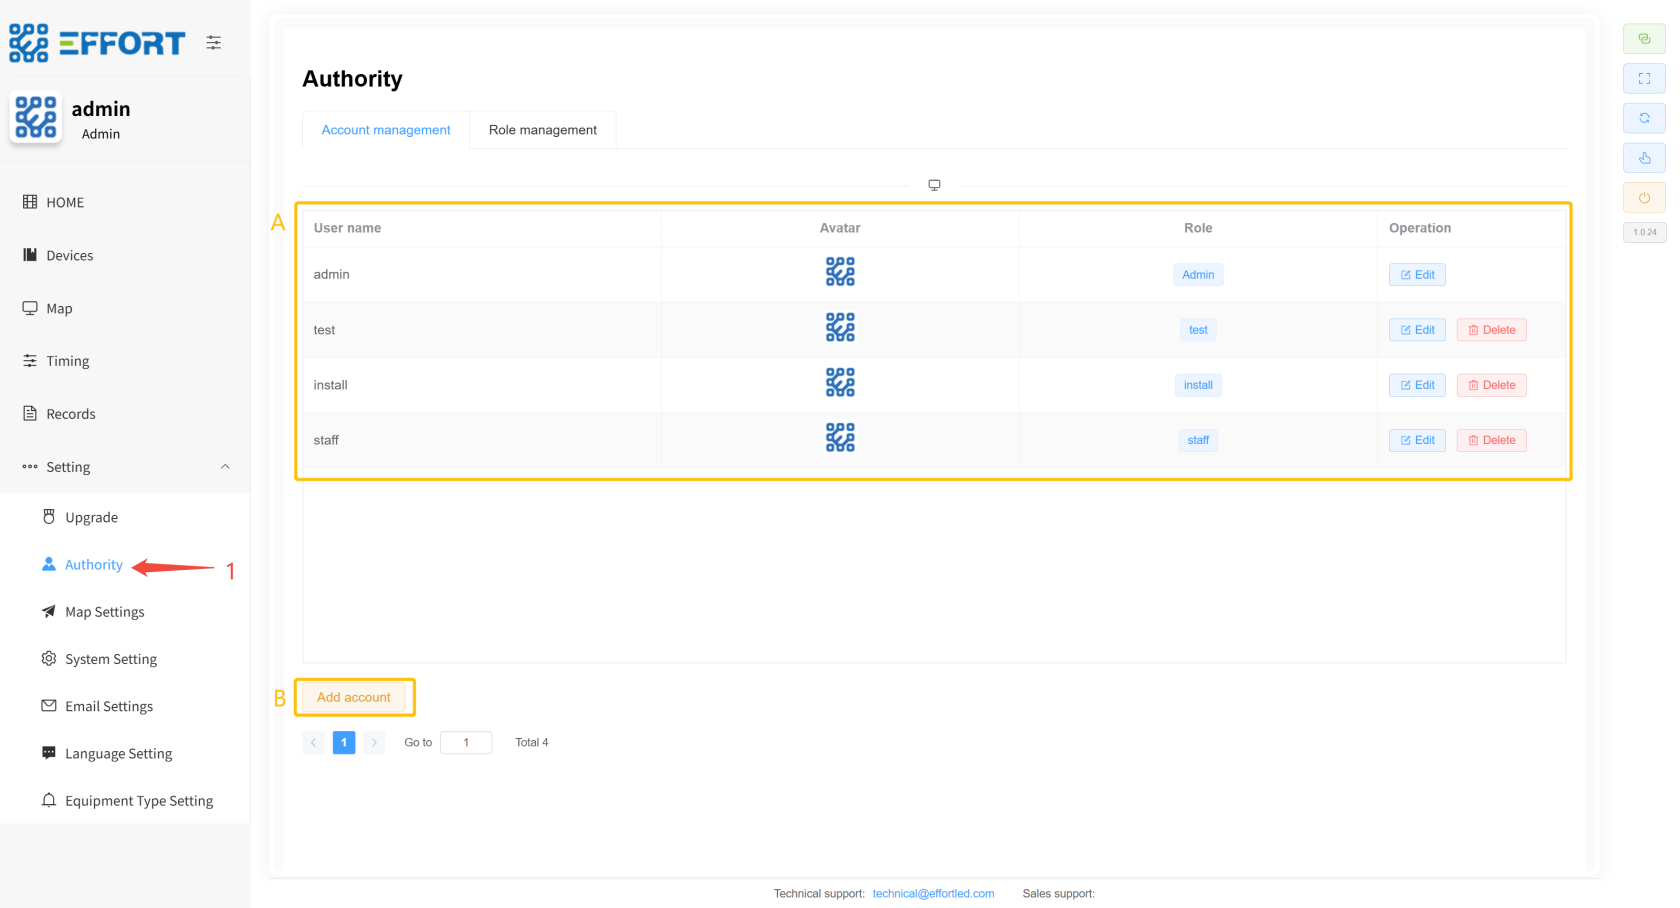
#### 2.2.6.2 Authority
> Authority: Account configuration, permission configuration, and custom language configuration pages
- **Account configuration**
- Step 1: Click Settings / Allocation / Account management to enter the account management page
---
- Box A: Basic information of the account: username, avatar, role permissions, mobile phone number, and in-line operations of the account
- Box B: Add Account button
[](http://13.222.61.26:6875/uploads/images/gallery/2026-01/2vUimage.png)
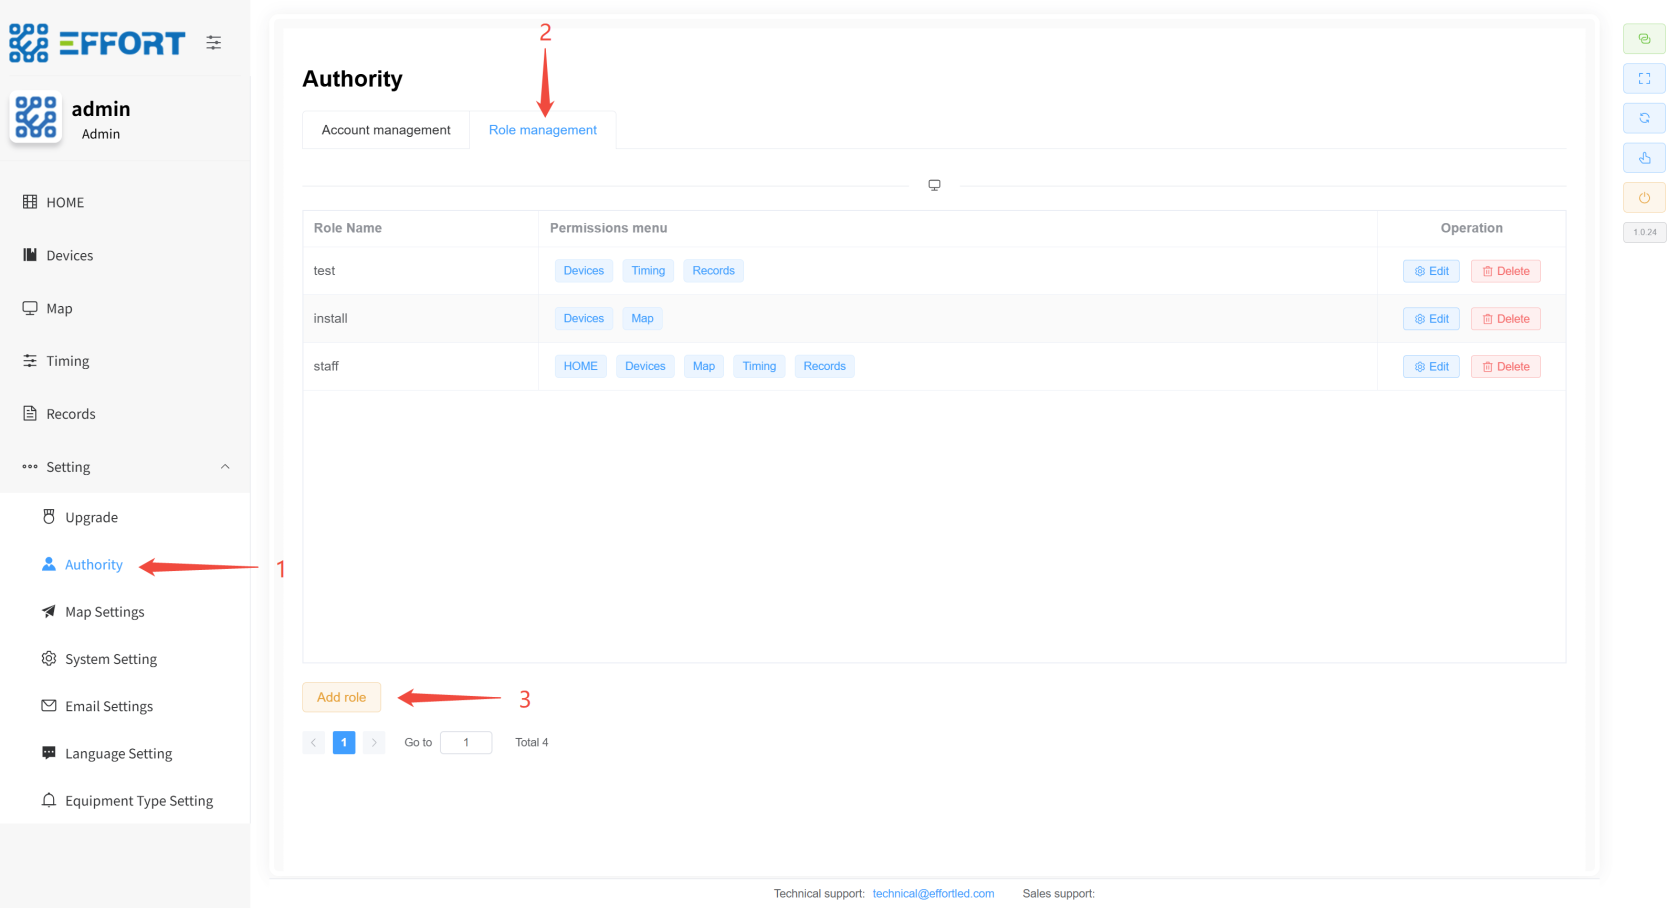
- **Permission configuration**
- Step 2: Click Role management to go to the permission management page
---
- Box B: Basic information of the permission: permission name, permission menu, and actions in the permission row
- Box A: Add permission button
[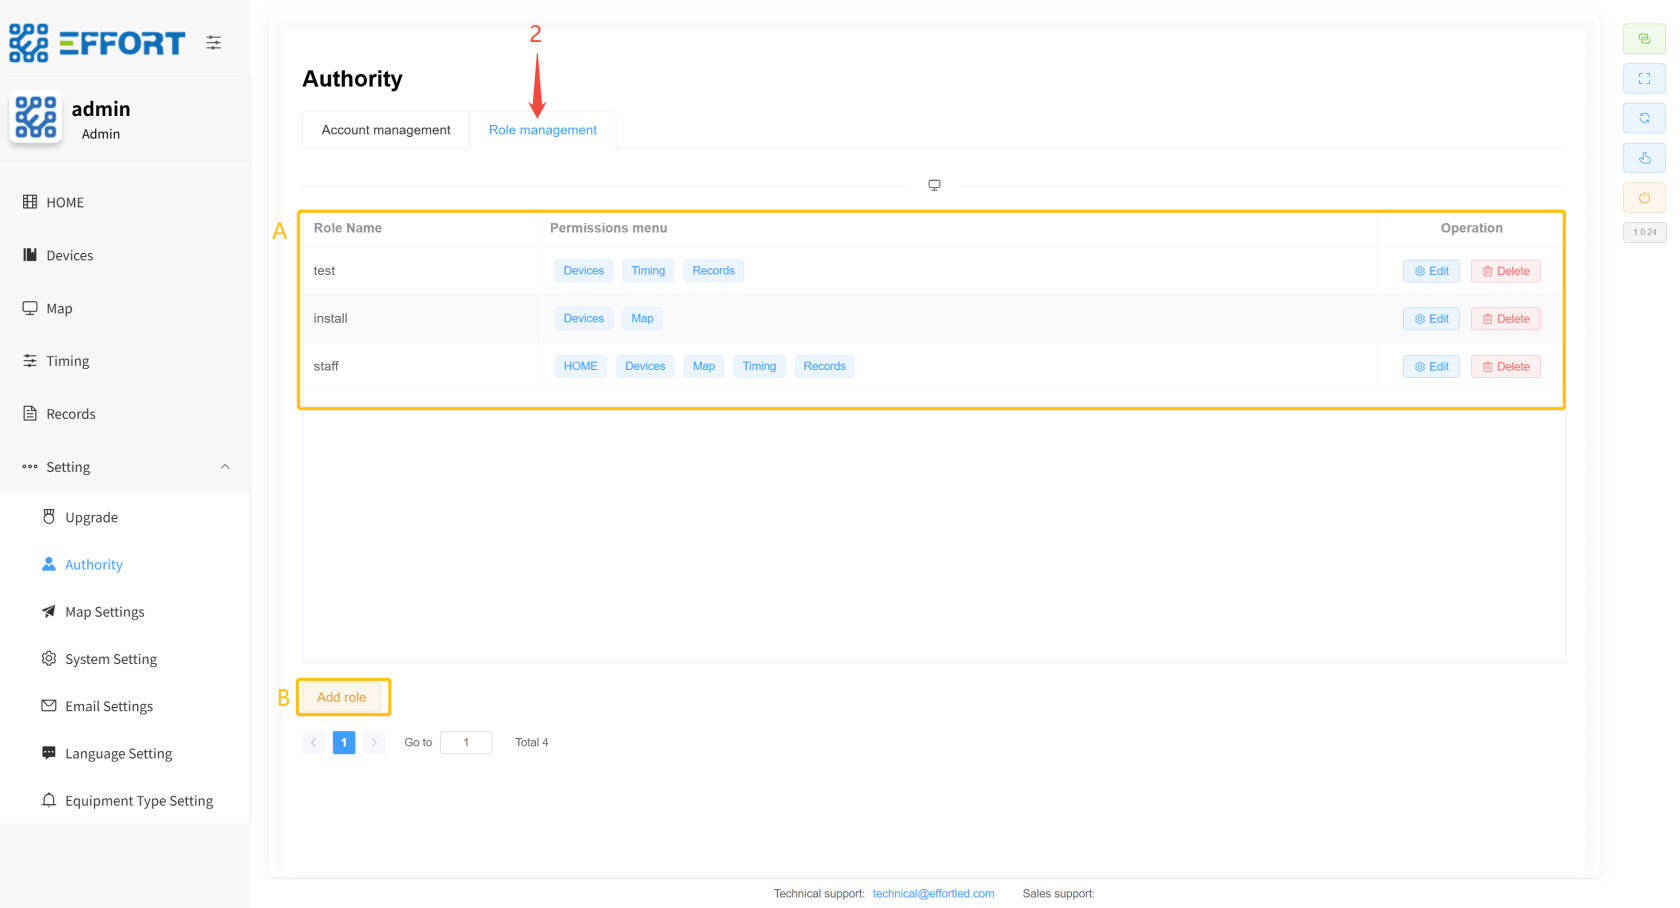](http://13.222.61.26:6875/uploads/images/gallery/2026-01/VKJimage.png)
#### 2.2.6.3 Map Settings
>Map Settings: Map Configuration Page
- Step 1: Click Settings / Map Settings to enter the map management page
---
- Box A: Basic information of the region: area name, area image, and operation in the area row
[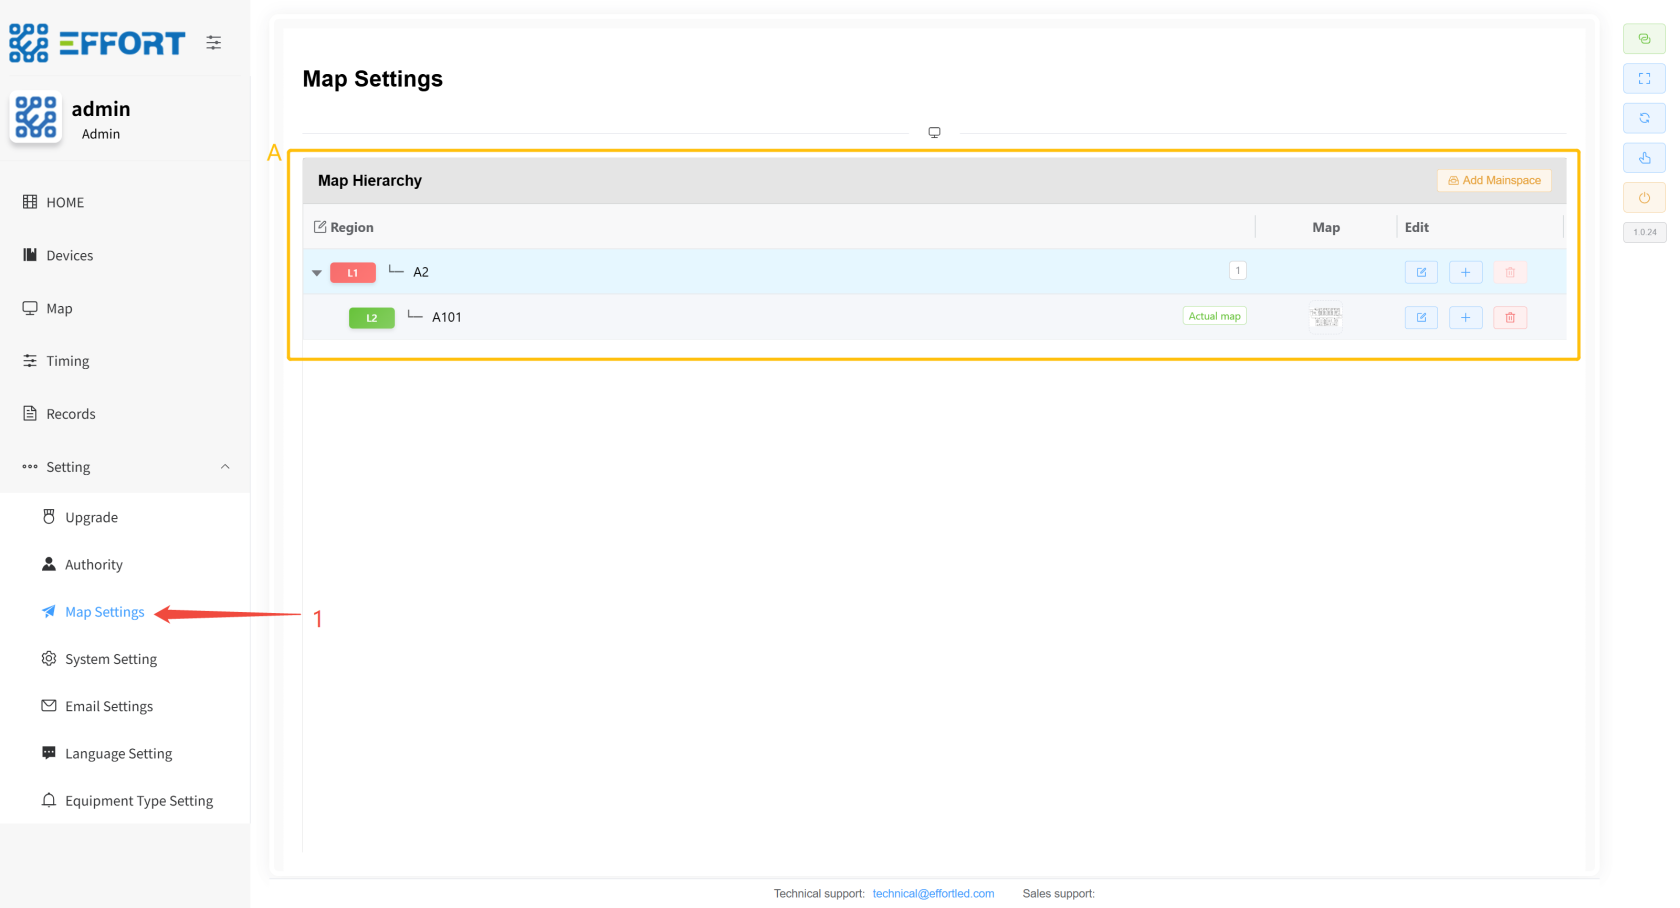](http://13.222.61.26:6875/uploads/images/gallery/2026-01/malimage.png)
#### 2.2.6.4 System Setting
>System Settings: System settings page
- Step 1: Click Settings / System Setting to enter the system settings page
---
- Box A: The settings page contains functions such as configuration LOGO, technical support email, sales support email, system name, theme, language, network card, remote connection, and download test record report
[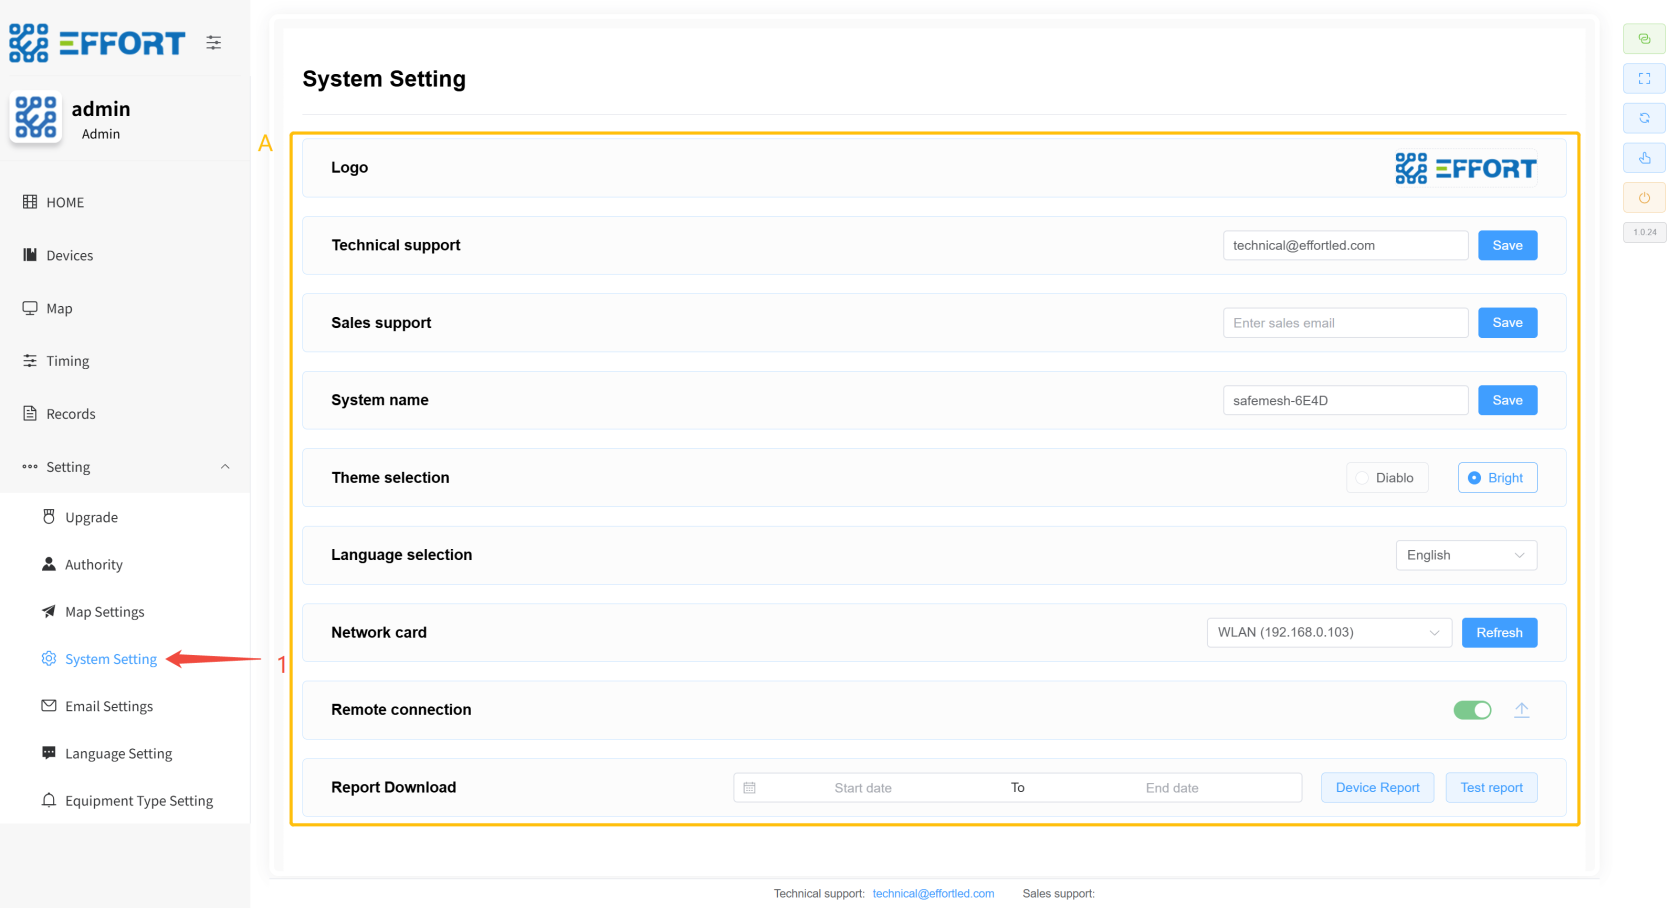](http://13.222.61.26:6875/uploads/images/gallery/2026-01/UXrimage.png)
#### 2.2.6.5 Email Setting
>Email Settings: Email settings page
- Step 1: Click Settings / Email Setting to go to the email settings page
---
- Box A: Configure the email sender, select SMTP service, select SSL, enter the sender's email address, and enter the application password of the sender's email address
- Box B: Configure the mail receiving group and enter the recipient's email address
- Box C: Configure the data required by the mail receiving group
[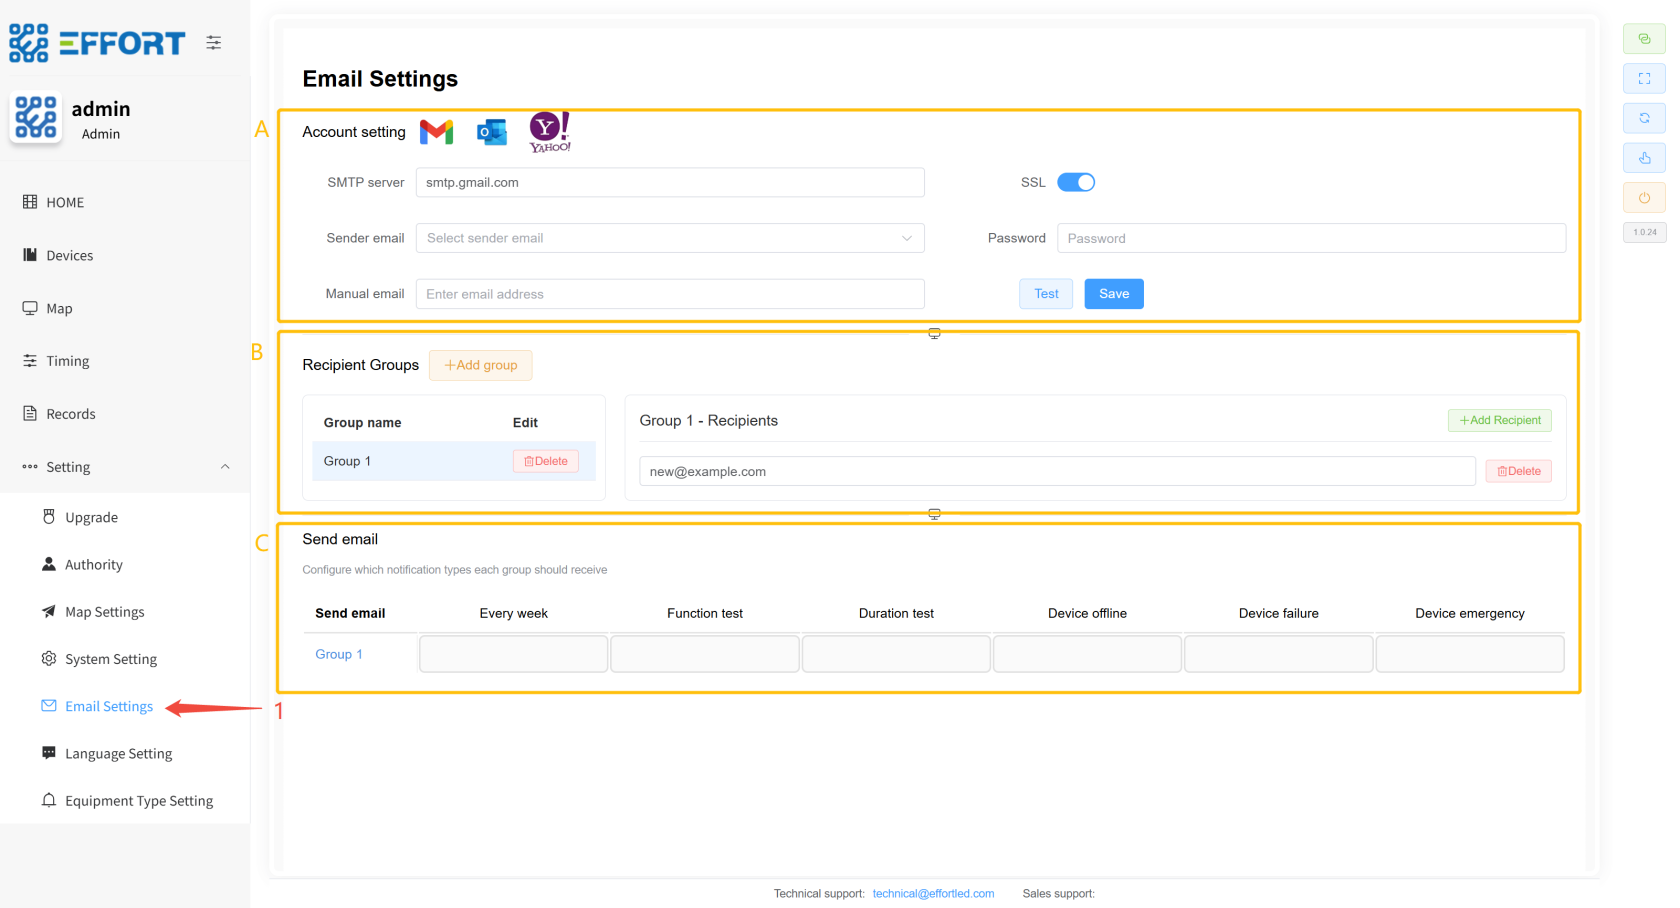](http://13.222.61.26:6875/uploads/images/gallery/2026-01/St1image.png)
---
#### 2.2.6.6 Language Setting
>Language Setting: Language settings page
- Step 1: Click Settings / Language Setting to enter the translation management page
---
- Box A: Language Management Action Bar: Add Language Button, Language Selection, Delete Language
- Box B: Basic information of the language table: serial number, English template, and selected language display on the left
[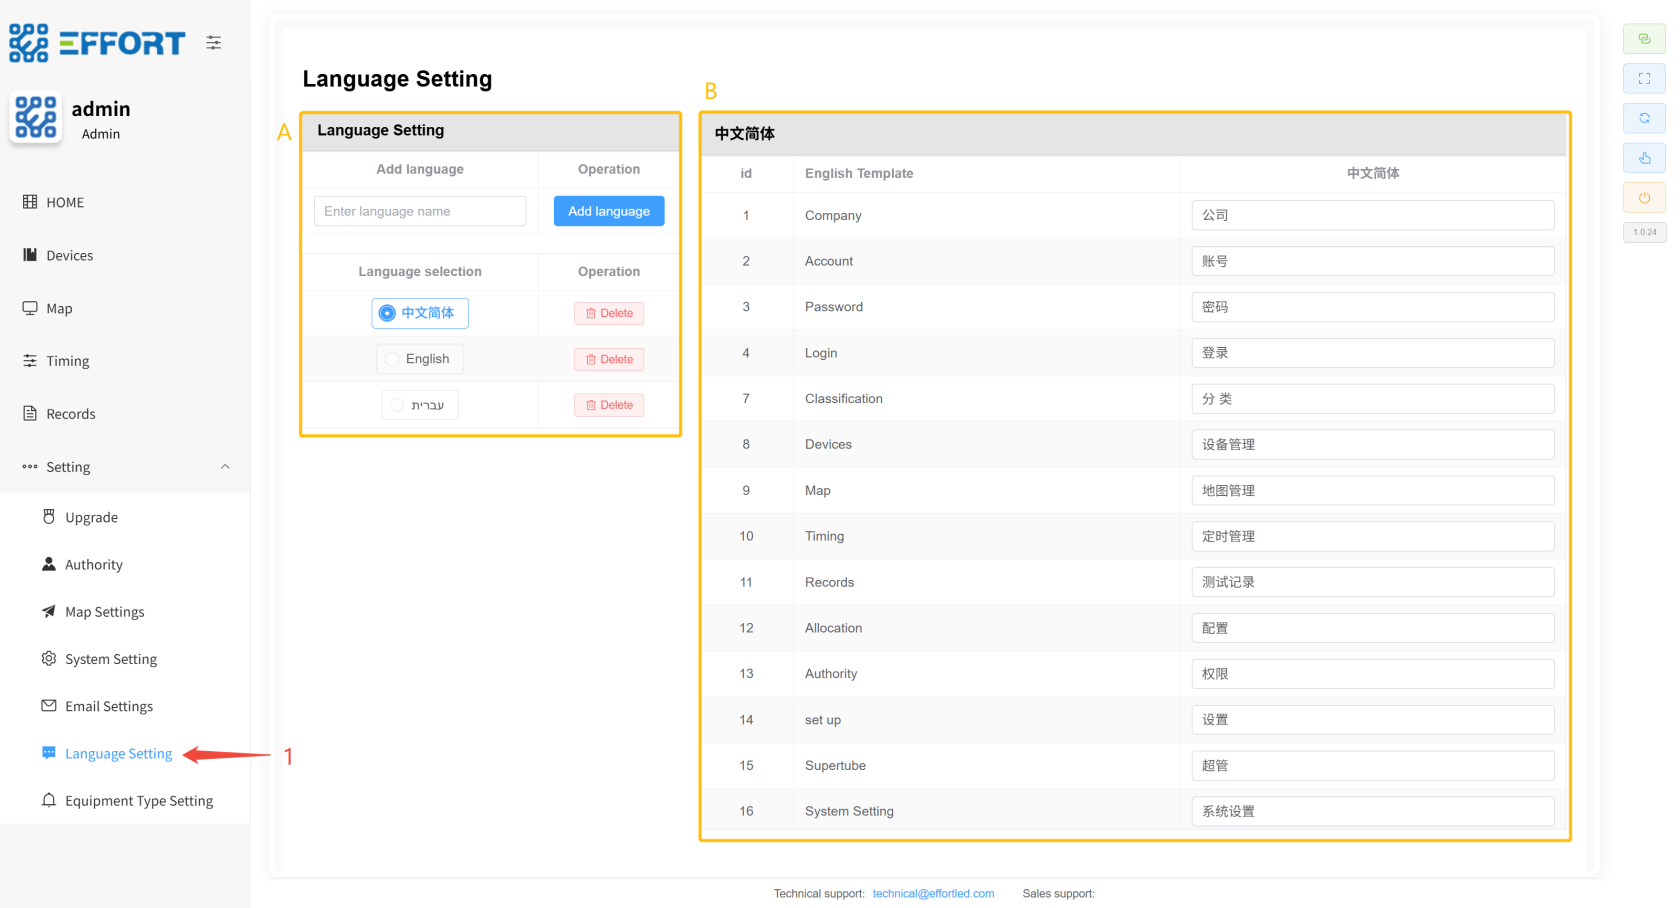](http://13.222.61.26:6875/uploads/images/gallery/2026-01/aPeimage.png)
#### 2.2.6.7 Equipment Type Setting
>Equipment Type Setting: Equipment Management Page
- Step 1: Click Settings /Equipment Type Management to enter the Equipment Type Management page
---
- Box A: Basic information of device classification: sorting, classification name, classification icon, and in-line operations of classification
- Box B: Add button for new device type
[](http://13.222.61.26:6875/uploads/images/gallery/2026-01/Ge7image.png)
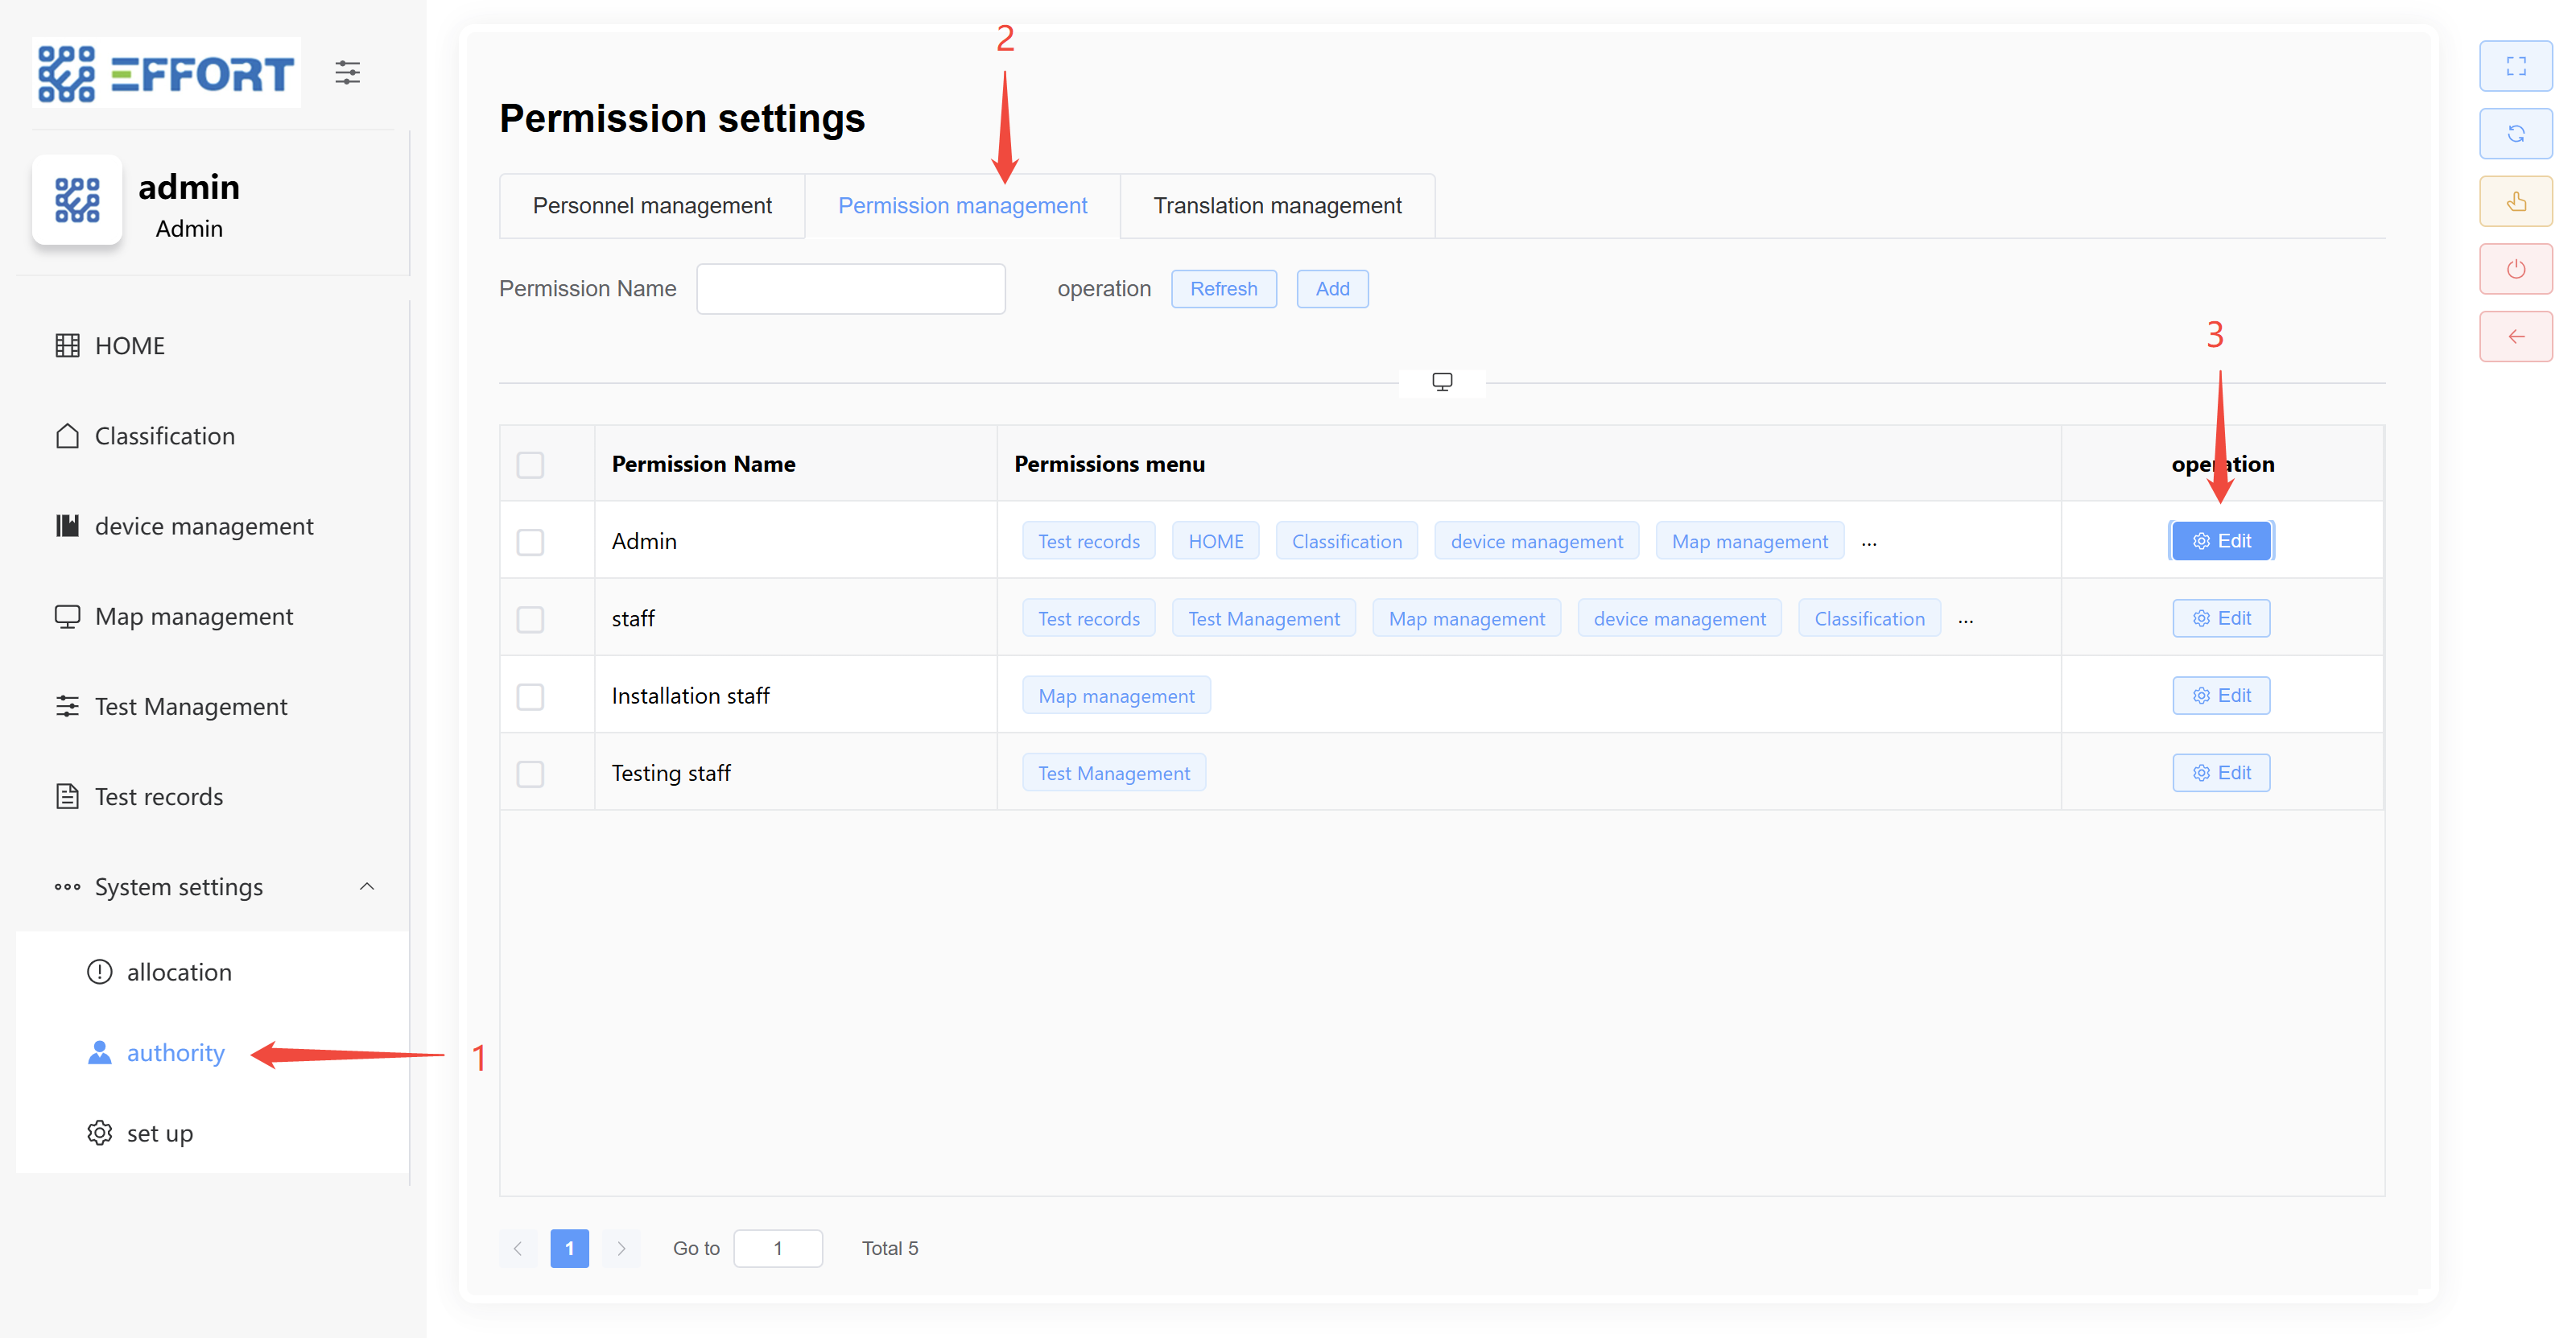
# 3. User Management ⚙️
Initial account: admin Initial password: 123456 Initial role: admin
Users can only see their role's page after logging in, and if the role does not have permission on this page, you will not see this page on the system.
## 3.1 New Characters
- Step 1: Go to Authority
- Step 2: Go to Role management
- Step 3: Click Add
- Step 4: Name the new permission
- Step 5: Select specific permissions
- Step 6: Click Confirm to add complete
[](http://13.222.61.26:6875/uploads/images/gallery/2026-01/AdHimage.png)
## 3.2 Modifying Roles
- Step 1: Go to Authority
- Step 2: Go to Account management
- Step 3: Click Edit
- Step 4: Modify the character name
- Step 5: Modify specific permissions
- Step 6: Click Confirm to complete the modification
---
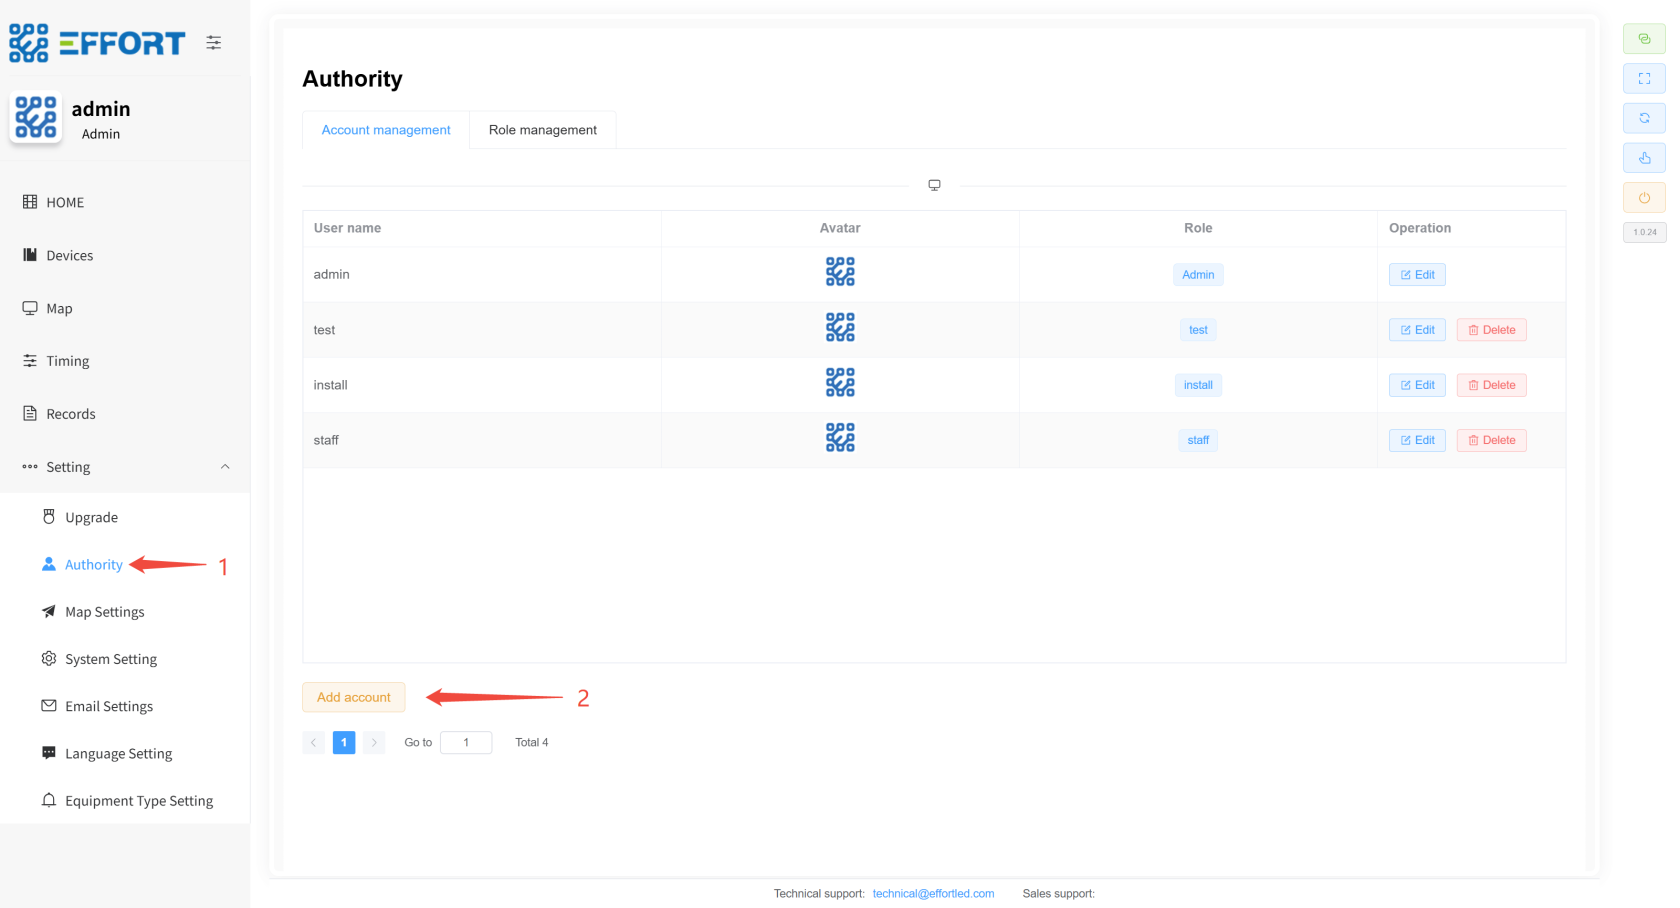
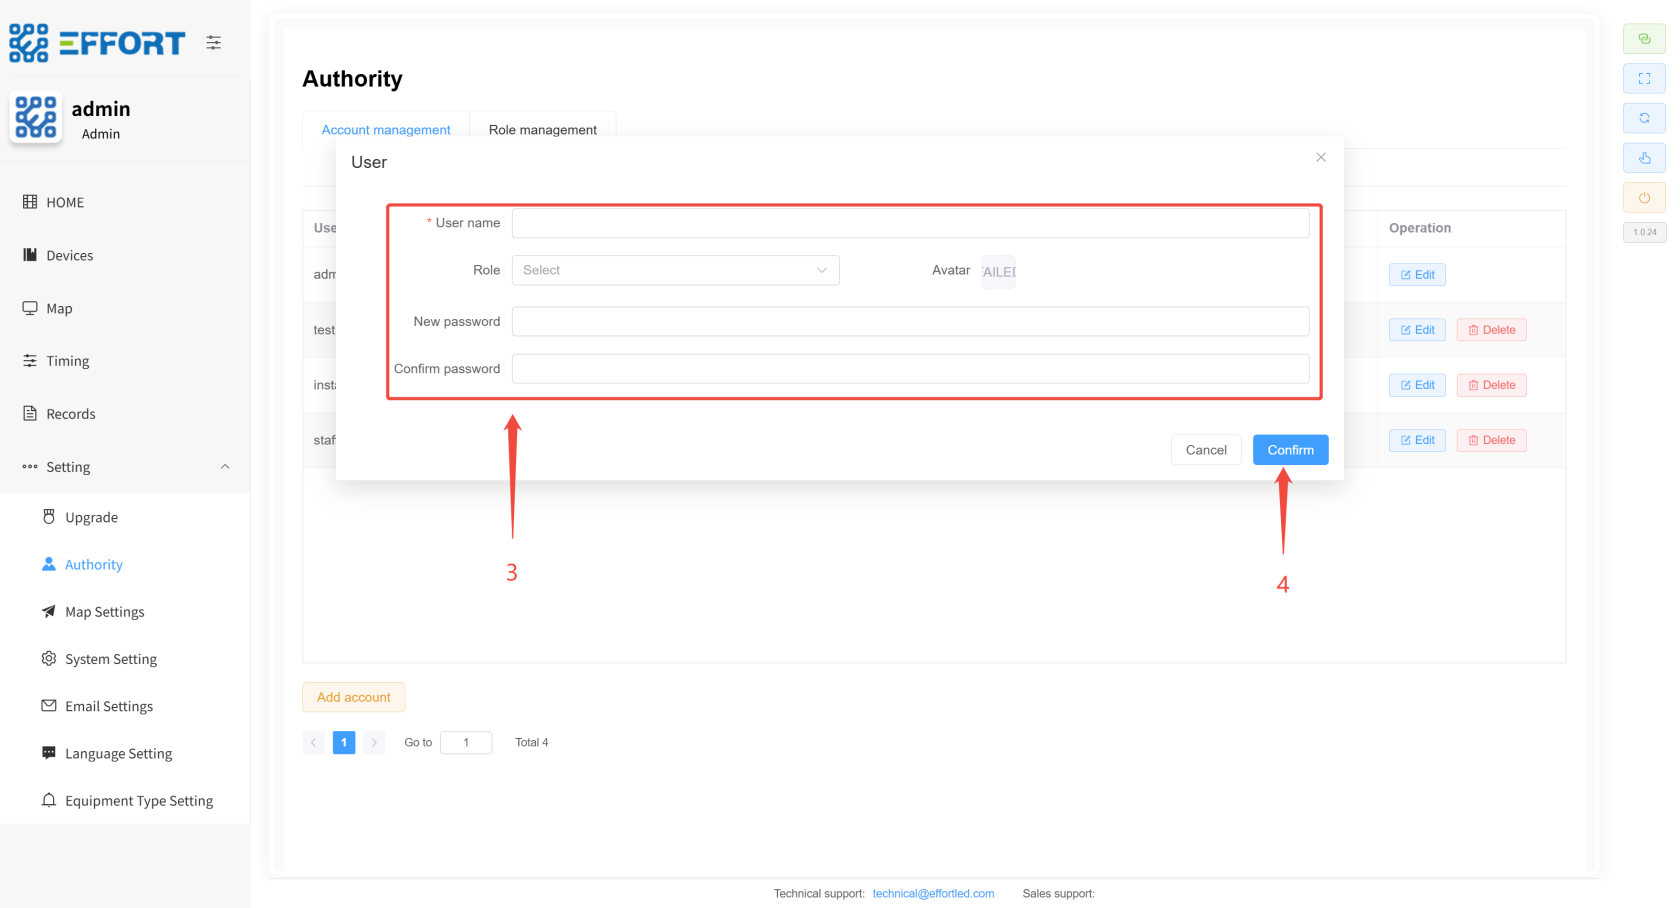
## 3.3 New Users
- Step 1: Go to Authority
- Step 2: Click Add
- Step 3: Configure the relevant parameters
- Step 4: Click Confirm to add complete
[](http://13.222.61.26:6875/uploads/images/gallery/2026-01/lz1image.png)
[](http://13.222.61.26:6875/uploads/images/gallery/2026-01/AEqimage.png)
---
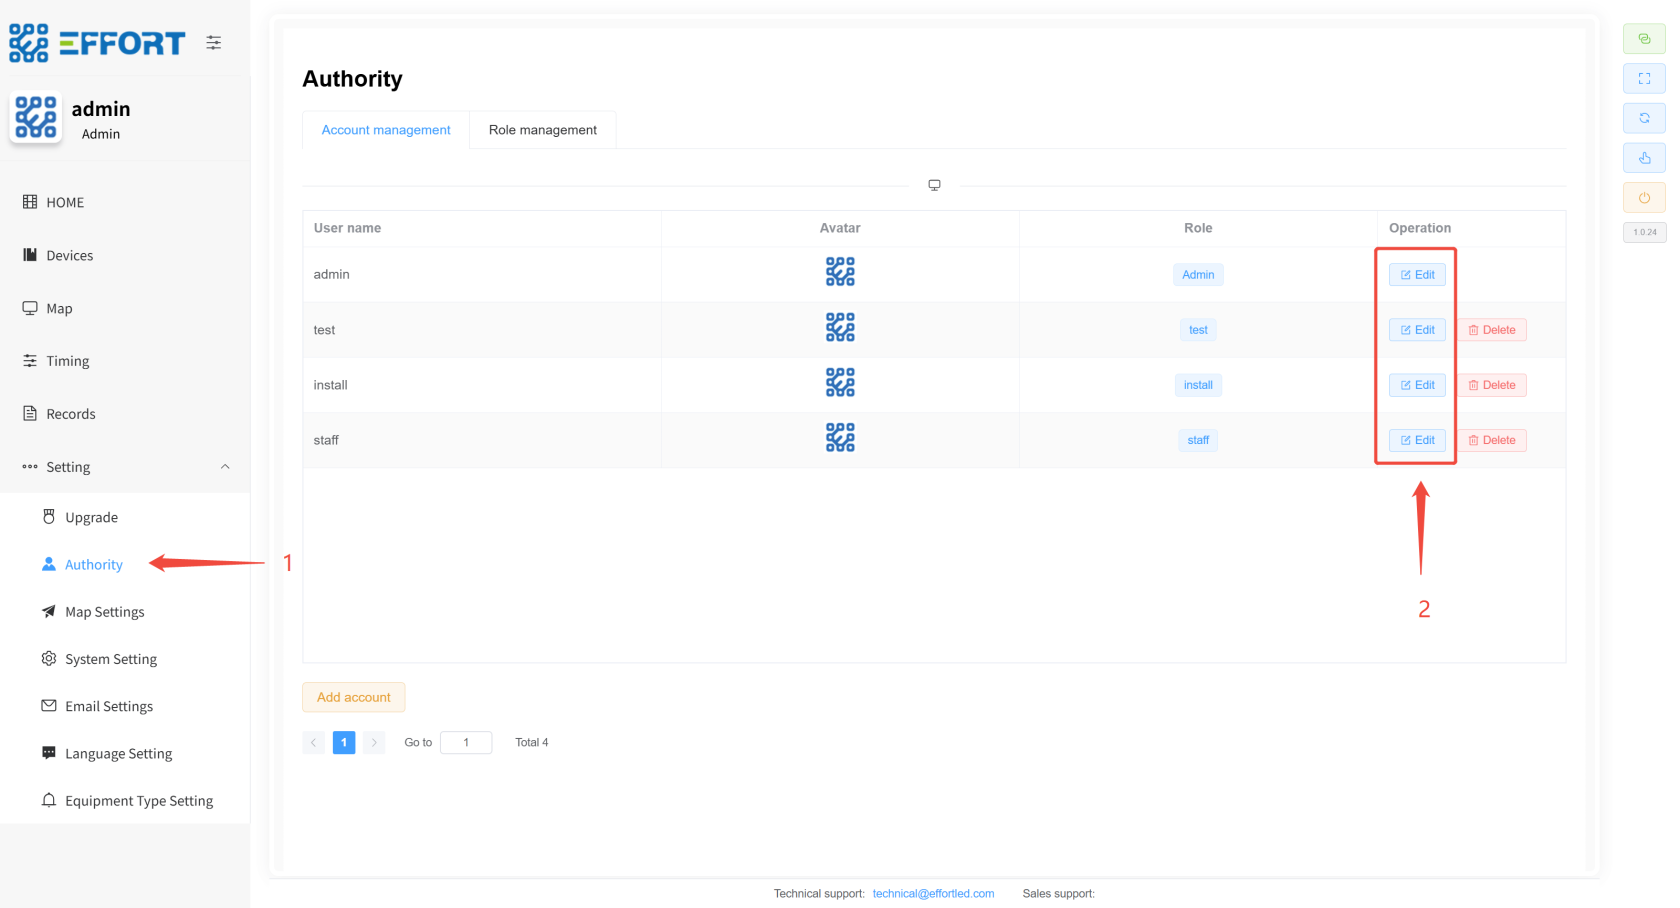
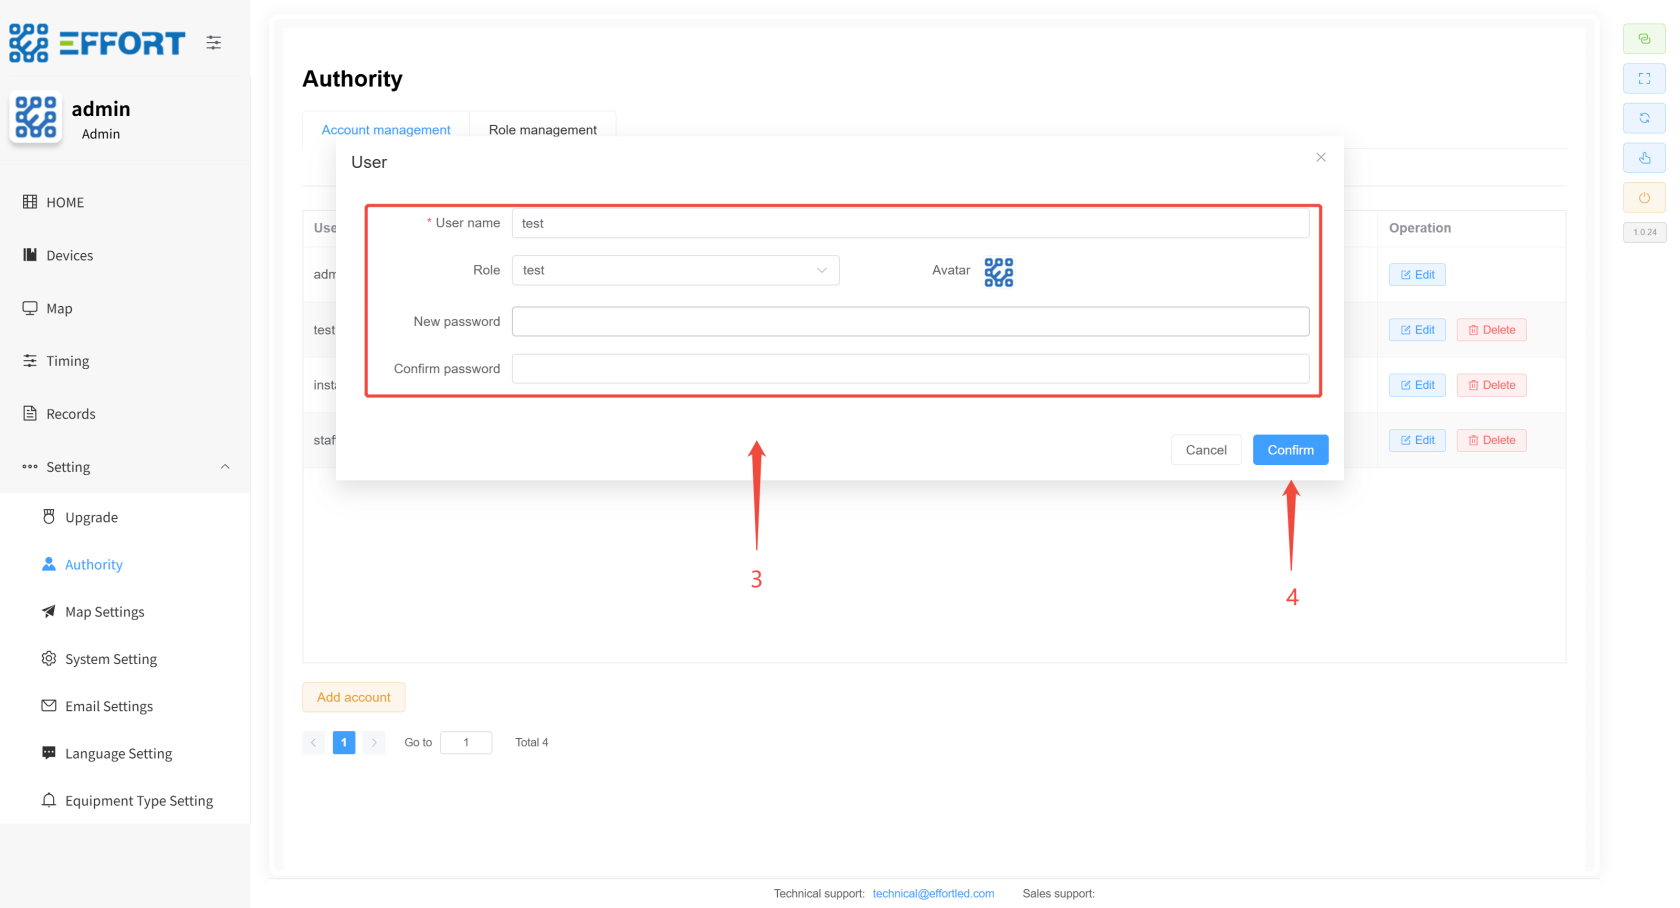
## 3.4 Modification of Users
- Step 1: Go to Authority
- Step 2: Click Edit
- Step 3: Modify the relevant parameters
- Step 4: Click Confirm to complete the modification
[](http://13.222.61.26:6875/uploads/images/gallery/2026-01/8Gdimage.png)
[](http://13.222.61.26:6875/uploads/images/gallery/2026-01/yV4image.png)
# 4. Workflow Description
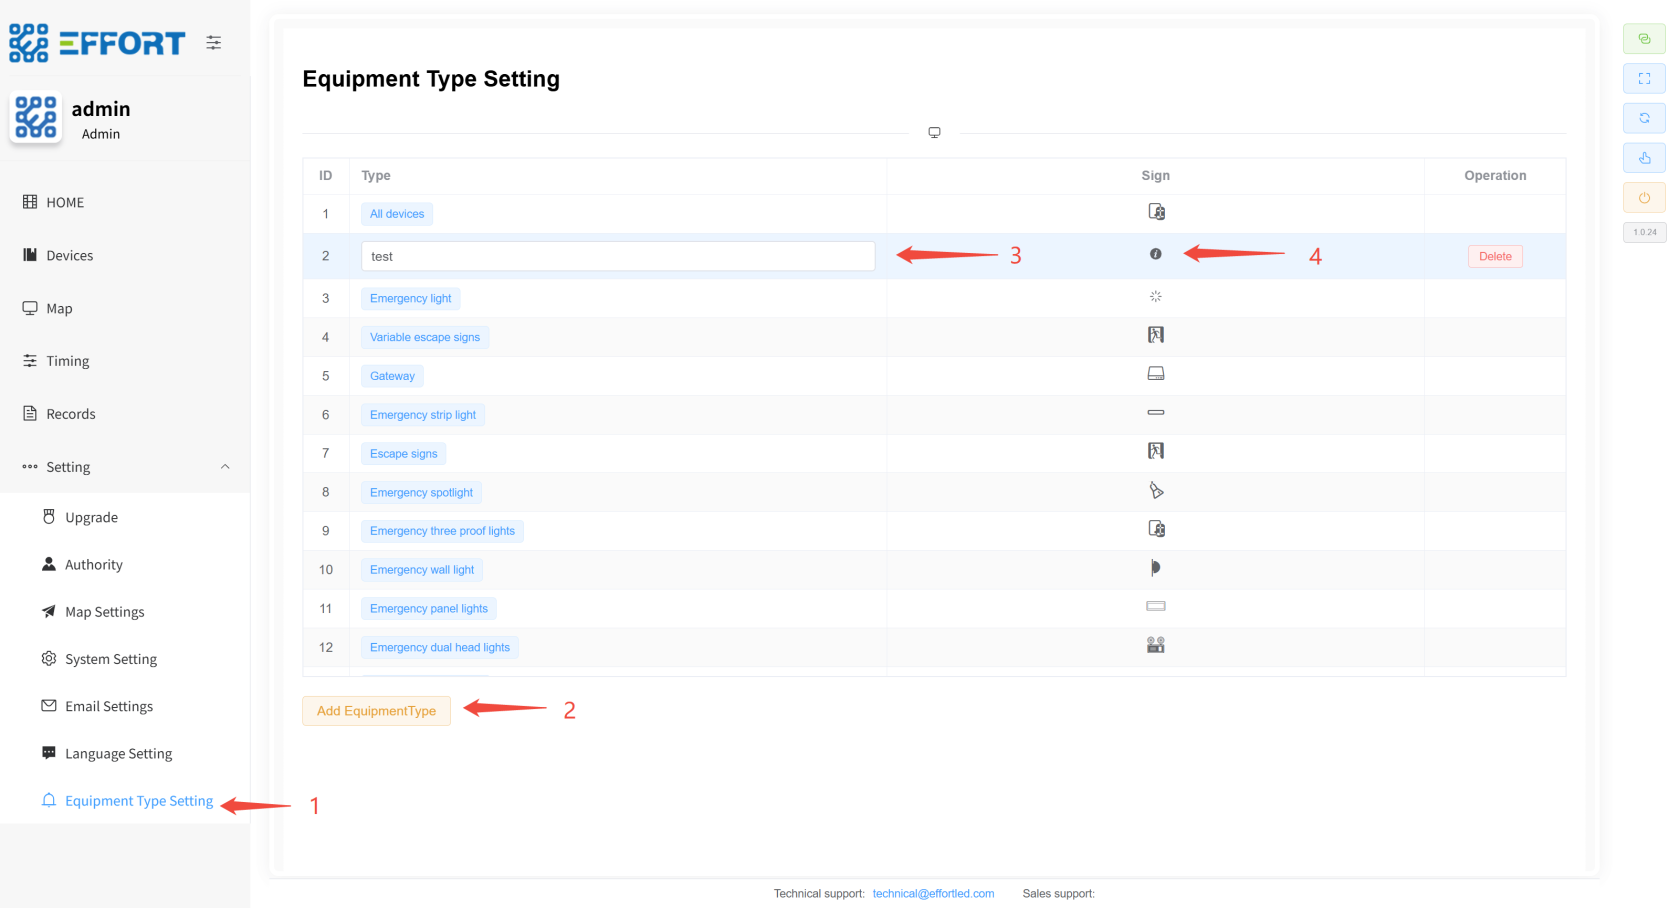
## 4.1 New Equipment Classification ⚙️
- Step 1: Click Equipment Type Setting to enter Equipment Type Management
- Step 2: Then tap Add EquipmentType to add a new device classification
- Step 3: Click the category name to modify the category name
- Step 4: In the Sign area, select the icon and the configuration is complete
[](http://13.222.61.26:6875/uploads/images/gallery/2026-01/R5himage.png)
---
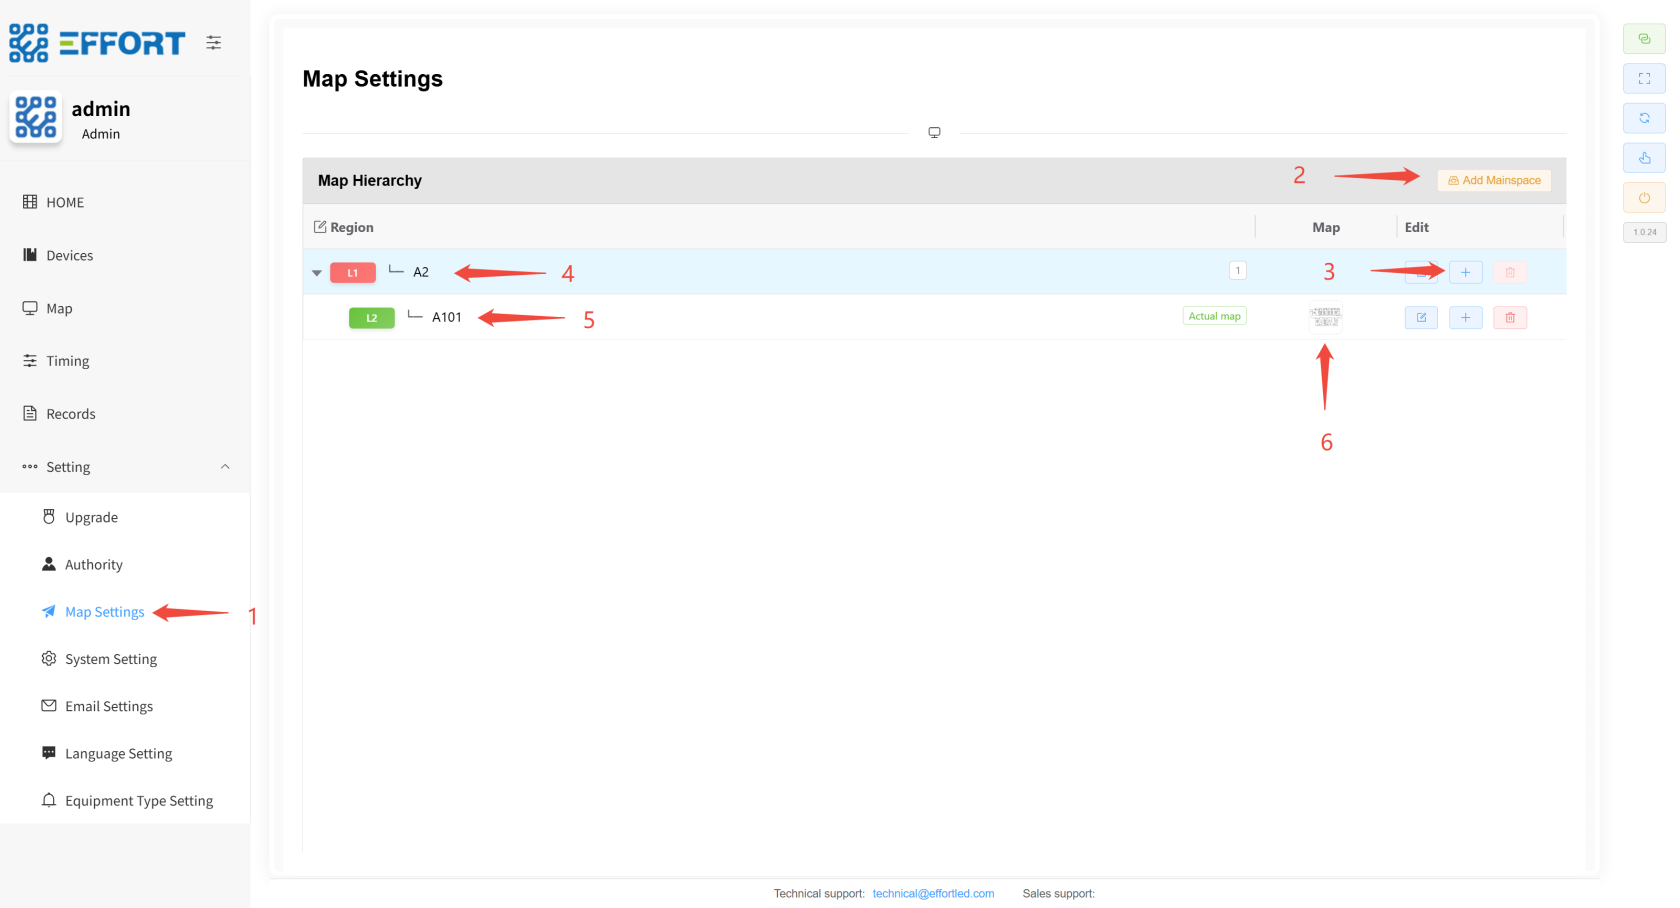
## 4.2 Import Map (product import guidelines are available). ⚙️
- Step 1: Click map settings again to enter the map management page
- Step 2: Click Add Mainspace to add the primary area
- Step 3: Then click "+" to add the secondary area, you can continue to add down......
- Step 4 & 5: Click on the area name to modify the region name
- Step 6: In the **last level** area, upload the area map and the configuration is complete
---
[](http://13.222.61.26:6875/uploads/images/gallery/2026-01/G8timage.png)
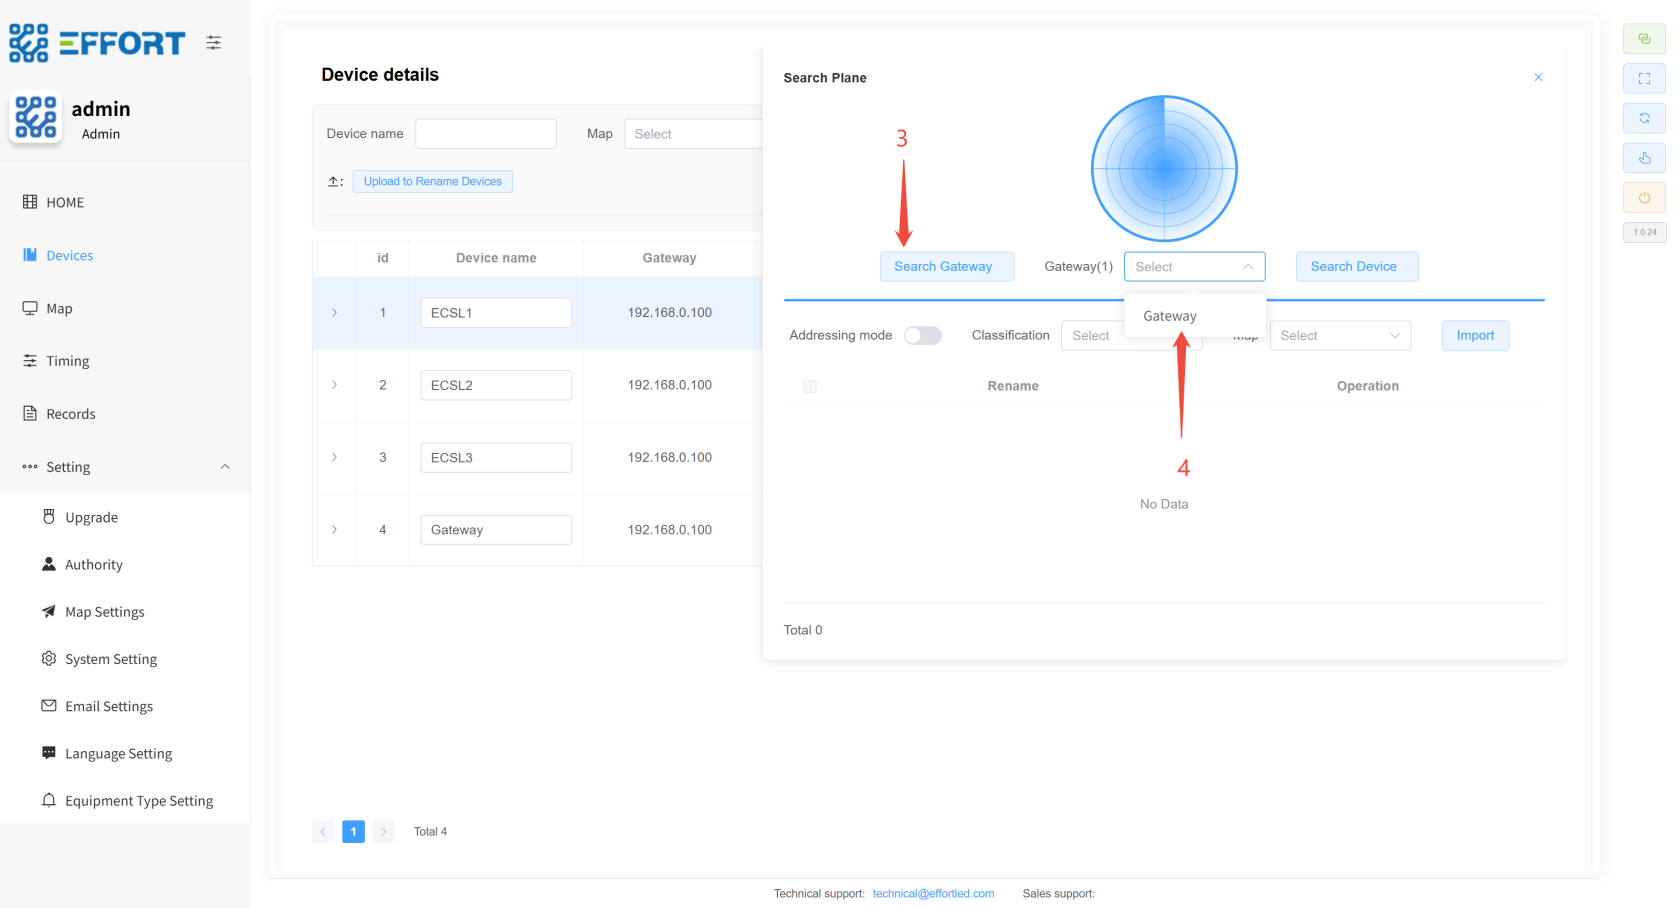
## 4.3 Import Gateways and Devices 👤
- **Gateway Import Steps**
- Step 1: Go to Device
- Step 2: Click Search Device to open Search Plane
- Step 3: Click on Search Gateway and wait for about 30 seconds
- Step 4: Click on the selected gateway
[](http://13.222.61.26:6875/uploads/images/gallery/2026-01/5bOimage.png)
[](http://13.222.61.26:6875/uploads/images/gallery/2026-01/bs9image.png)
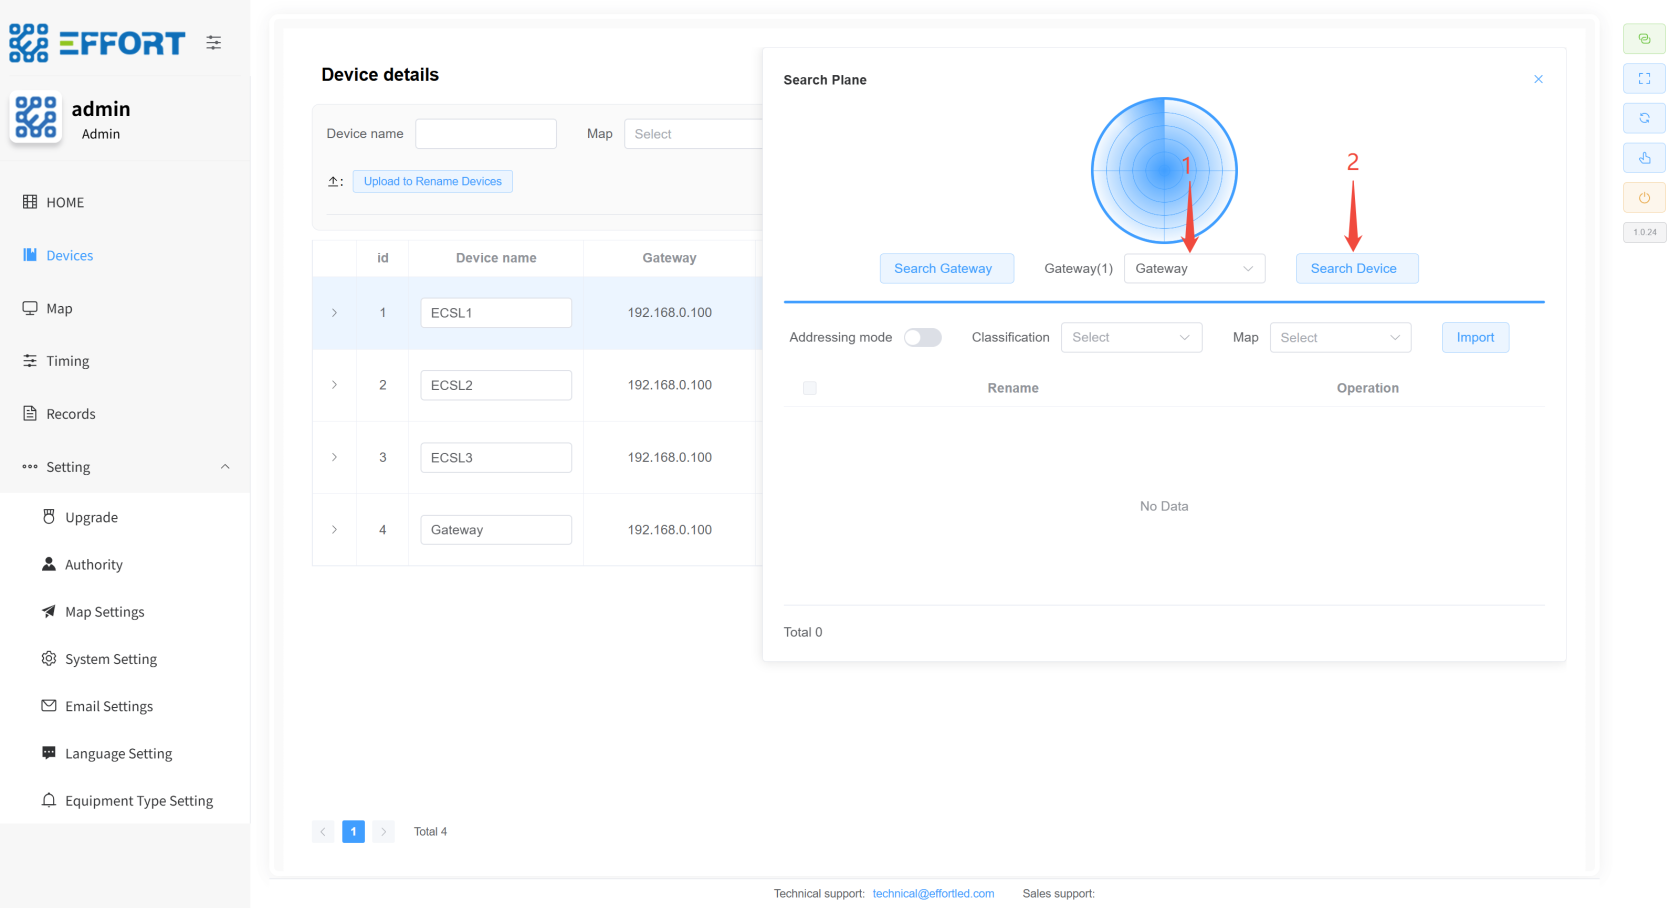
- **Device Import Steps**
- Step 1: Select the gateway first
- Step 2: Click Search Device
- Step 3: Select the search mode
- Step 4: Click Search Device
- Step 5: Once the search is complete, tap Search Device again to stop the search
- Step 6: Select the device
- Step 7: Select the device classification
- Step 8: Select the region
- Step 9: Click Import
[](http://13.222.61.26:6875/uploads/images/gallery/2026-01/Rw5image.png)
[](http://13.222.61.26:6875/uploads/images/gallery/2026-01/37Himage.png)
[](http://13.222.61.26:6875/uploads/images/gallery/2026-01/Vwaimage.png)
---
## 4.4 Placing the Device on the Map 👤
- Step 1: Left-click and hold the device to drag it into the map
[](http://13.222.61.26:6875/uploads/images/gallery/2026-01/B35image.png)
---
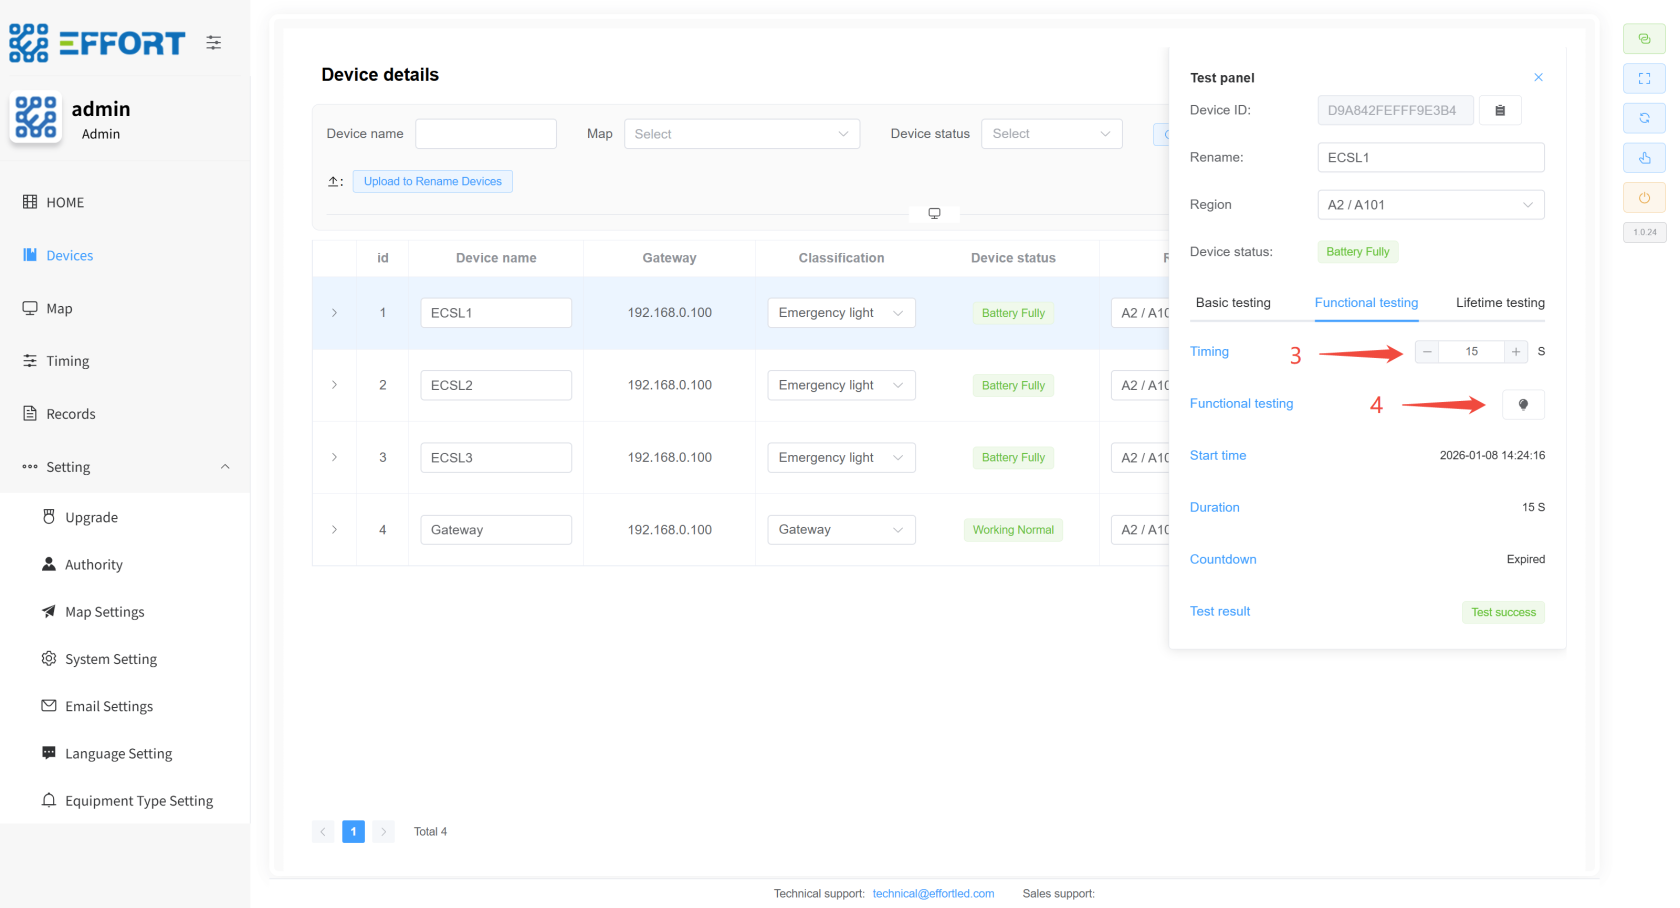
## 4.5 Temporary Functional Inspection and Life Inspection 👤
- **Temporary functional inspection steps**
- Step 1: Go to Devices
- Step 2: Click to enter the Test Panel
- Step 3: Configure the duration
- Step 4: Click the icon to enter the temporary function check
[](http://13.222.61.26:6875/uploads/images/gallery/2026-01/K8Dimage.png)
[](http://13.222.61.26:6875/uploads/images/gallery/2026-01/or0image.png)
- **Temporary life inspection steps**
- Step 1: Go to Lifetime testing
- Step 2: Configure the duration
- Step 3: Click the icon to enter the temporary life test
[](http://13.222.61.26:6875/uploads/images/gallery/2026-01/2CXimage.png)
## 4.6 Timing Function Inspection and Life Inspection 👤
- Step 1: Go to Timing
- Step 2: Click the Batch Configure Test Time button
- Step 3: Select the device for which you need to set a schedule
- Step 4: Configure timing-related parameters
- Step 5: Click Start setting and the configuration is complete
---
[](http://13.222.61.26:6875/uploads/images/gallery/2026-01/xDXimage.png)
[](http://13.222.61.26:6875/uploads/images/gallery/2026-01/accimage.png)
## 4.7 Test Report Download ⚙️
- Step 1: Go to System Settings
- Step 2: Click Select date
- Step 3: Click Download device report
- Step 4: Click to download the test report
---
[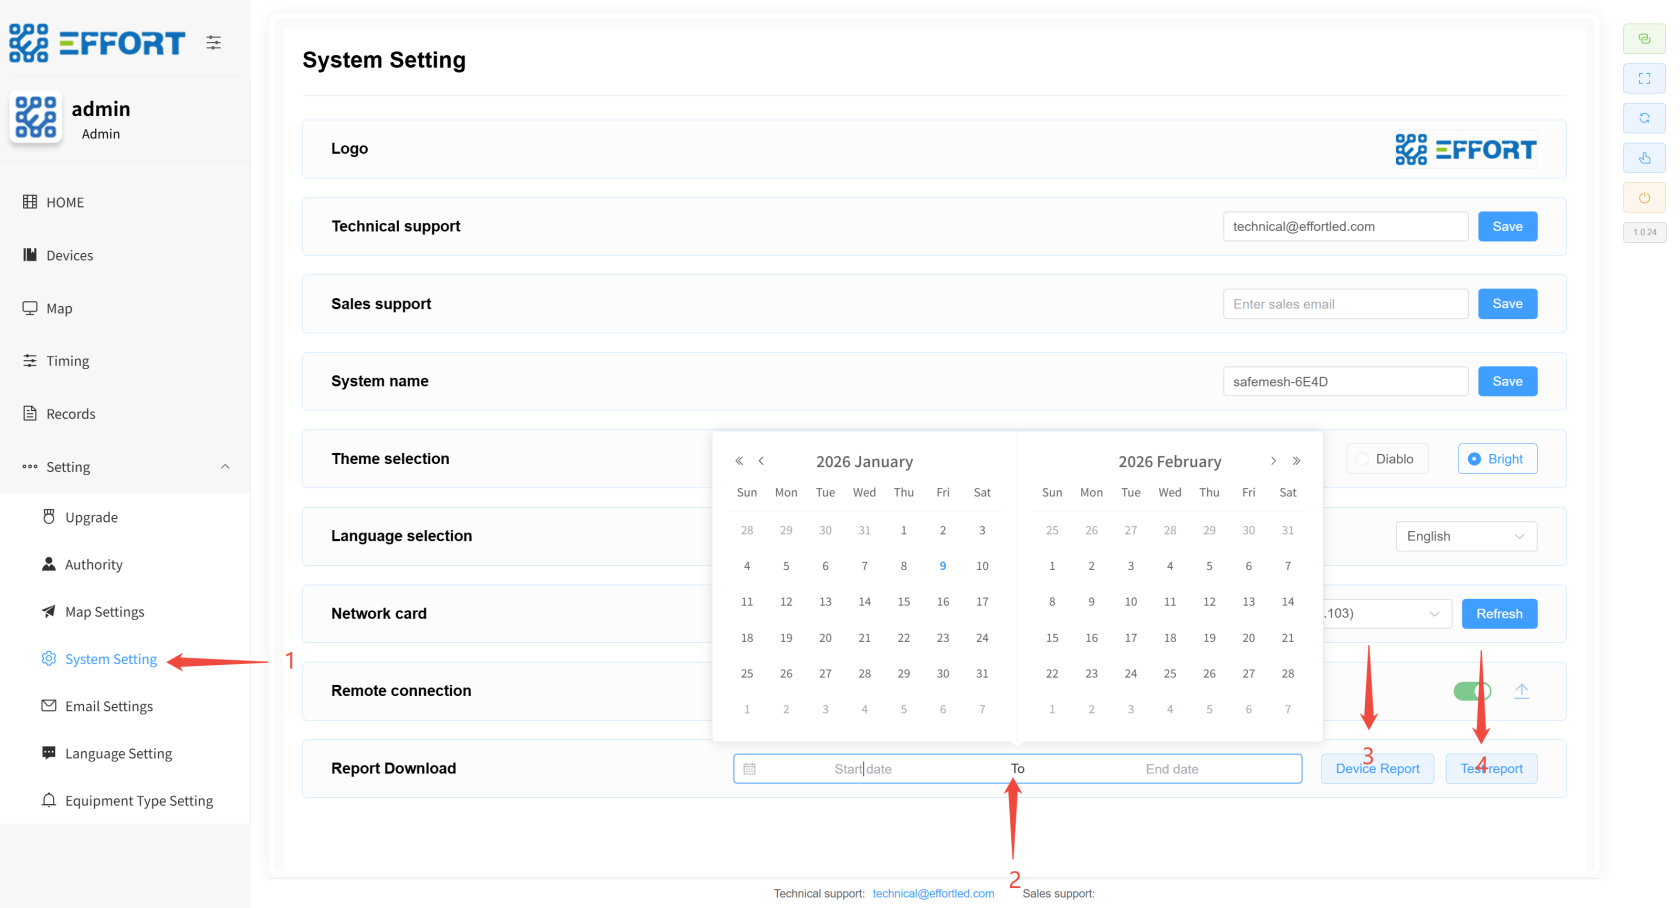](http://13.222.61.26:6875/uploads/images/gallery/2026-01/YsZimage.png)
## 4.8 Switching Languages ⚙️
- Step 1: Click System Setting to go to the System Settings page
- Step 2: Click the selection box to switch the language
[](http://13.222.61.26:6875/uploads/images/gallery/2026-01/JuUimage.png)
---
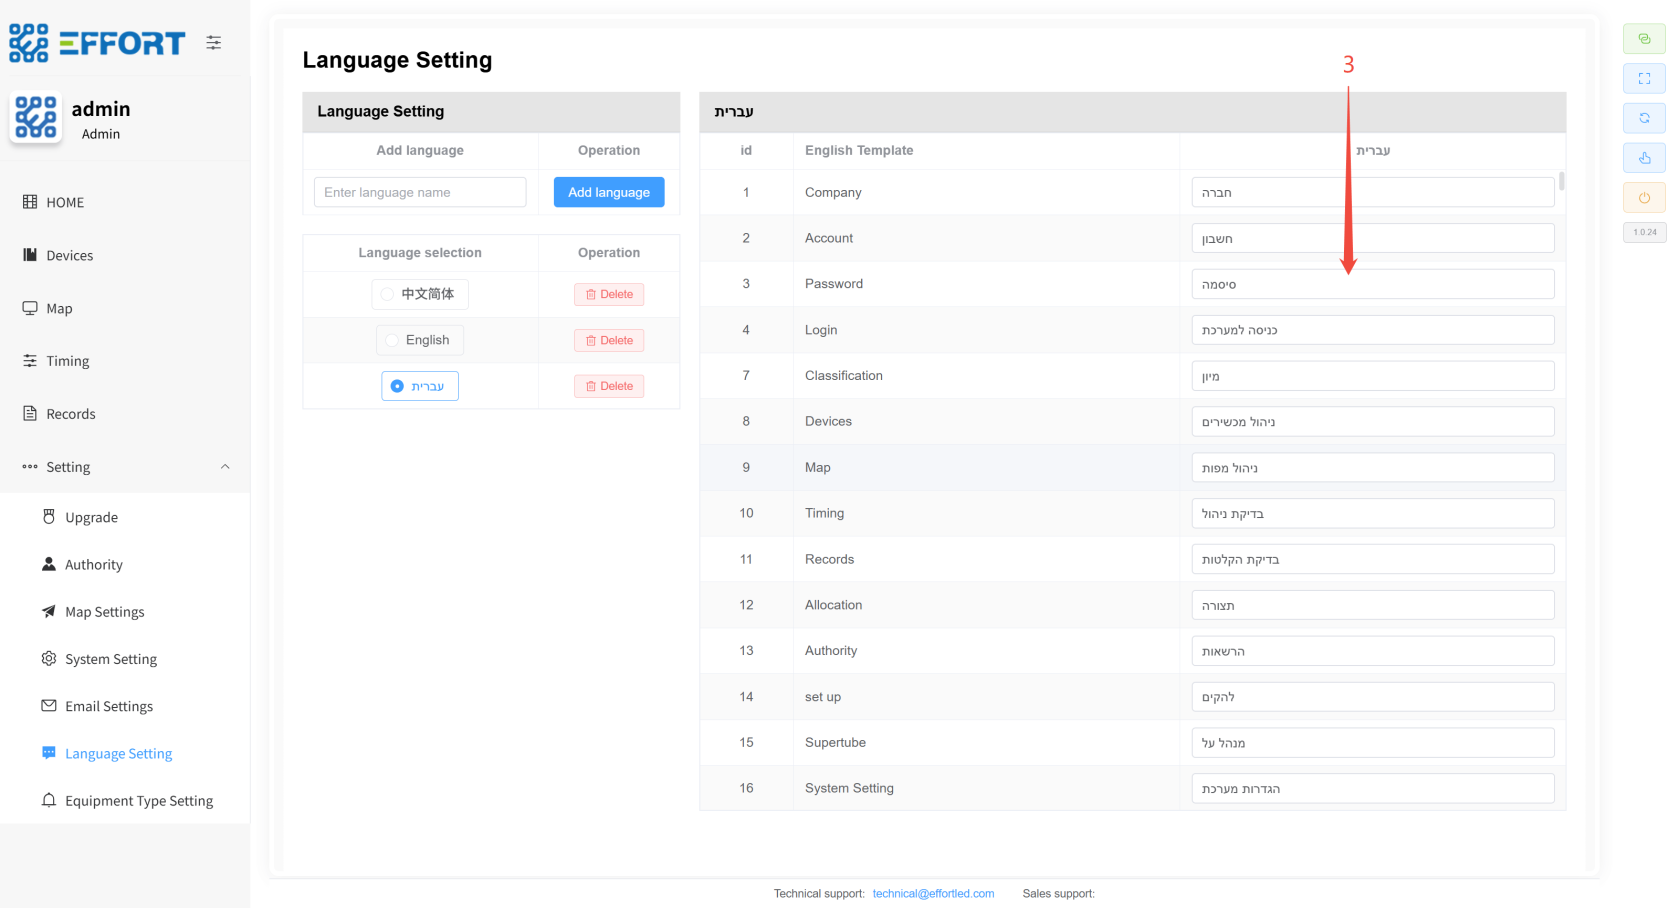
## 4.9 Configuring Custom Languages ⚙️
- Step 1: Click Language management to go to the translation management page
- Step 2: Click Add language to add a language template or select an existing language template
- Step 3: Modify the actual display language according to the template language English Template
[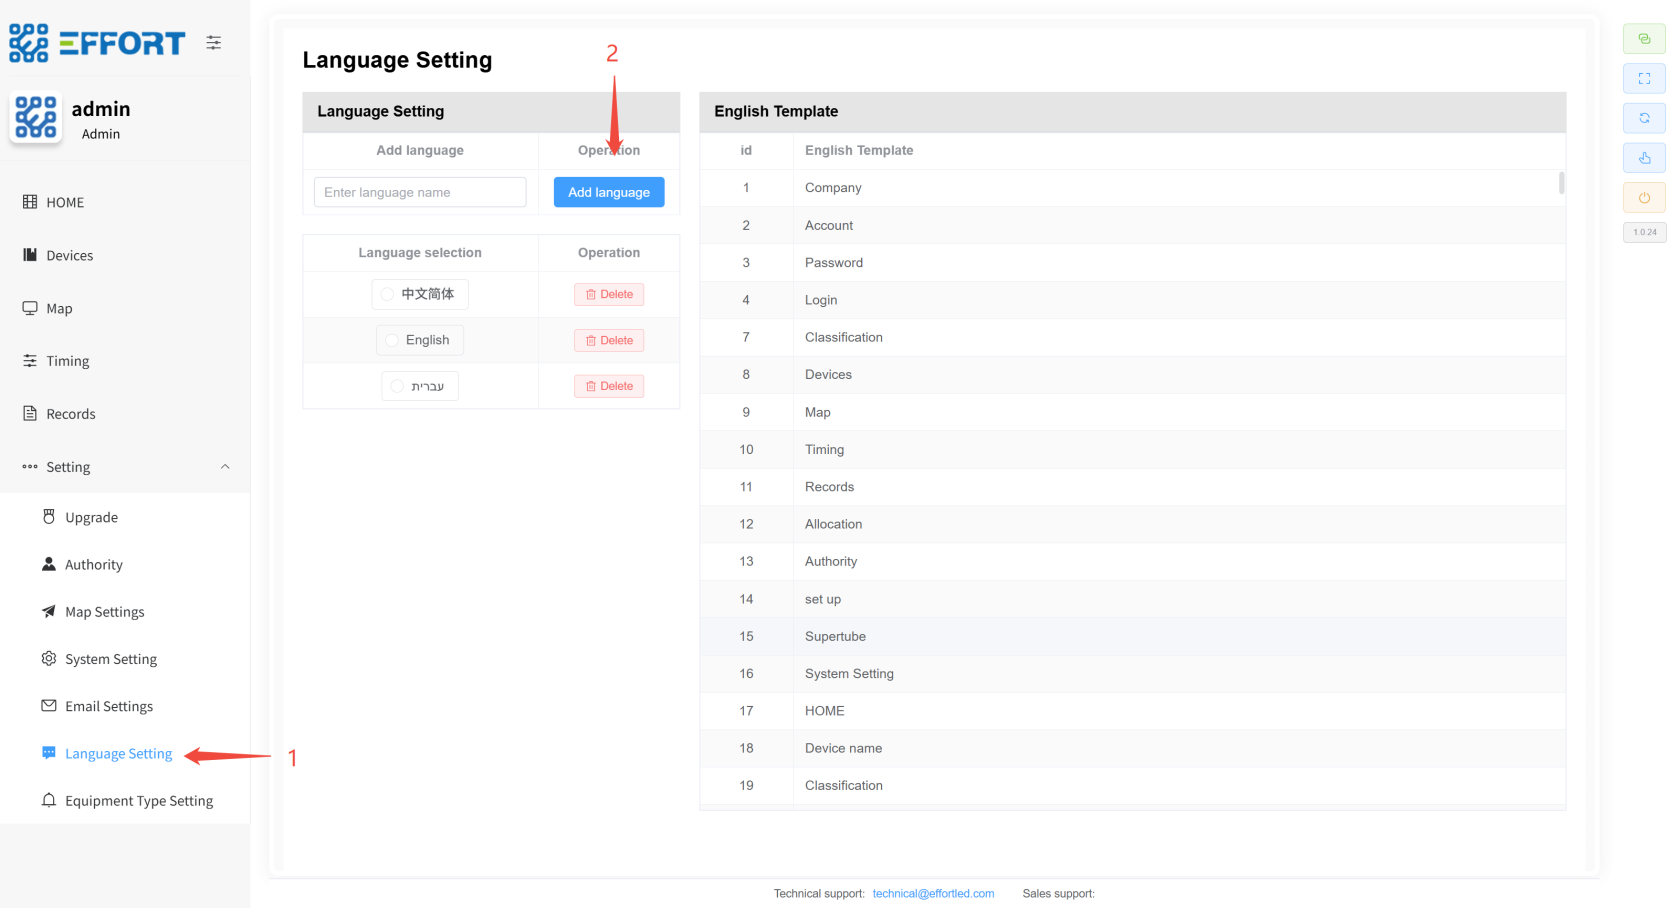](http://13.222.61.26:6875/uploads/images/gallery/2026-01/xzsimage.png)
[](http://13.222.61.26:6875/uploads/images/gallery/2026-01/1xvimage.png)
---
## 4.10 Set the LOGO and Theme ⚙️
- Step 1: Click System setting to enter the system settings interface
- Step 2: Click on the image to upload the new system logo
- Step 3: Click the theme checkbox to switch themes
[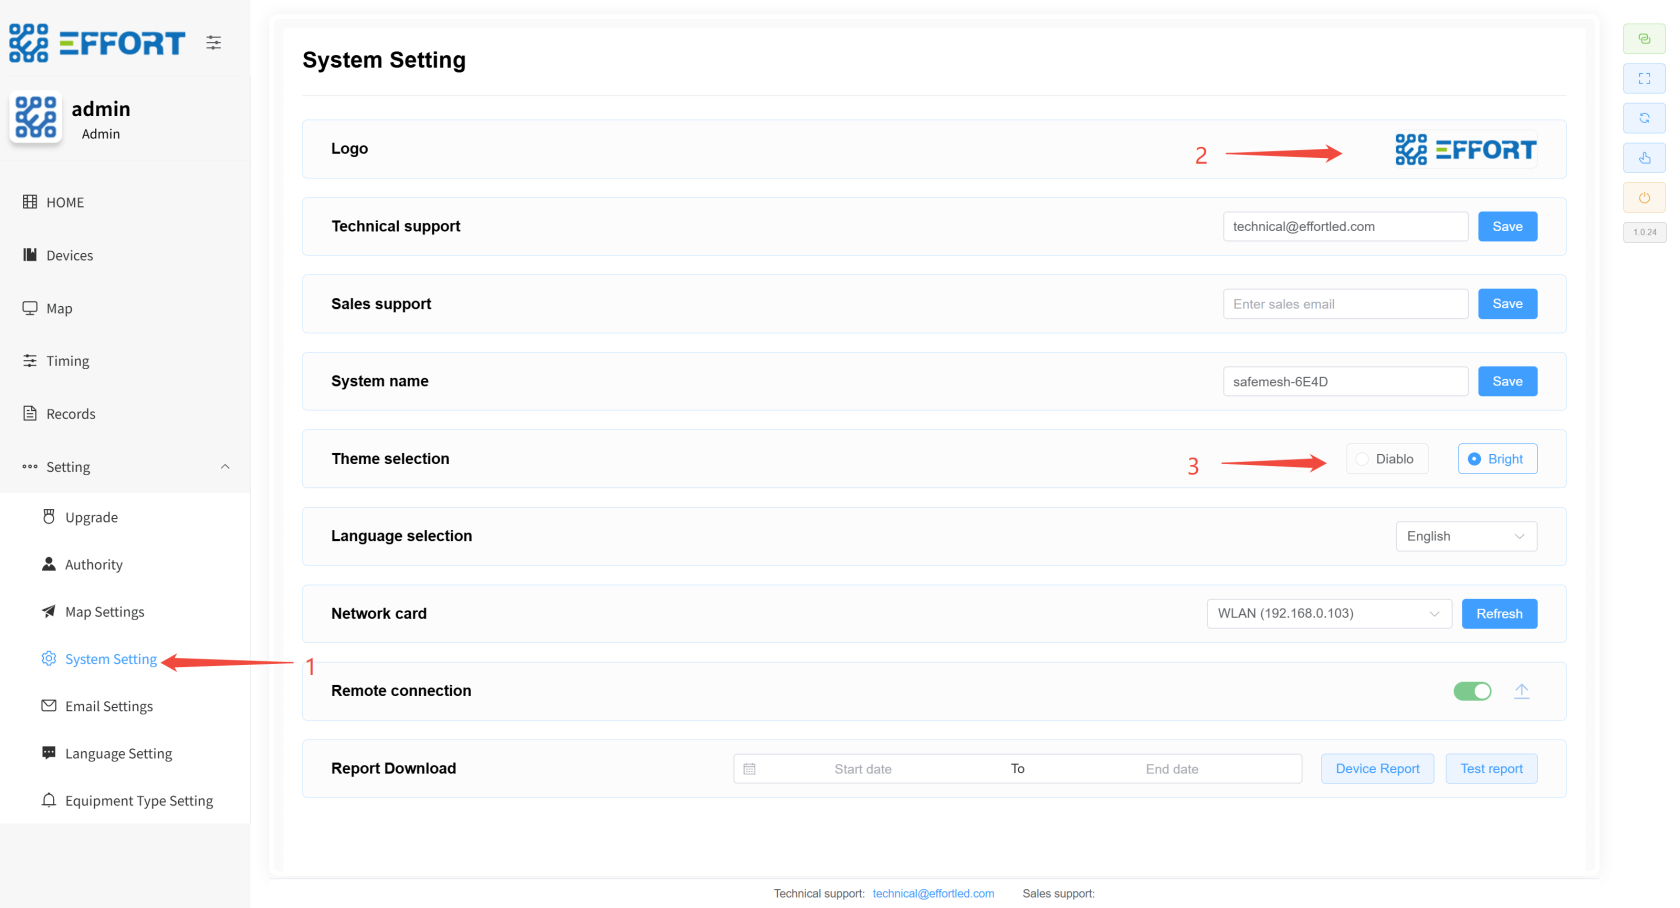](http://13.222.61.26:6875/uploads/images/gallery/2026-01/biqimage.png)
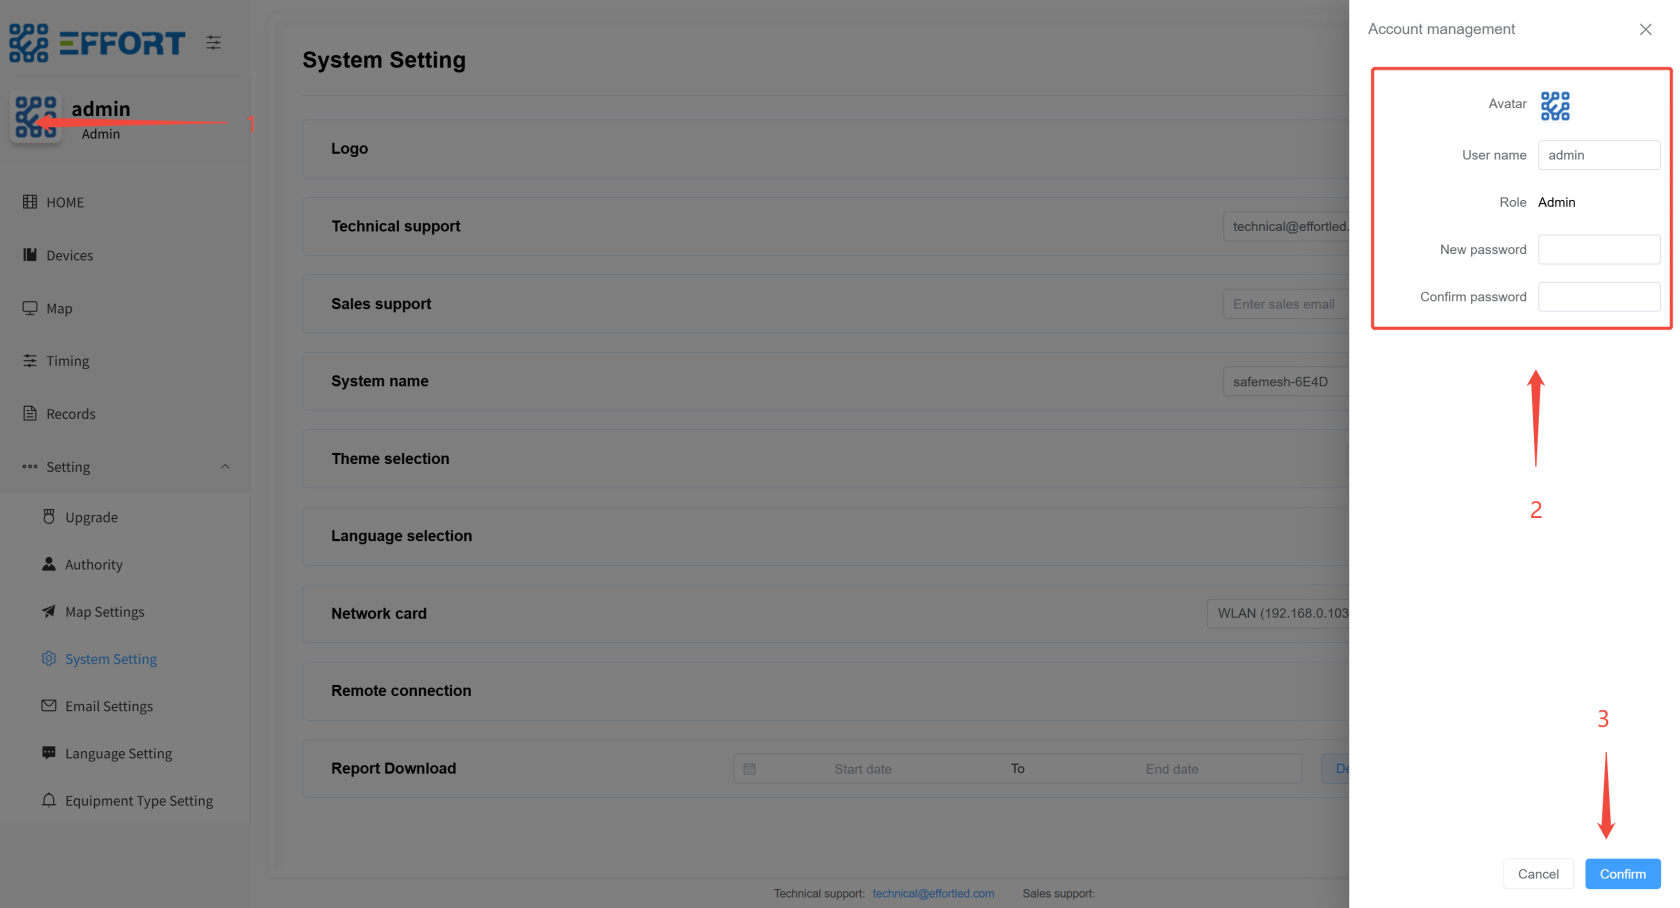
## 4.11 Modifying Personal Information 👤
- Step 1: Tap on your profile picture
- Step 2: Enter your personal information
- Step 3: Click OK to modify your personal information
---
[](http://13.222.61.26:6875/uploads/images/gallery/2026-01/astimage.png)
## 4.12 Gateway Firmware Upgrade ⚙️
- Step 1: Click Upgrade to go to the firmware upgrade page
- Step 2: Click Upload the new version of the firmware file
- Step 3: Select the gateway you want to upgrade
- Step 4: Click Start Upgrade and wait for the upgrade to complete
[](http://13.222.61.26:6875/uploads/images/gallery/2026-01/txiimage.png)
---
## 4.13 QR Code Positioning 👤
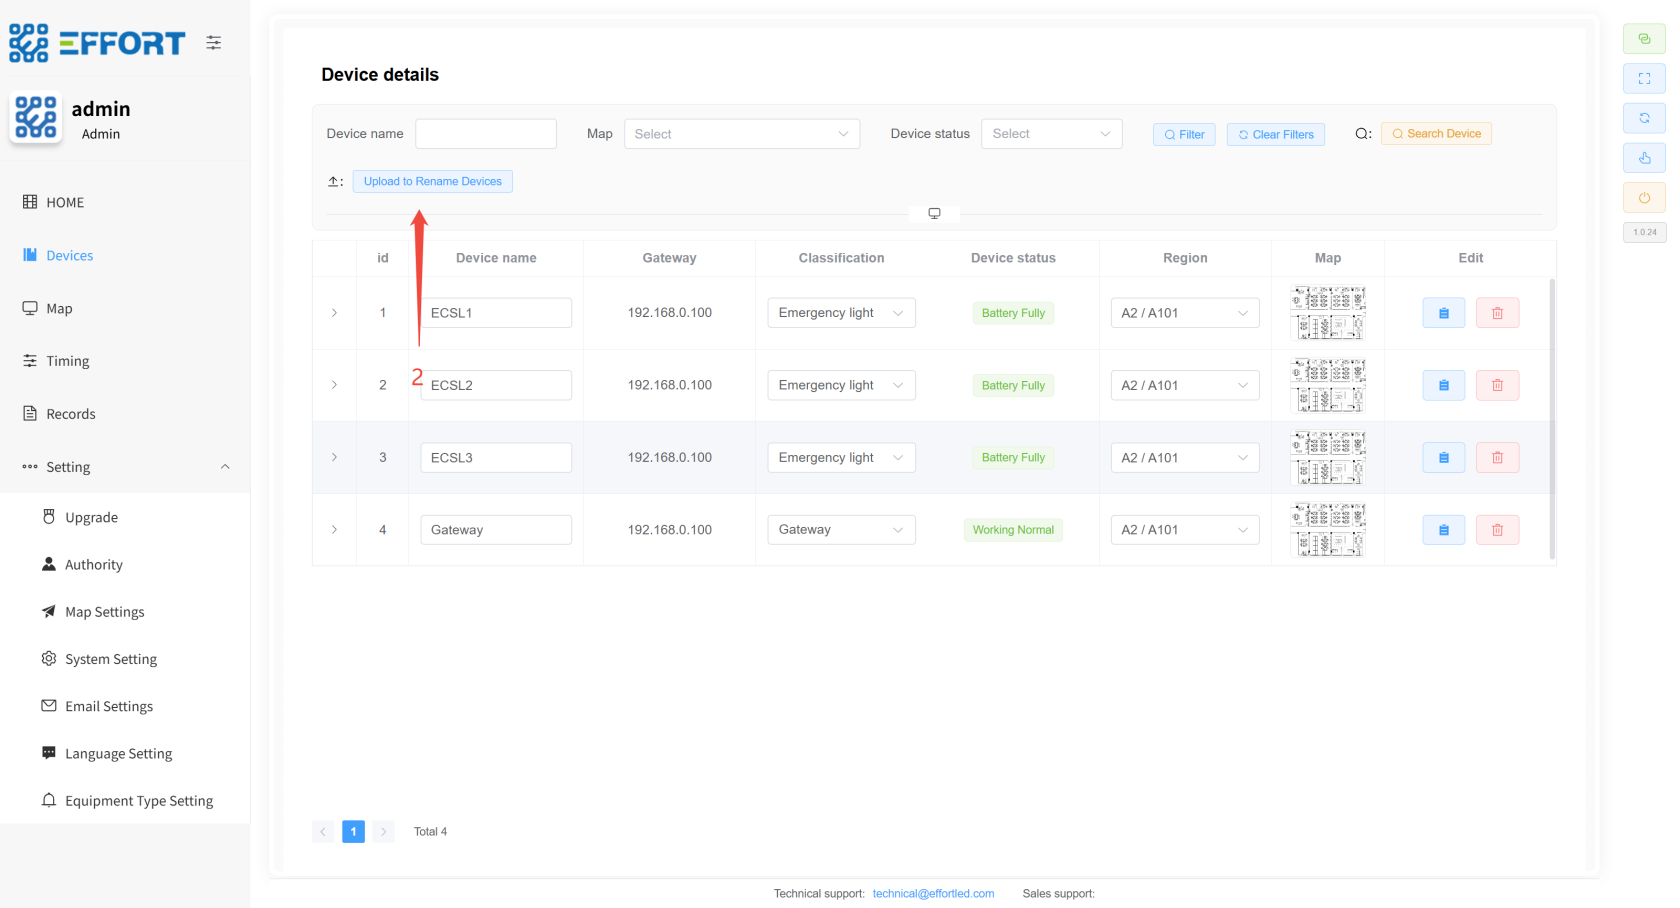
- Step 1: Transfer the form to the computer where the system is located
- Step 2: Go to the system device management page and click Choose File to import the table just now, and the device renaming is complete
[](http://13.222.61.26:6875/uploads/images/gallery/2026-01/Gjsimage.png)
