VI. Software User Operation and System Administration Manual
##### I. Cover* *
Product/System*
Name> Logo**本文档为 SafeMesh 系统的软件用户操作与系统管理手册**
> **Adaptation system version**: V1.0.0
> **Document version**: V1.0
> **Release date**: January 1, 2026
> **Published by**: EFFORT
*
Document Title: << Software Installation and Configuration Manual >
>* *
Applicable product/system version
*# Document
versionrevision records
| Version number
(e.g.,| v1.0)
* ReleaseRevision date
* Company Name & Logo
* Applicable Role Identification:
* 👤 Daily operation users (green mark)
* ⚙️ System Administrator (Blue Logo)
##### II. Documentation Revision Record
|
versionSummary |of Date | Revised content | Role taggingrevisions | Reviser
| Reviewer |
| --- | --- | --- | --- | --- |
|
v2.V1.0 |
2023/10/202026-1-1 |
OperationsInitial and management functions are combinedrelease |
👤⚙️JLJ |
Zhang GongShyne |
###### III. Dual-role navigation catalog双角色导航
* **👤
Operation Chapter*操作章节**
(Green Bookmark)
* ⚙️ Manage Chapters (Blue Bookmark)
* **
Universal⚙️管理章节**
Appendix**
(Black Bookmark)
##### IV. Preamble
###### **
4.1通用附录**
Document# Objectives**1.前言
## 1.1文档目标
* Let the system user know how to operate the system
######## **4.1.2 Target
audience**audience
* System users
######## 4.1.3 Document Scope
* Steps to use system functions
######## 4.1.4 Related Documentation
* Prerequisite Documentation: System Overview and Installation Guide (Must-Read)
* Related documents: "Product Introduction Guidelines" and "End Product Manual"
######## **4.1.5
Document文档架构
Architecture**## ###### **4.1.6
Role Permission Matrix**角色权限矩阵
| Functional modules | Operate user permissions | Admin permissions |
| --- | --- | --- |
| Device status view | ✔️ | ✔️ |
| User permission modifications | ✘ | ✔️ |
| User account management | ✘ | ✔️ |
######## **4.1.7
Symbology**符号系统
* ▶️ Indicates the start of the operation step
* ⚠️ Indicates key considerations
###### V.2\. Basic operations基础操作 👤
######## **5.2.1
Quick Guide to Workbenches**工作台快速指南
page页面 | Introduction介绍 |
| Home | The system is large系统大屏 |
DevicesDevice management | Device details table设备详情表页面 |
| Map management | Area details page区域详情页面 |
| Timing | Timed Test Rule Settings page定时测试规则设置页面 |
RecordsTest Info | Test Log page测试记录页面 |
| Setting/Upgrade | Gateway upgrade page网关升级页面 |
| Setting/Authority | Account configuration and permission configuration page账号配置、权限配置页面 |
| Setting/Map Settings | Map configuration page地图配置页面 |
| Setting/System Setting | System Settings page |
| Setting/Email Settings | Message configuration page |
| Setting/Language Settings | Customize the language configuration page |
| Setting/Equipment Type Settings | Device classification configuration page |
######## **5.2.2
Core核心功能操作
function### operation**
**5.2.2.1
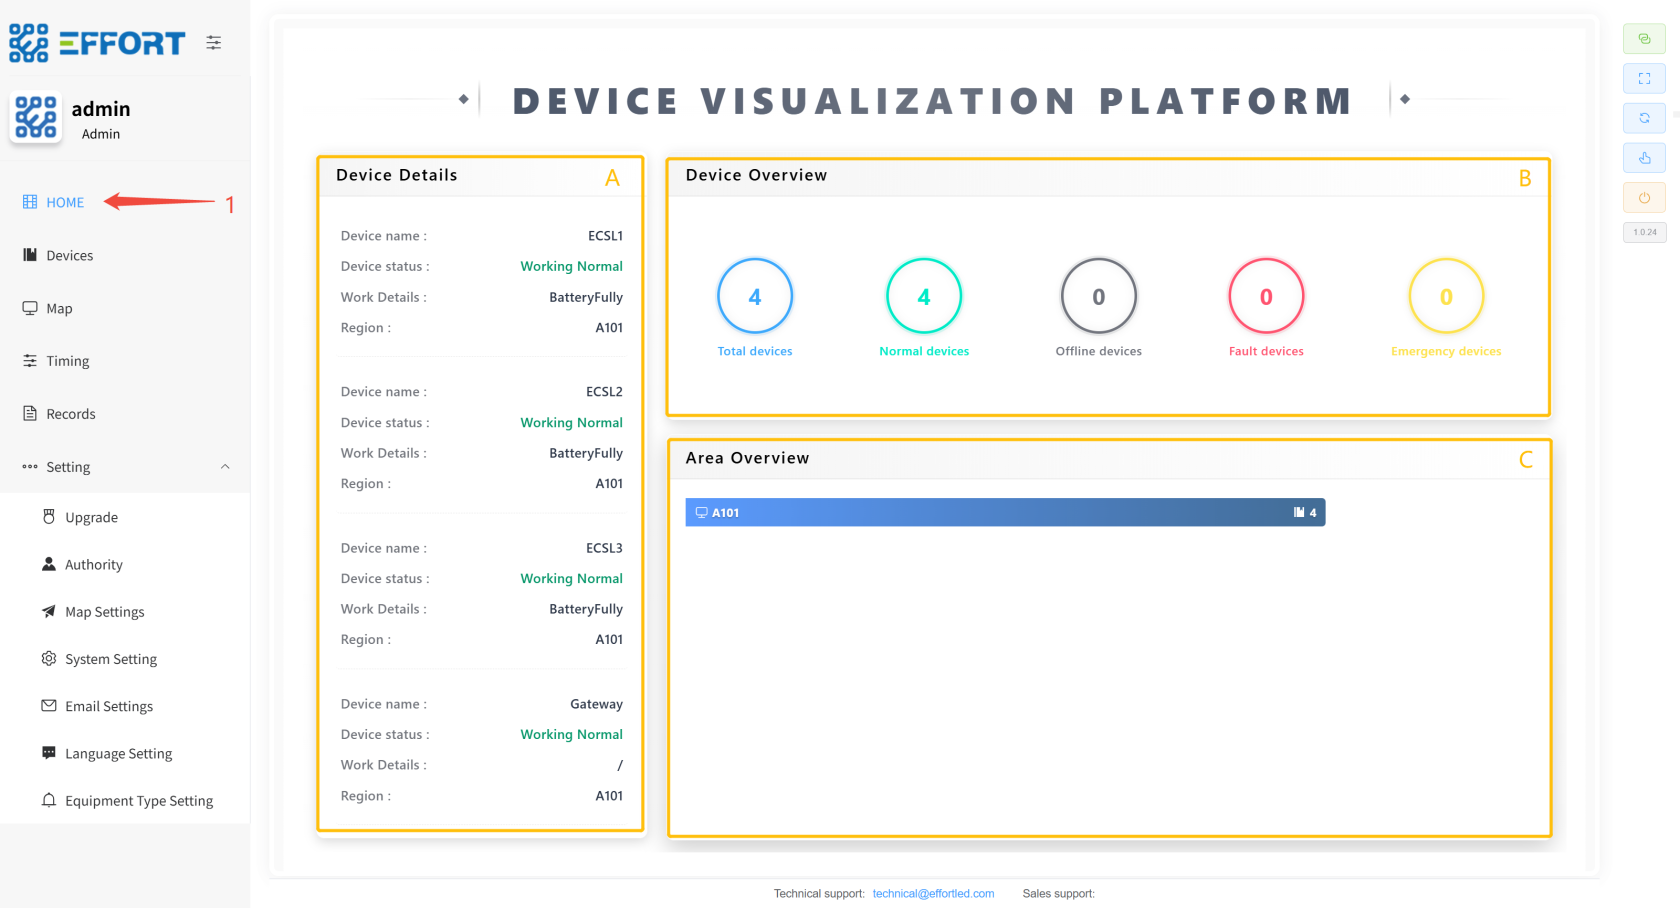
HOME**HOME
1. Step 1: Click Home to enter the large screen
2. Box A: Device details: device name, equipment status, work details, and location
3. Box B: Equipment Overview quantity information
4. Box C: Device area distribution information
[](http://13.222.61.26:6875/uploads/images/gallery/2026-01/image.png)
**5.### 2.2.2
Device**Device
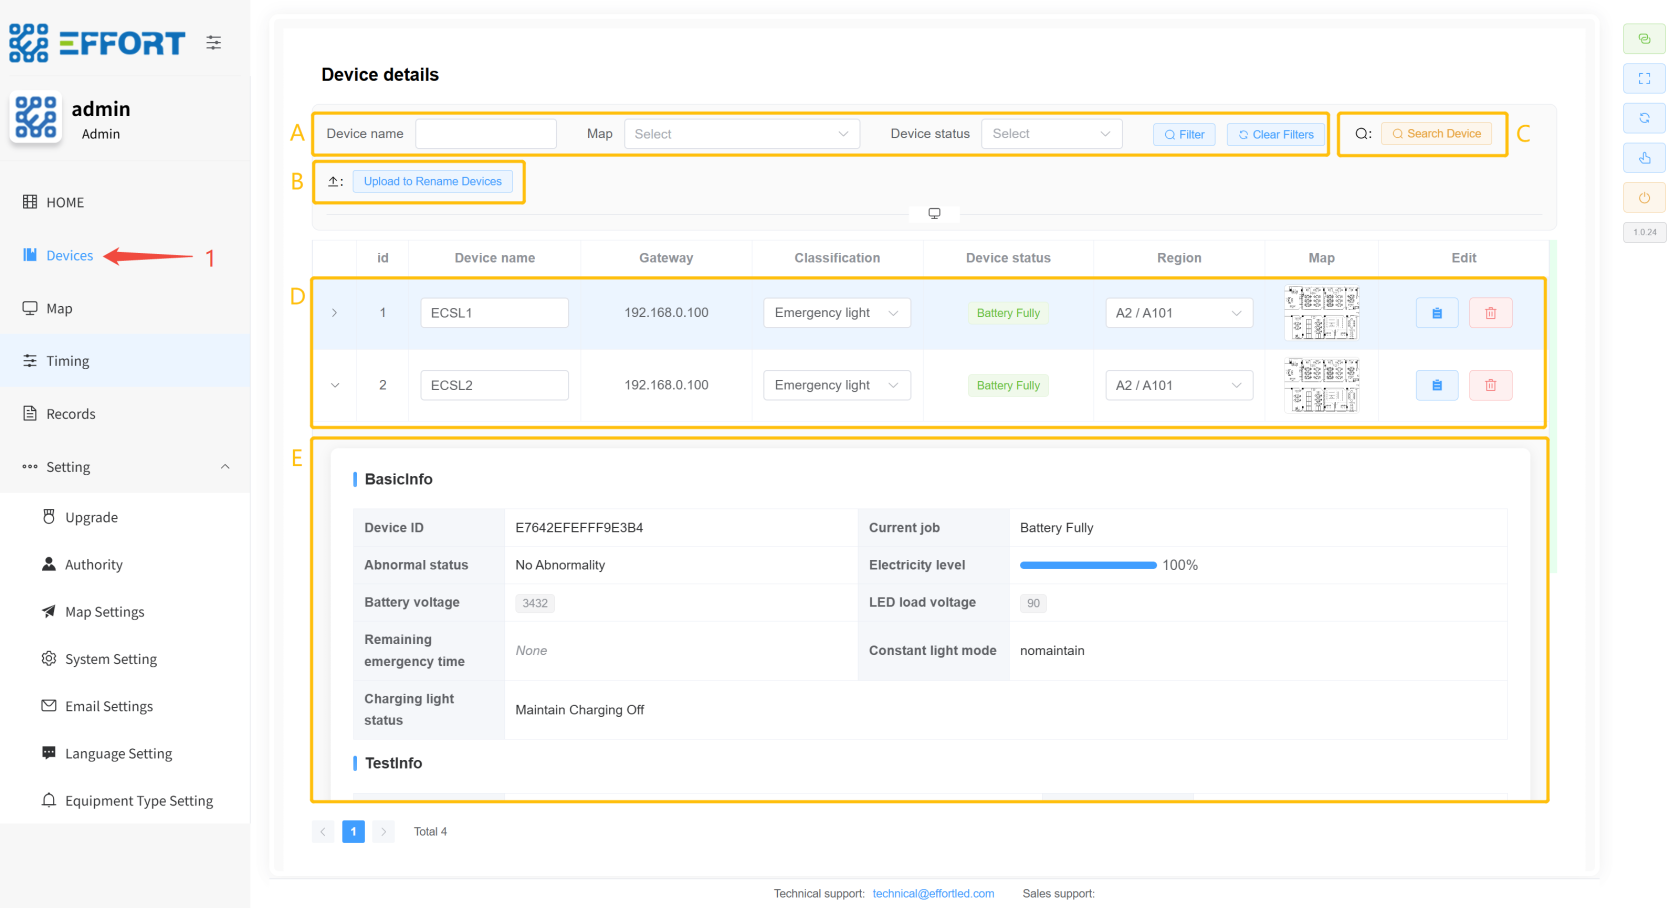
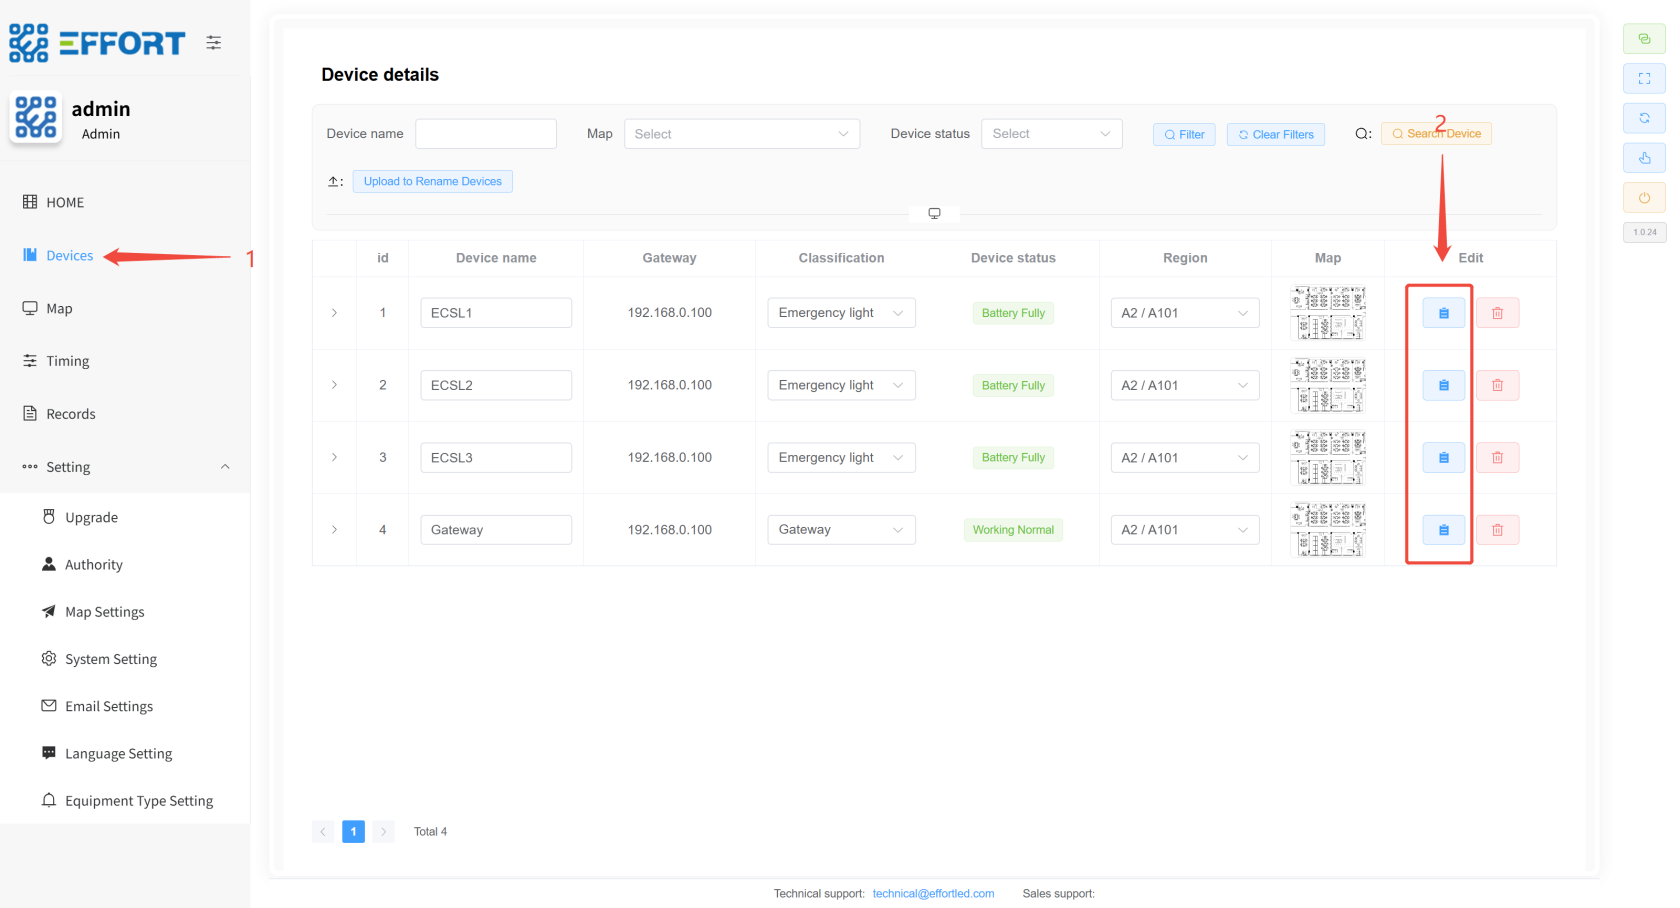
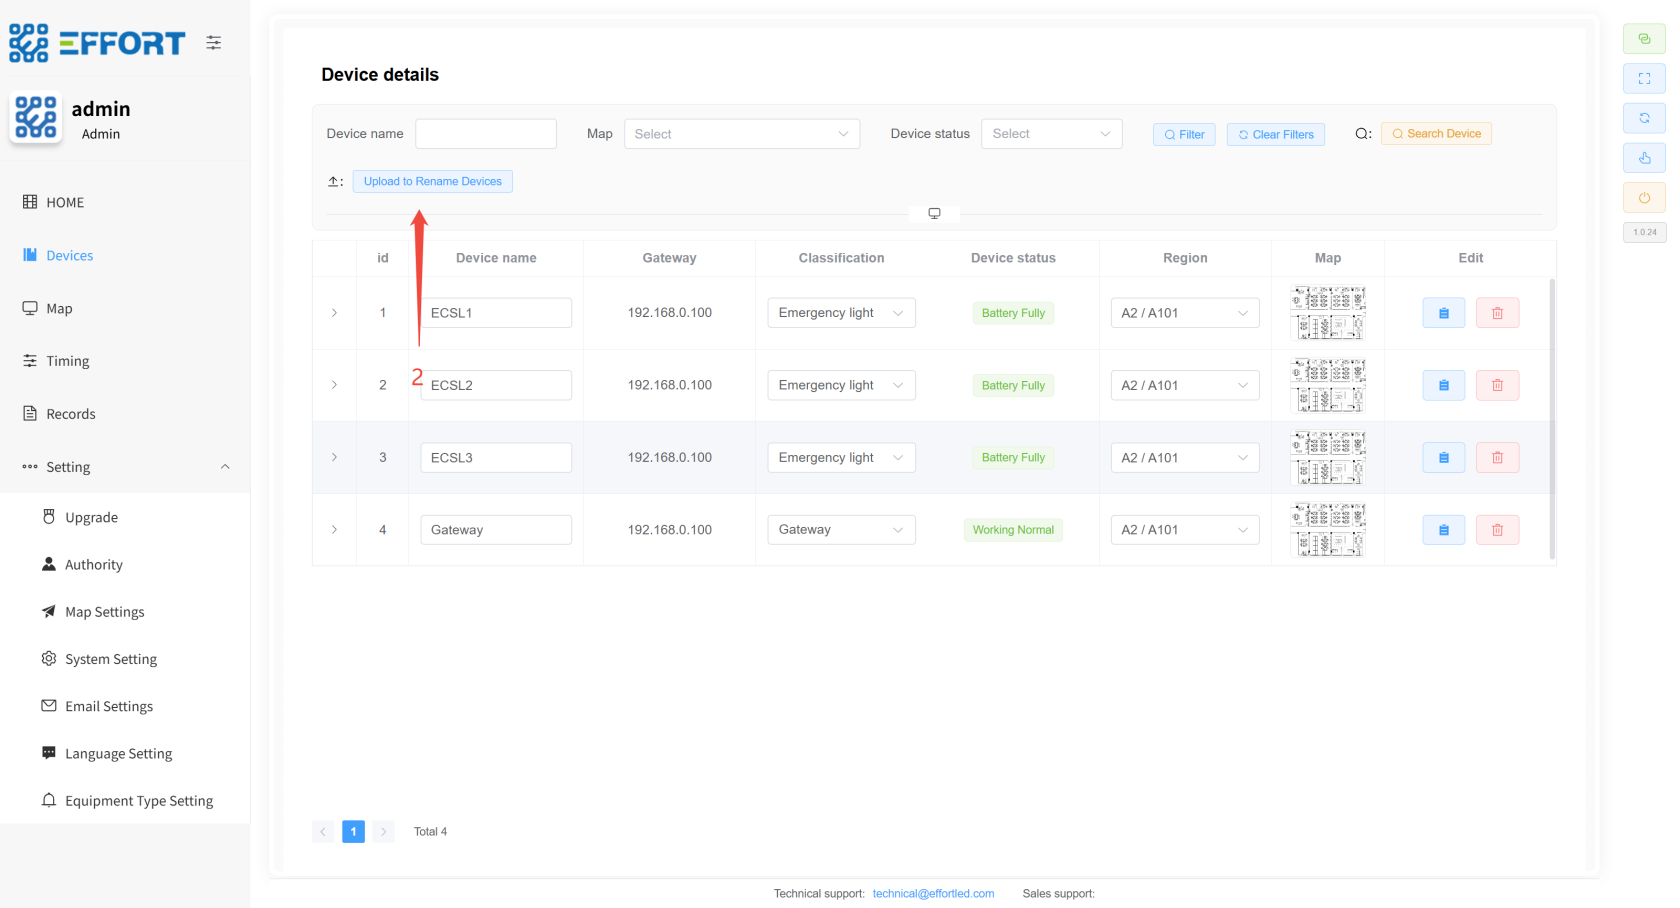
* **Device Details**
> Device Details: Search for gateways, search for devices, device details, device tests, and other function pages
1. Step 1: Click on Device to enter
2. Box A: Device query action bar
3. Box B: Upload Device Rename File button
4. Box C: Search for device button
5. Box D: Basic device information: serial number, device name, gateway, classification, status, and region
6. Box E: Device Details: Device ID, Battery, Battery Voltage, Remaining Emergency Time, LED Load Voltage, Last Function Check Result, Number of Function Checks, Last Life Check Result, Number of Life Checks, Time Since Last Life Check, Last Life Check Duration, Maintain Mode, Charging Light Status
[](http://13.222.61.26:6875/uploads/images/gallery/2026-01/2AJimage.png)
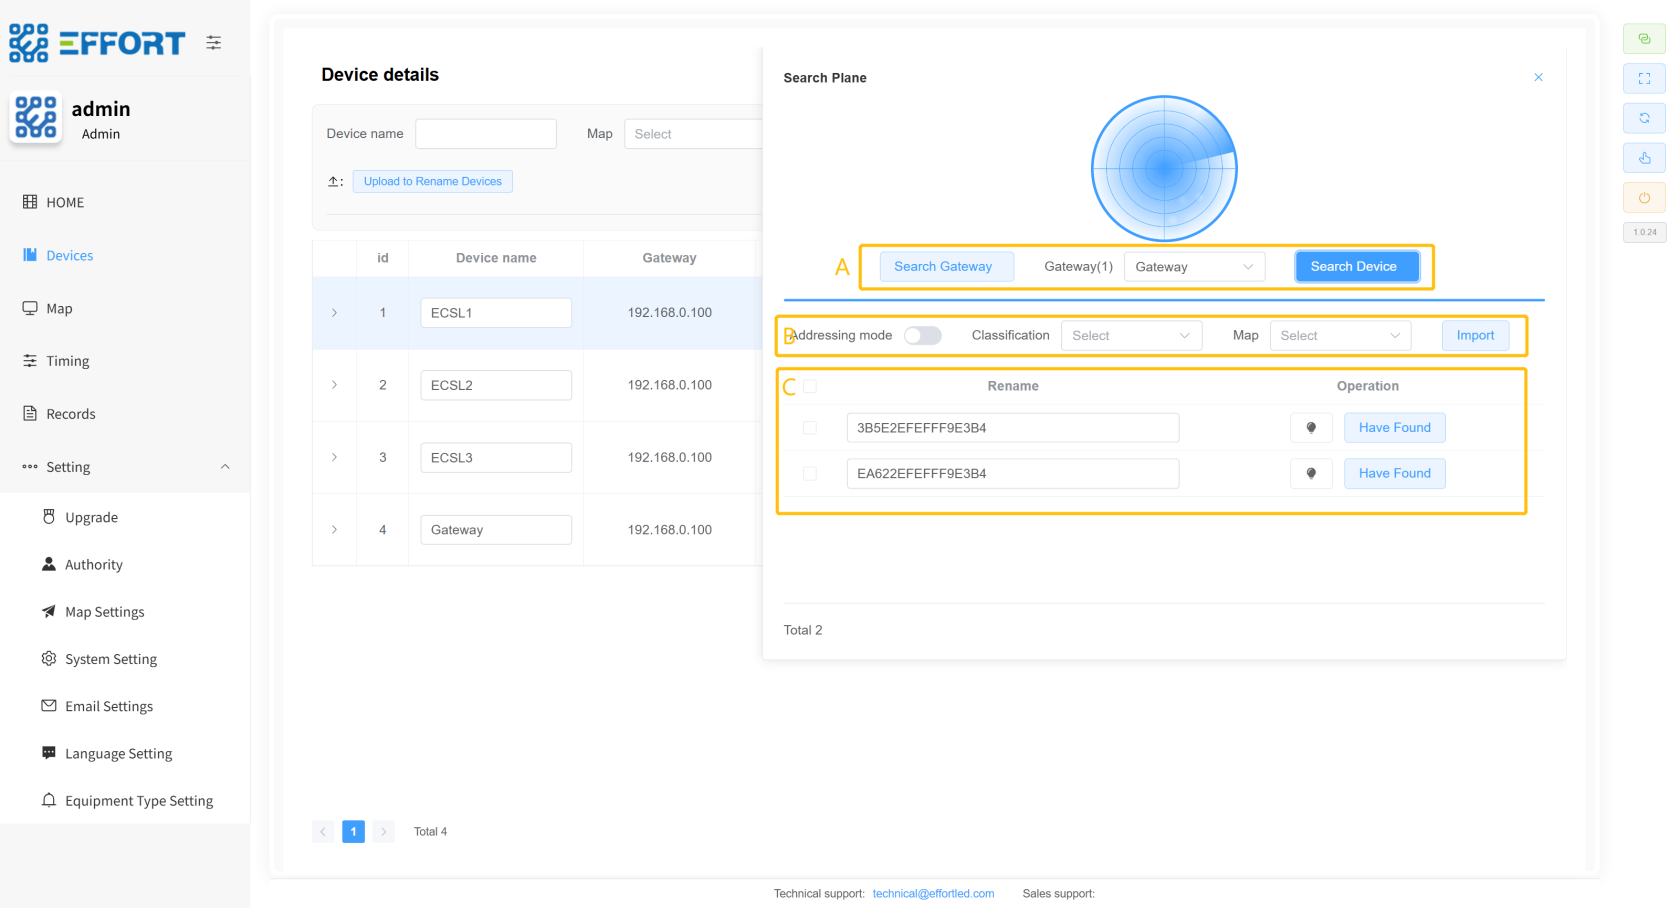
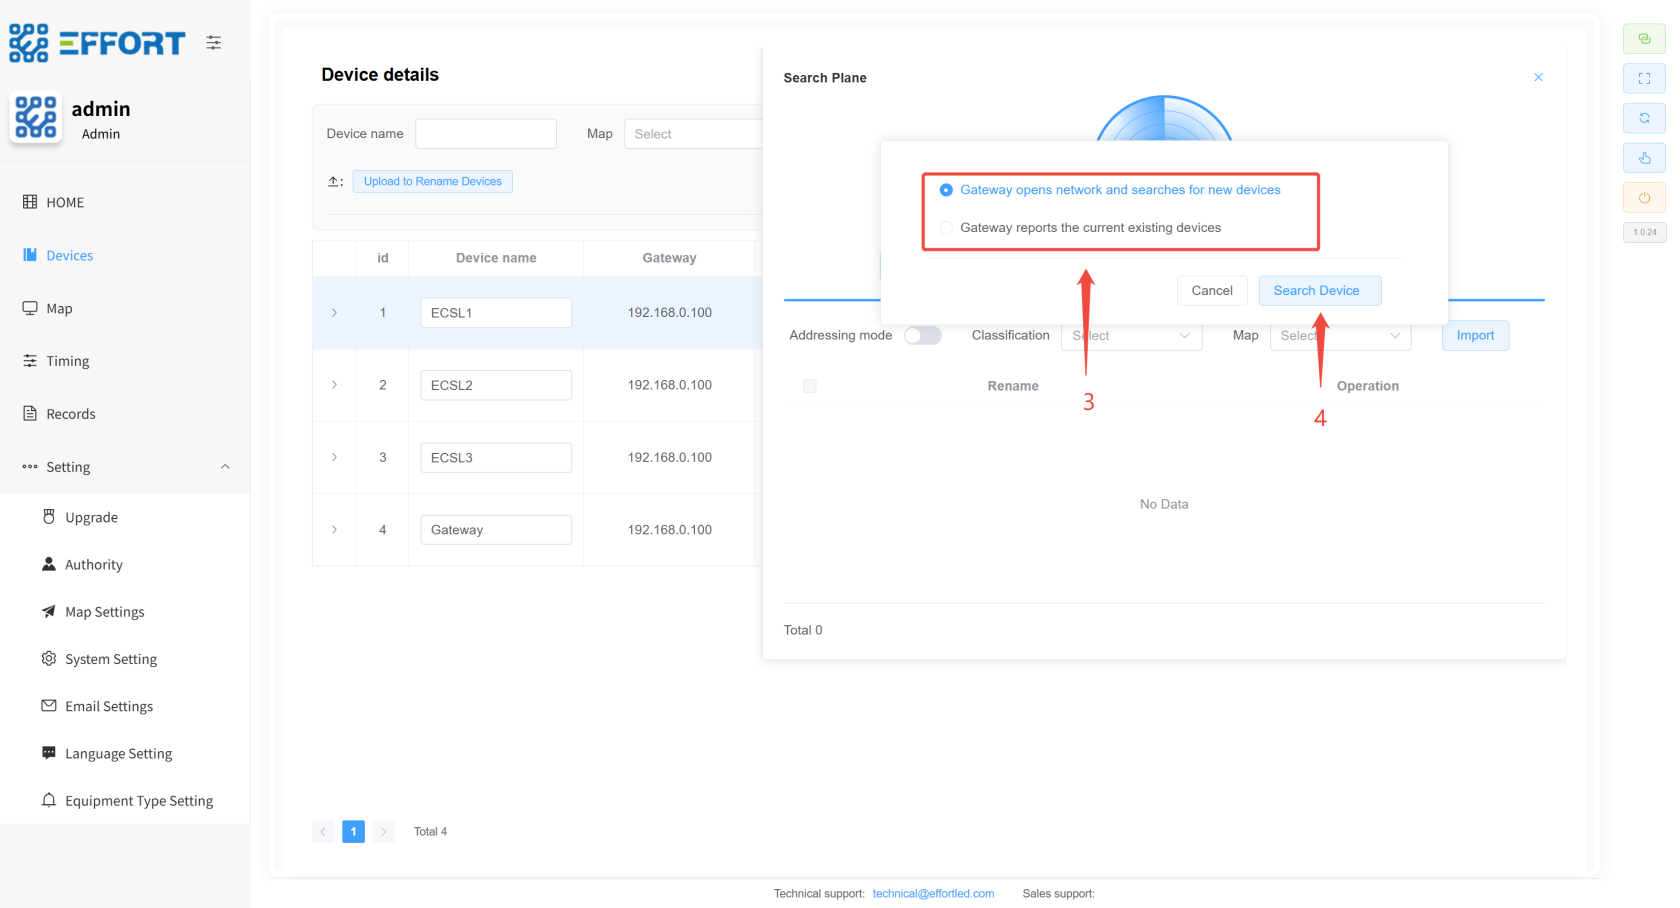
* **Search panel**
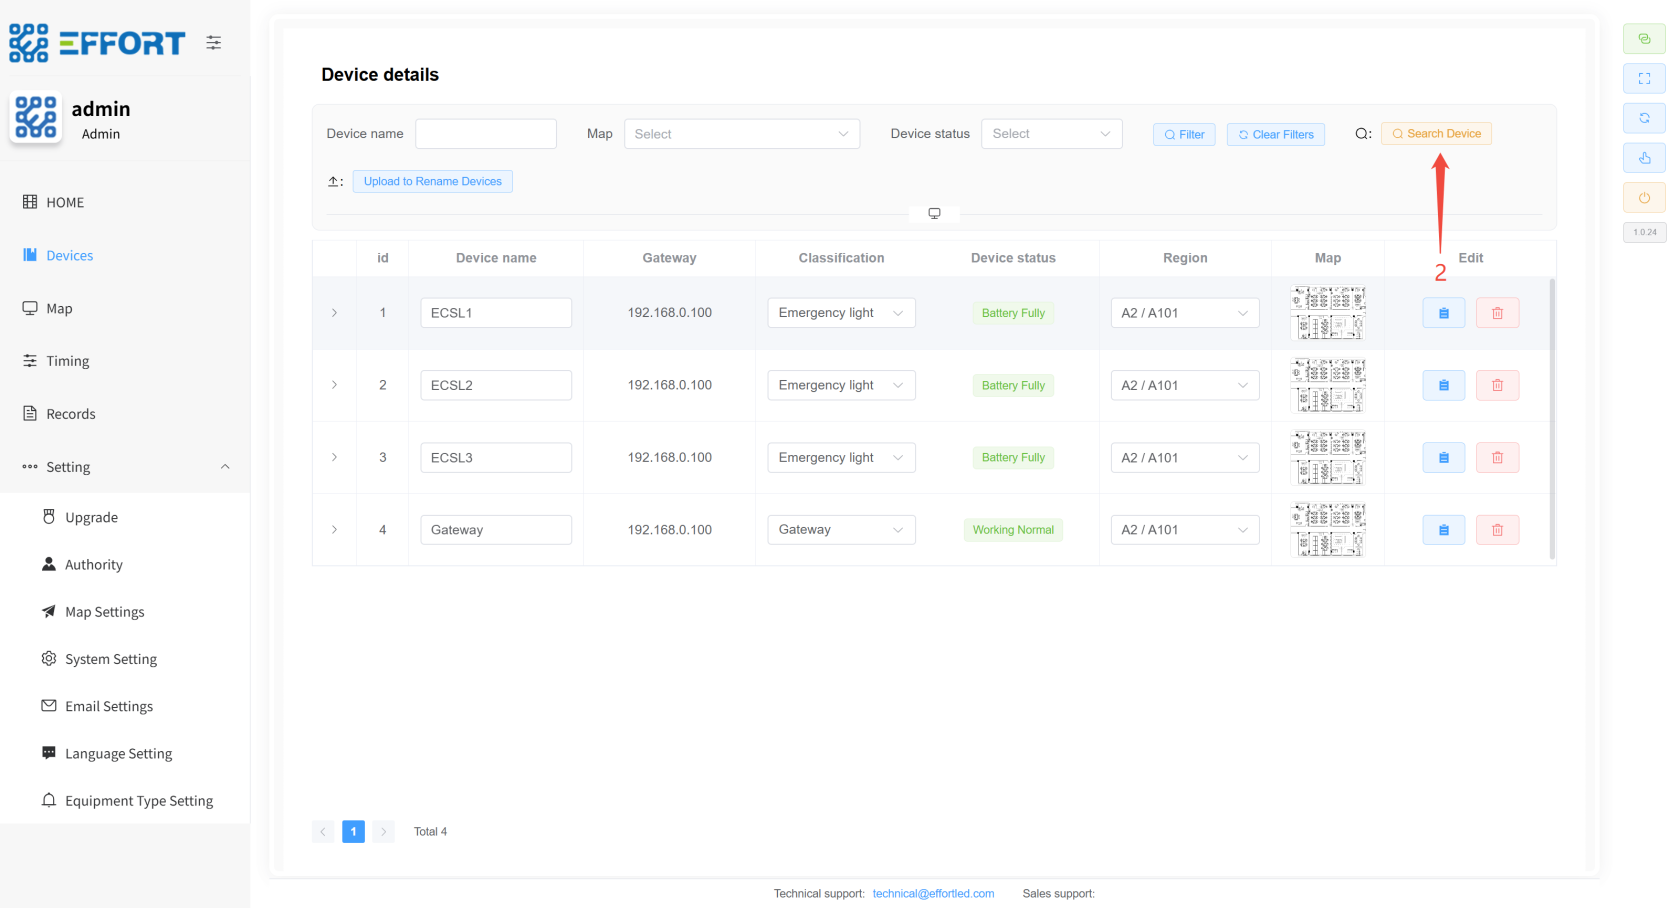
1. Step 2: Click the Search Device button
2. Box A: Search for gateways, device operation bars
3. Box C: Addressing mode switch, device classification, area link, device import button
4. Box D: Searched device information: device ID, device in-line operation
[](http://13.222.61.26:6875/uploads/images/gallery/2026-01/NoBimage.png)
[](http://13.222.61.26:6875/uploads/images/gallery/2026-01/c4timage.png)
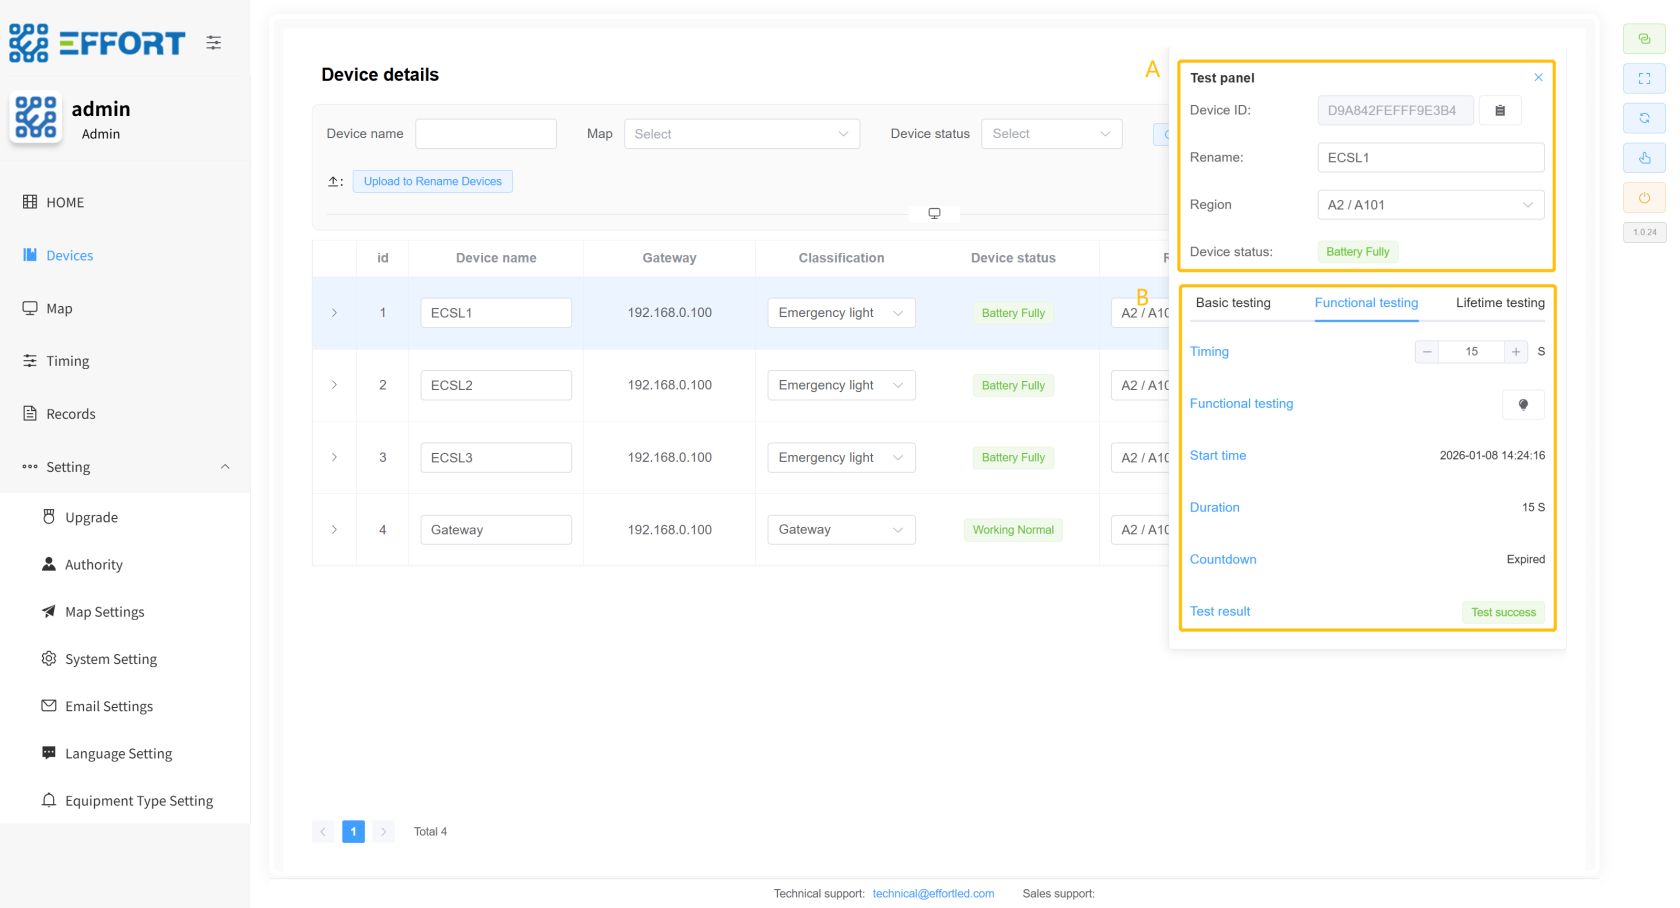
* **Device details panel**
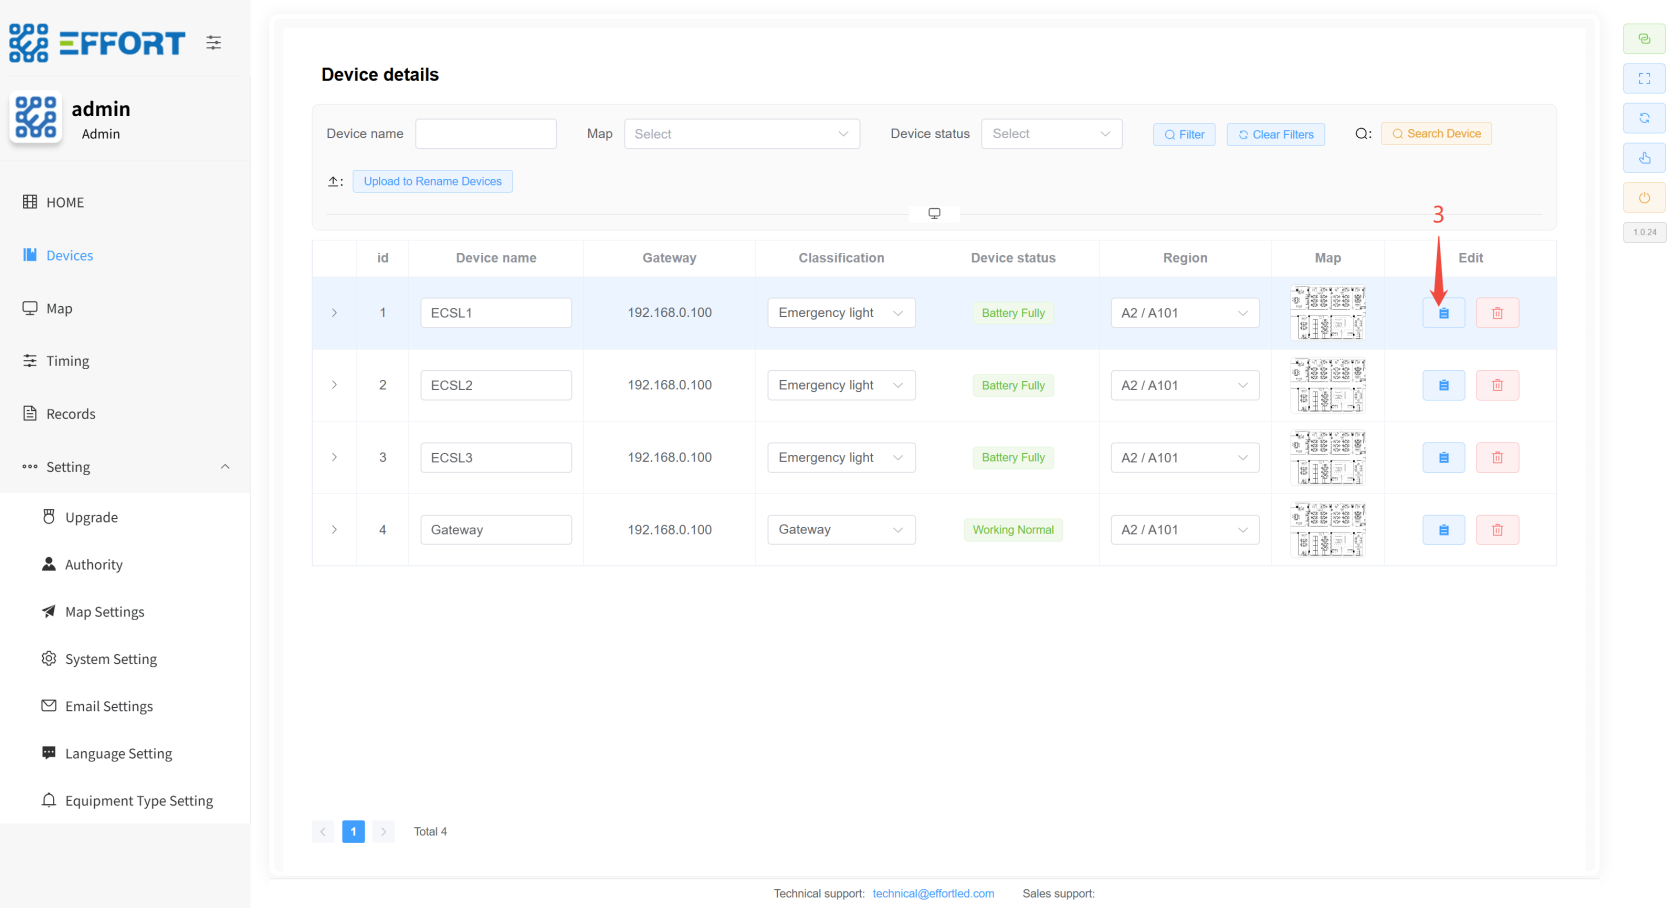
1. Step 3: Click the Device Details button
2. Box A: Device basic information: device ID, rename, region, device status
3. Box B: Device Test Control Panel:
1. Basic testing: addressing button, emergency switch, maintain switch
2. Functional testing: Timer time, test button, start time, duration, countdown, test result
3. Lifetime testing: Timer time, test button, start time, duration, countdown, test results
[](http://13.222.61.26:6875/uploads/images/gallery/2026-01/weVimage.png)
[](http://13.222.61.26:6875/uploads/images/gallery/2026-01/Cfoimage.png)
**5.### 2.
42.3 Map
management**management
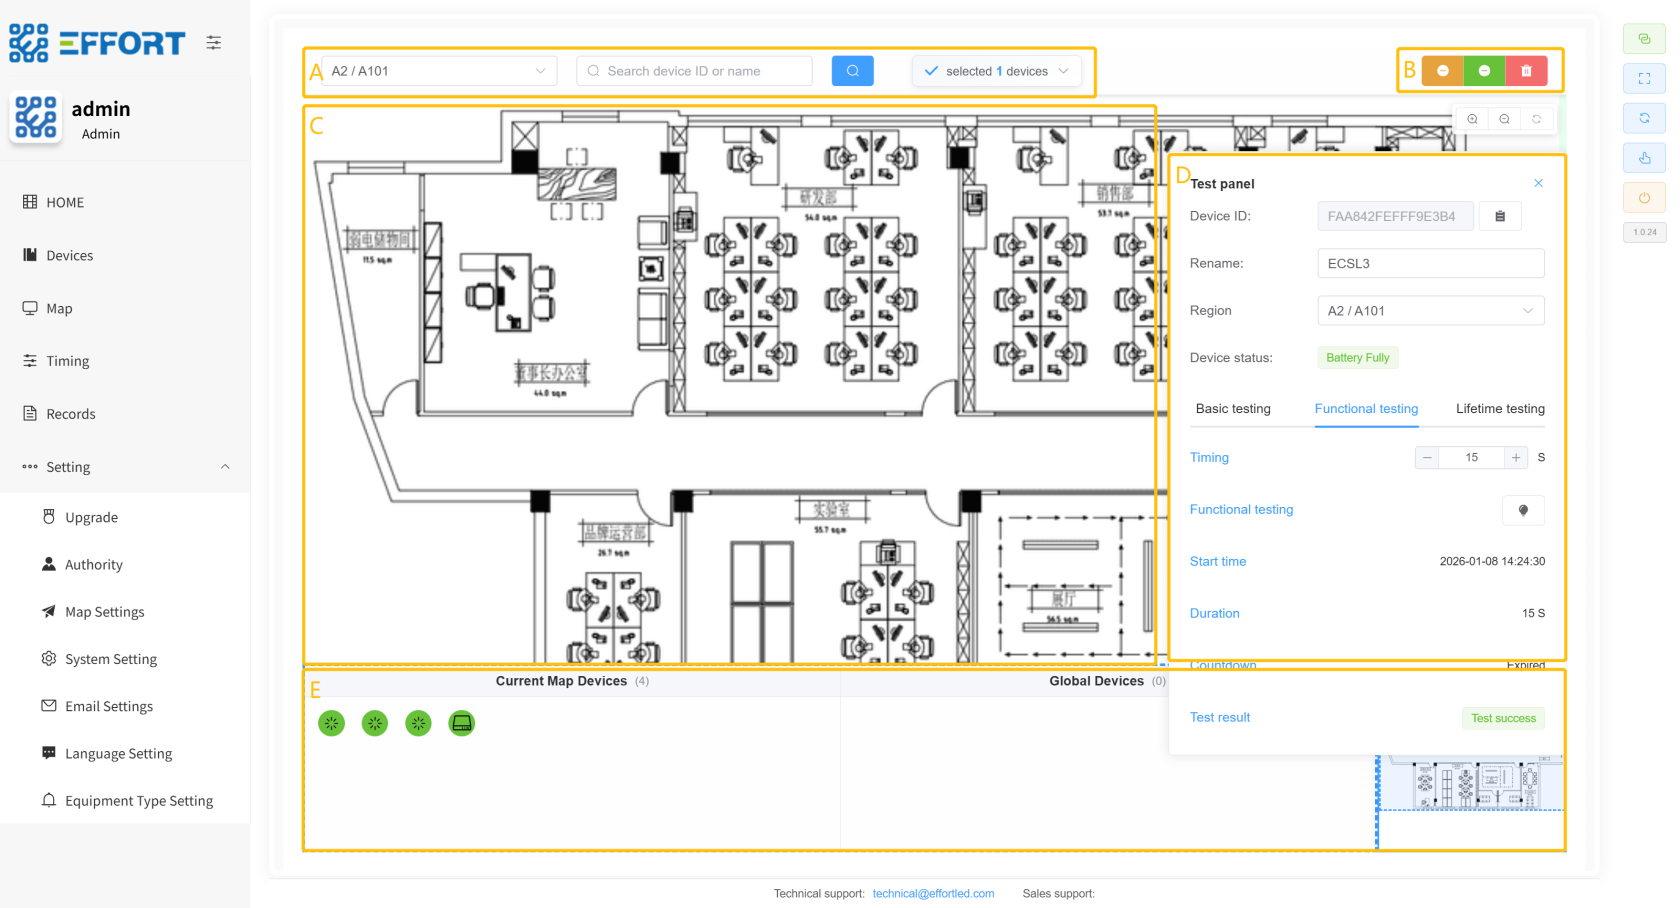
1. Step 1: Click Map
2. Step 2: Tap Area
3. Box A: Current area, Find device input box, Number of devices selected
4. Box B: Uninstall button, unbind button, delete button
5. Box C: Area master map
6. Box D: Device details panel
7. Box E: Current Area Devices, Unassigned Devices, Thumbnails
[](http://13.222.61.26:6875/uploads/images/gallery/2026-01/nZ9image.png)
[](http://13.222.61.26:6875/uploads/images/gallery/2026-01/tvRimage.png)
**5.### 2.
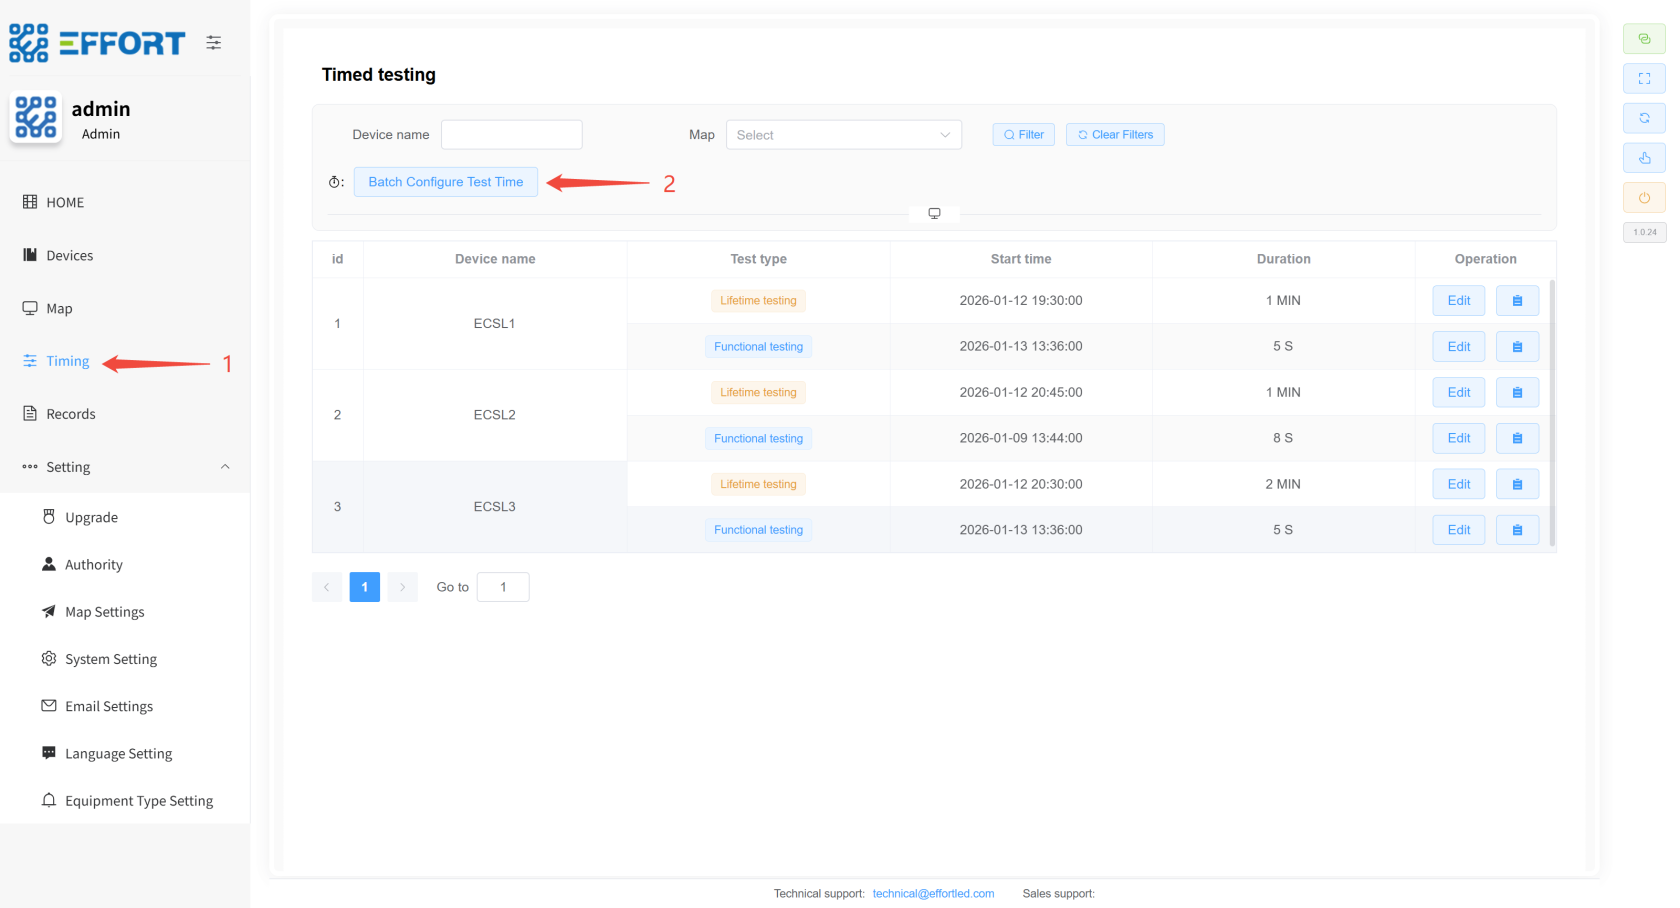
52.4 Timing**Timing
> Timing: Timed test rule settings page
1. Step 1: Click Timing
2. Box A: Timed Rule Search and Action Bar
3. Box B: Timing Rule Information Table: Serial Number, Device Name, Test Type, Start Time, Duration, Operation Bar
[](http://13.222.61.26:6875/uploads/images/gallery/2026-01/Zf5image.png)
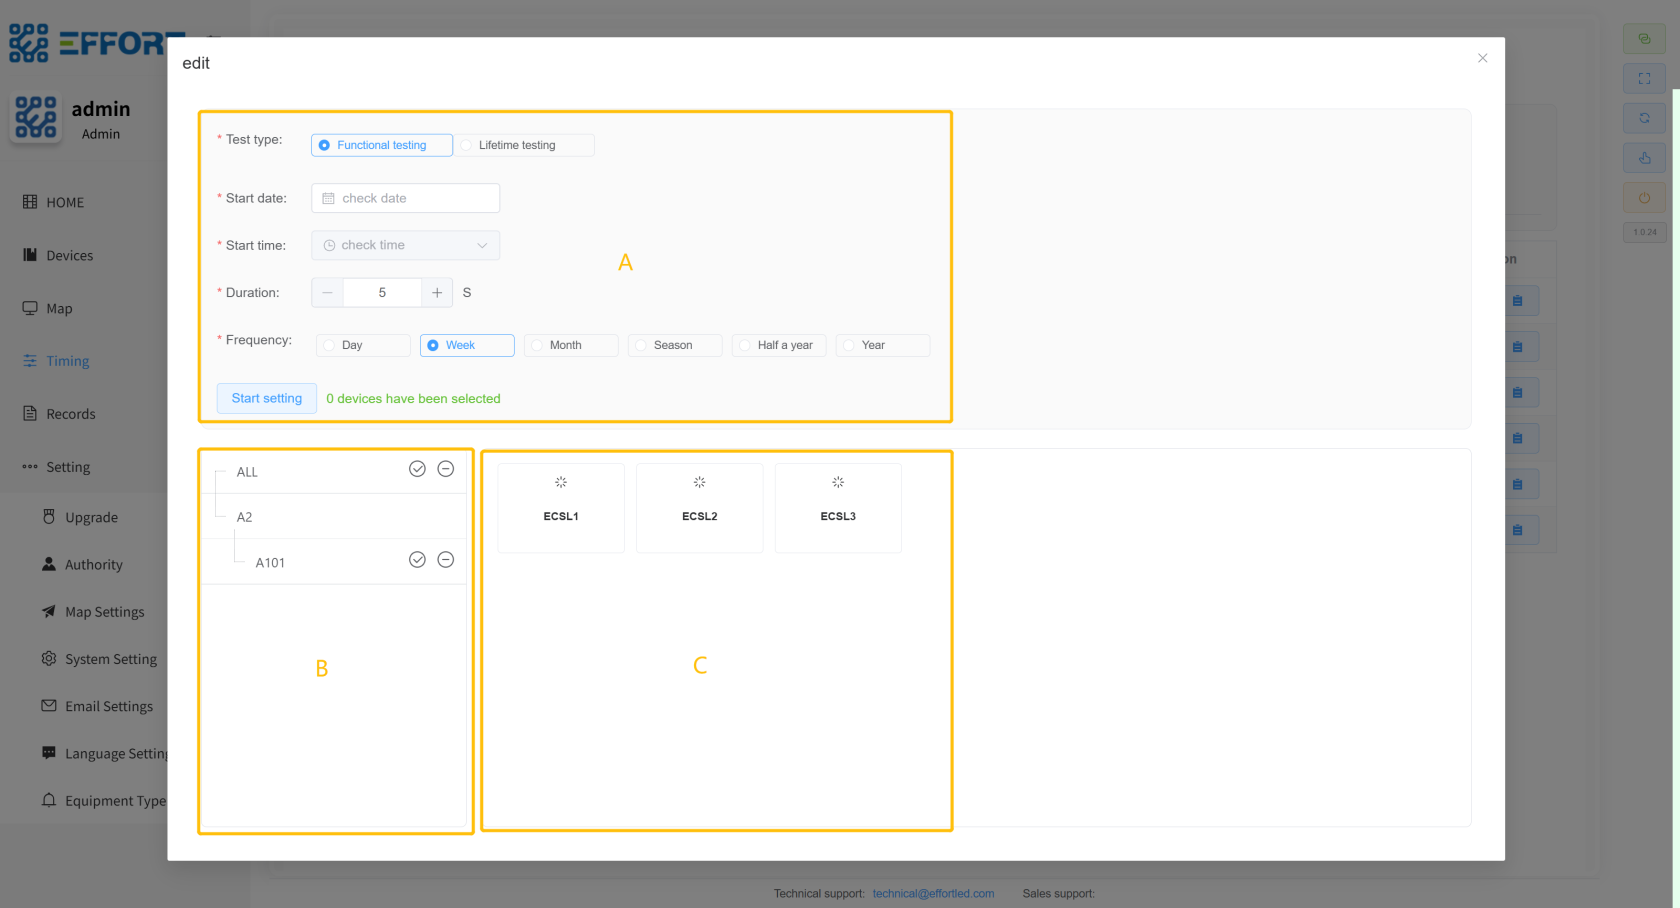
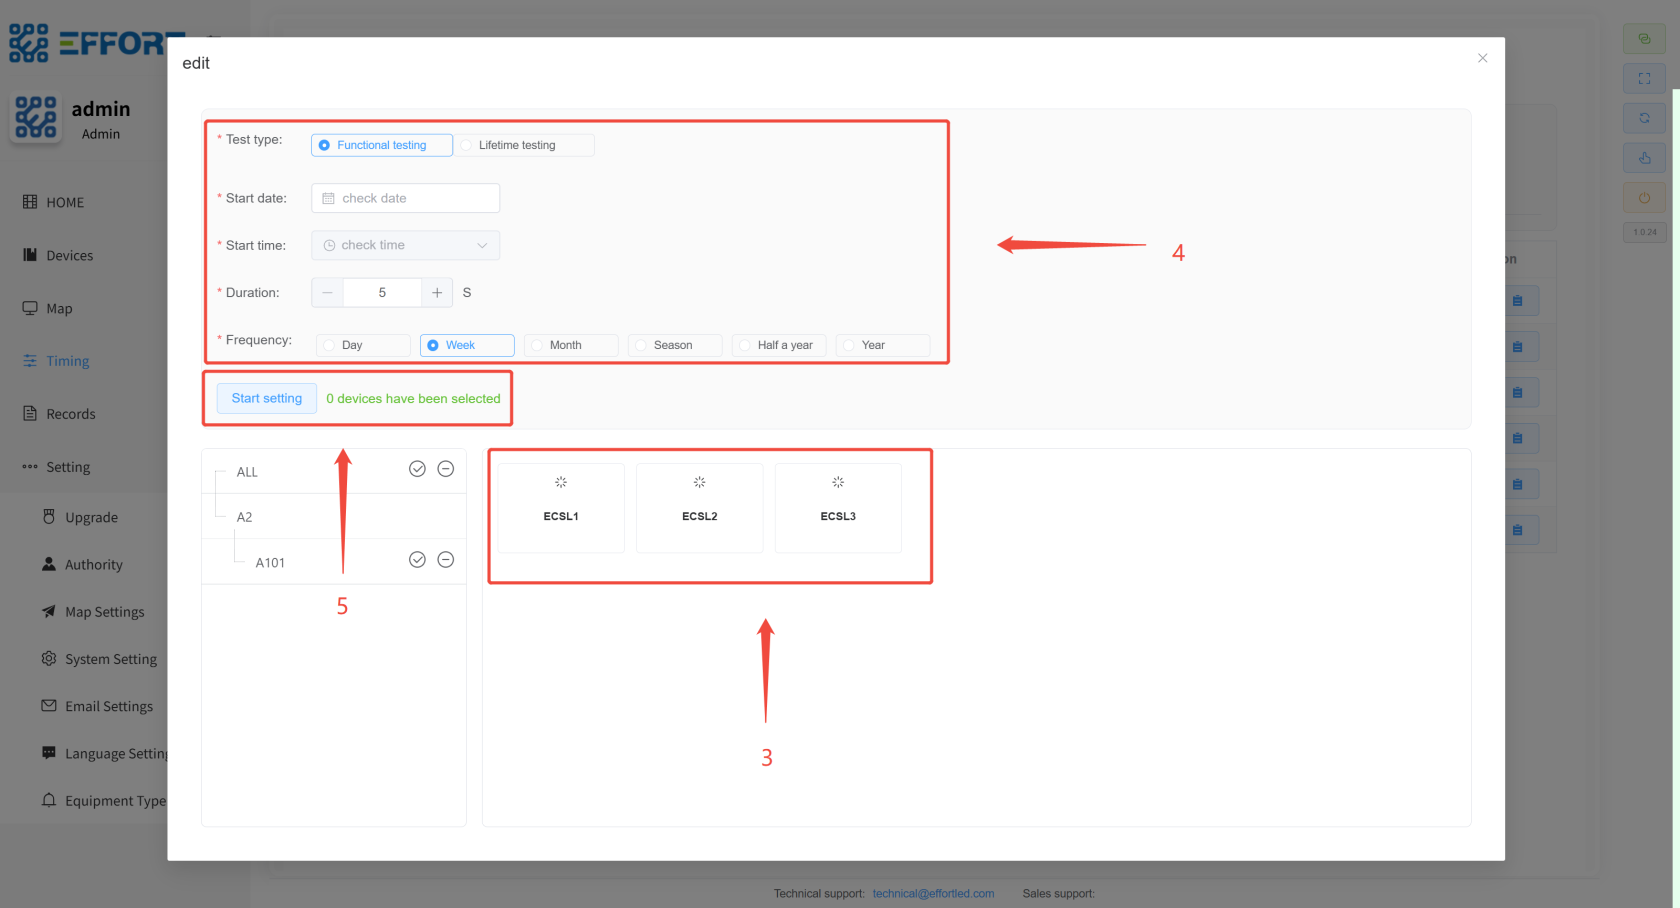
* **Timing rule setting pop-up**
1. Step 2: Click Batch Configure Test Time to open the Timing Rule Settings pop-up window
2. Box A: Timing rule configuration: test type, start date, start time, duration, test frequency
3. Box B: Area classification filter to filter the devices on the right
4. Box C: List of devices within the left area
[](http://13.222.61.26:6875/uploads/images/gallery/2026-01/nL4image.png)
* **A pop-up window for setting a single timing rule**
1. Step 3: Click Edit to open the Single Timing Rule Setting pop-up window
2. Box D: Timing Rule Configuration: Test Type, Start Date, Start Time, Duration, Test Frequency, Current Device
[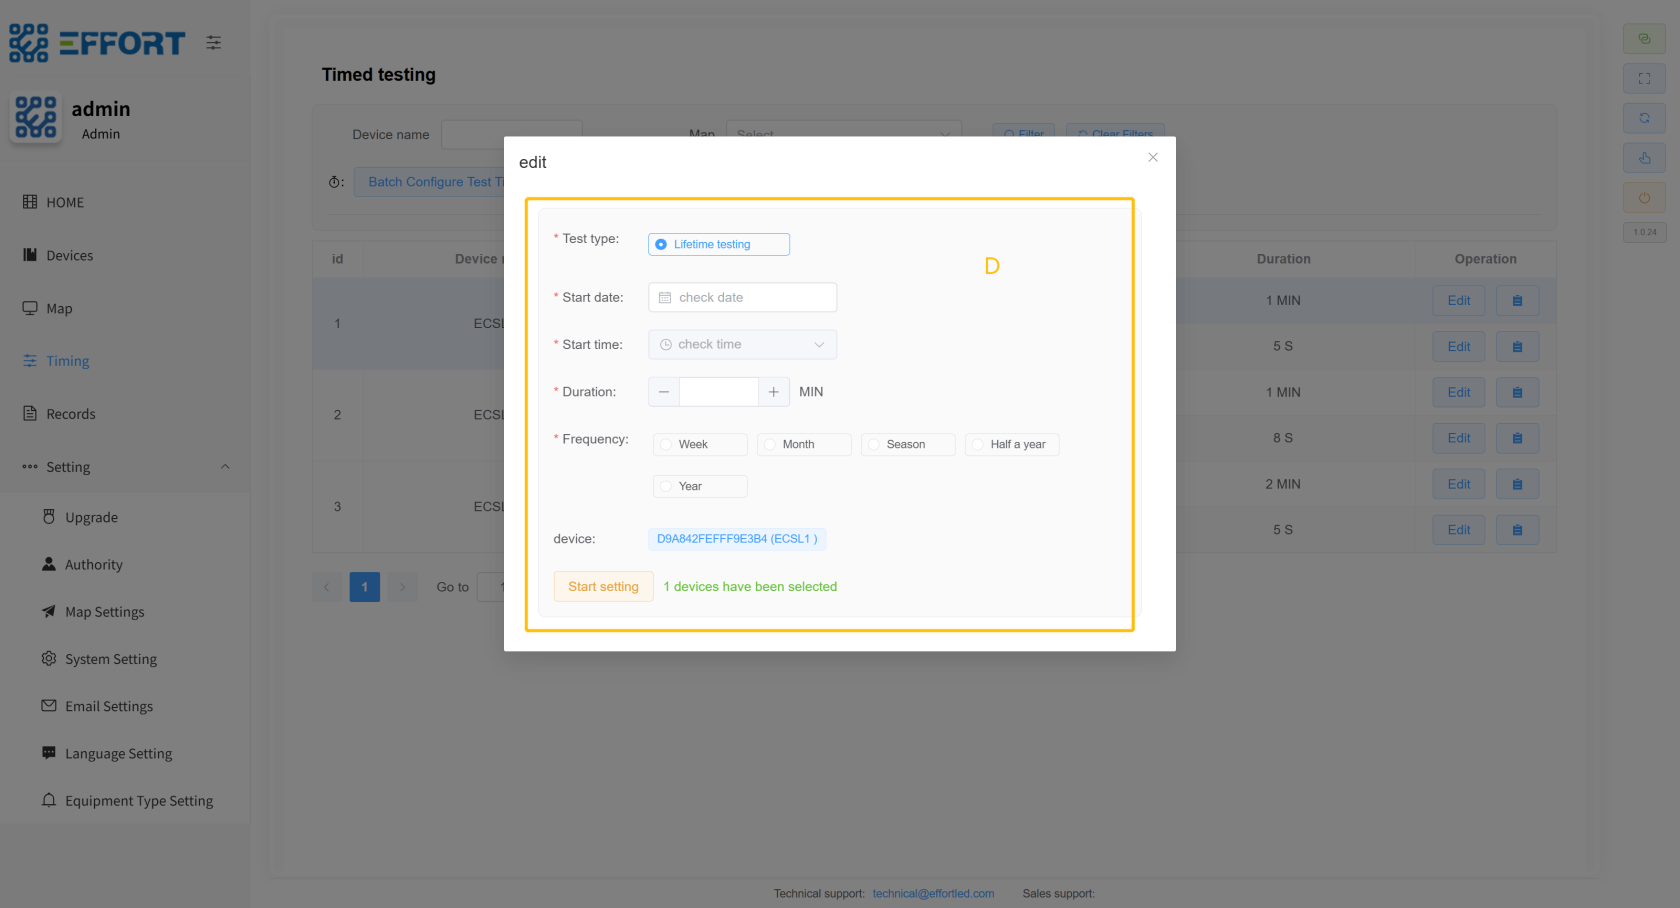](http://13.222.61.26:6875/uploads/images/gallery/2026-01/zmgimage.png)
* * *
**5.### 2.
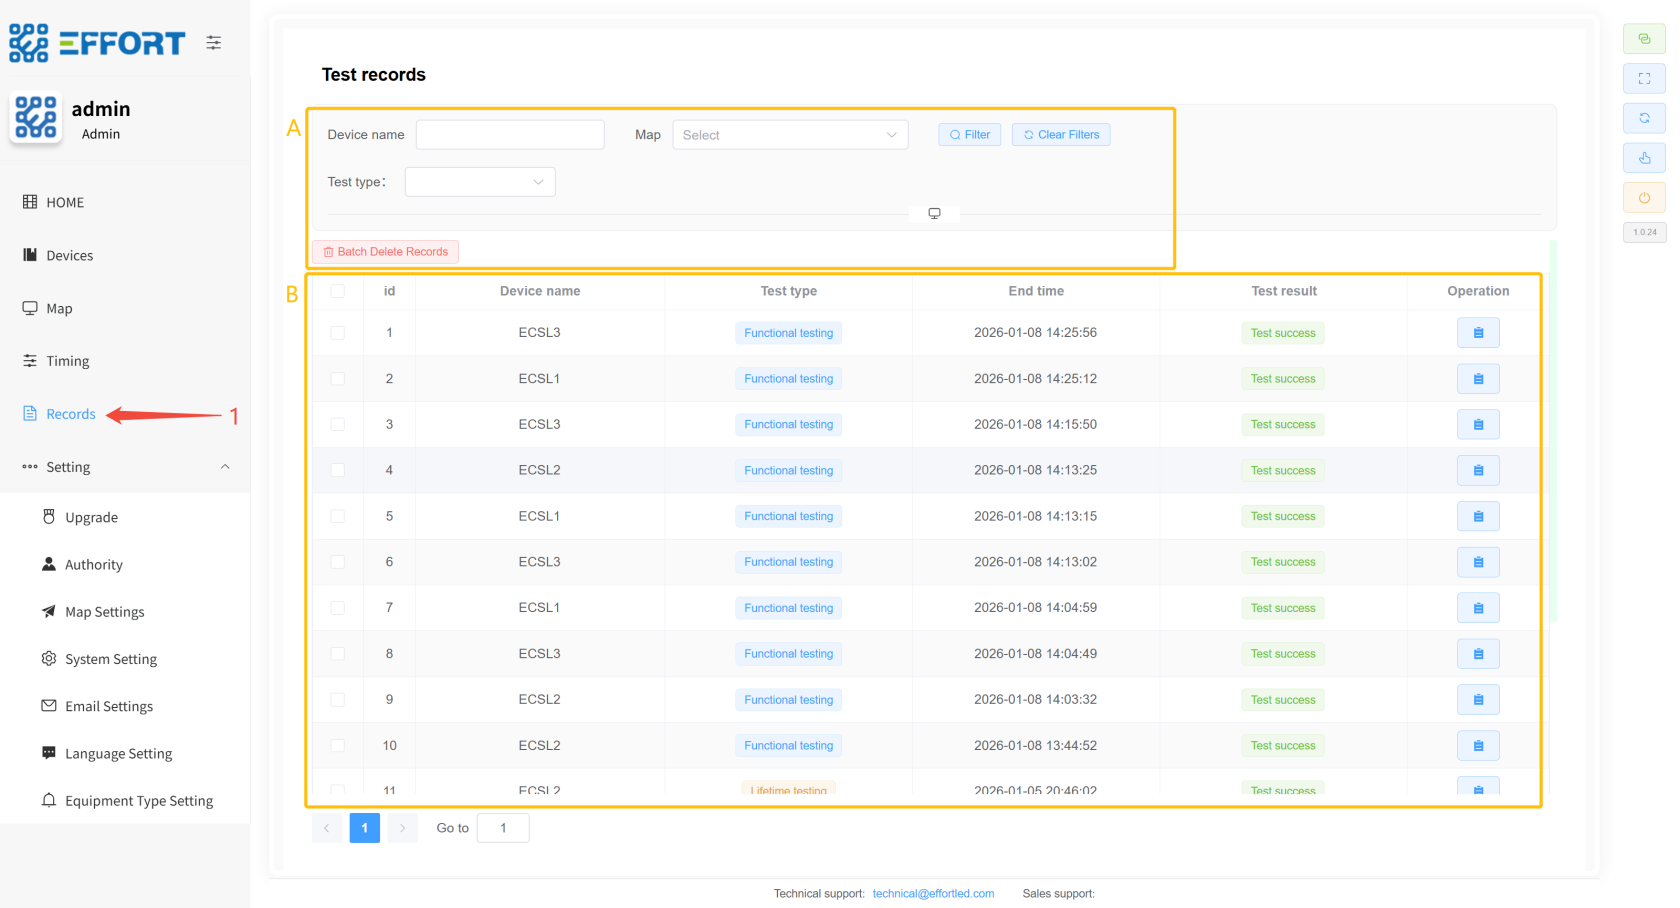
62.5 Records**Records
> Records: Test Records page
1. Step 1: Click on Records
2. Box A: Test Log Search Action Bar
3. Box B: Life Test Record Information Table: Serial Number, Device Name, Test Type, Start Time, End Time, Test Result
[](http://13.222.61.26:6875/uploads/images/gallery/2026-01/YuLimage.png)
* * *
**5.### 2.
72.6 System settings ⚙
️**️
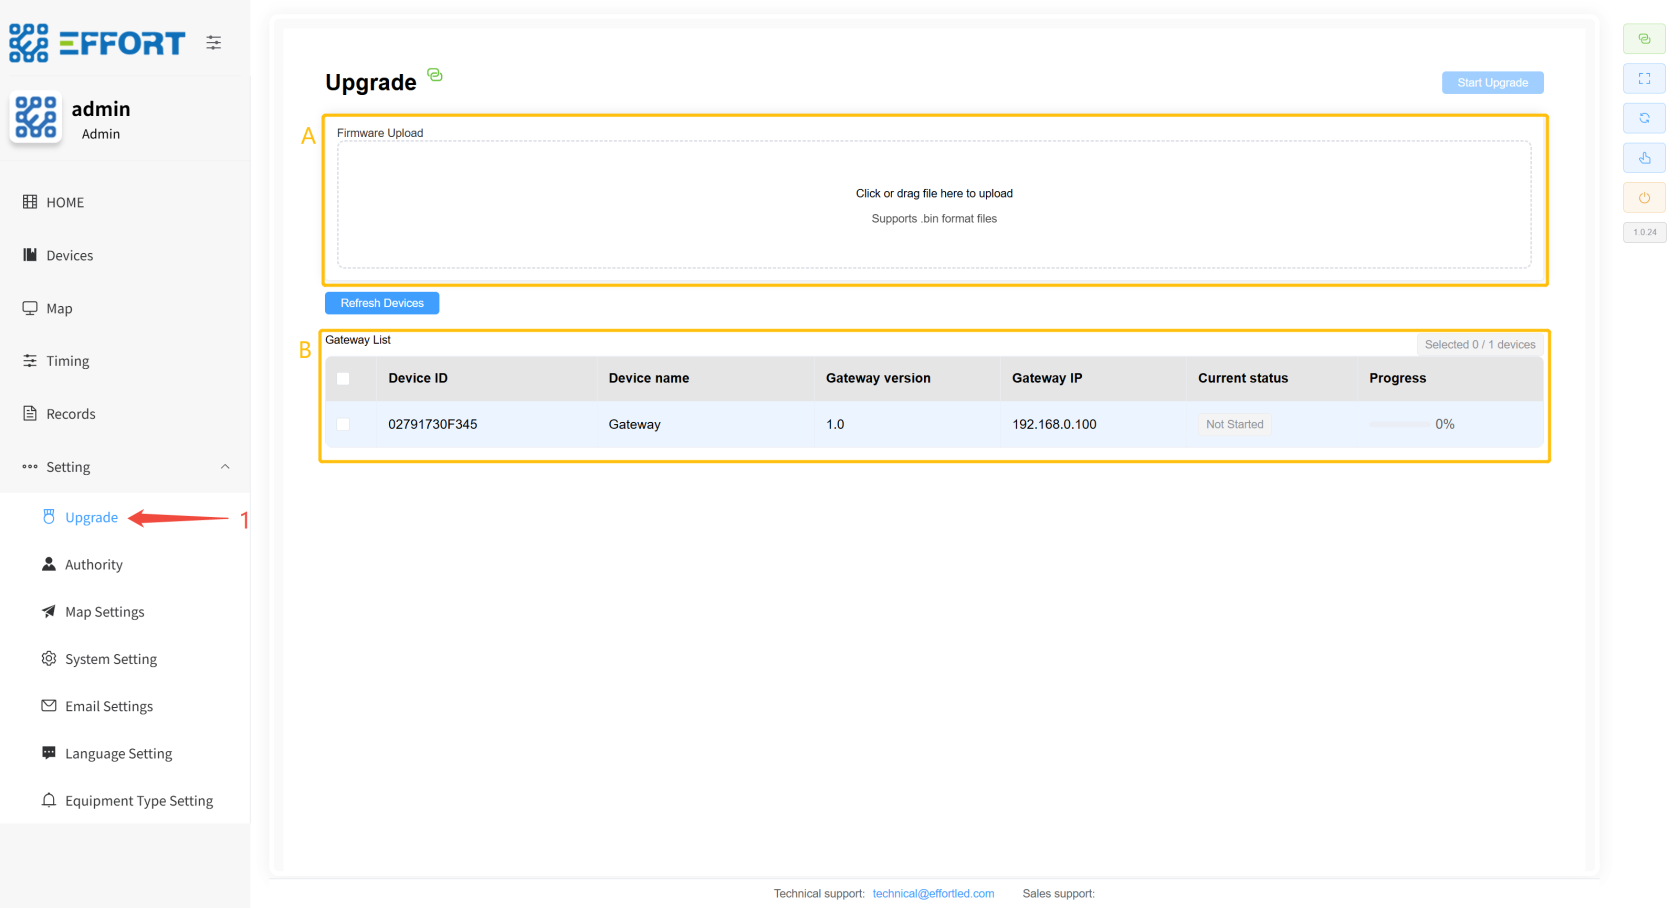
**5.#### 2.
7.2.6.1
Upgrade**Upgrade
1. Step 1: Click Settings/Upgrade to enter the firmware upgrade page
2. Box A: Import .bin file
3.
Box方框 B:
Select the gateway for the upgrade选择网关进行升级
[](http://13.222.61.26:6875/uploads/images/gallery/2026-01/bk7image.png)
**5.#### 2.
7.2.6.2
Authority**Authority
>
Authority: Account configuration, permission configuration, and custom language configuration pagesAuthority:账号配置、权限配置、自定义语言配置页面
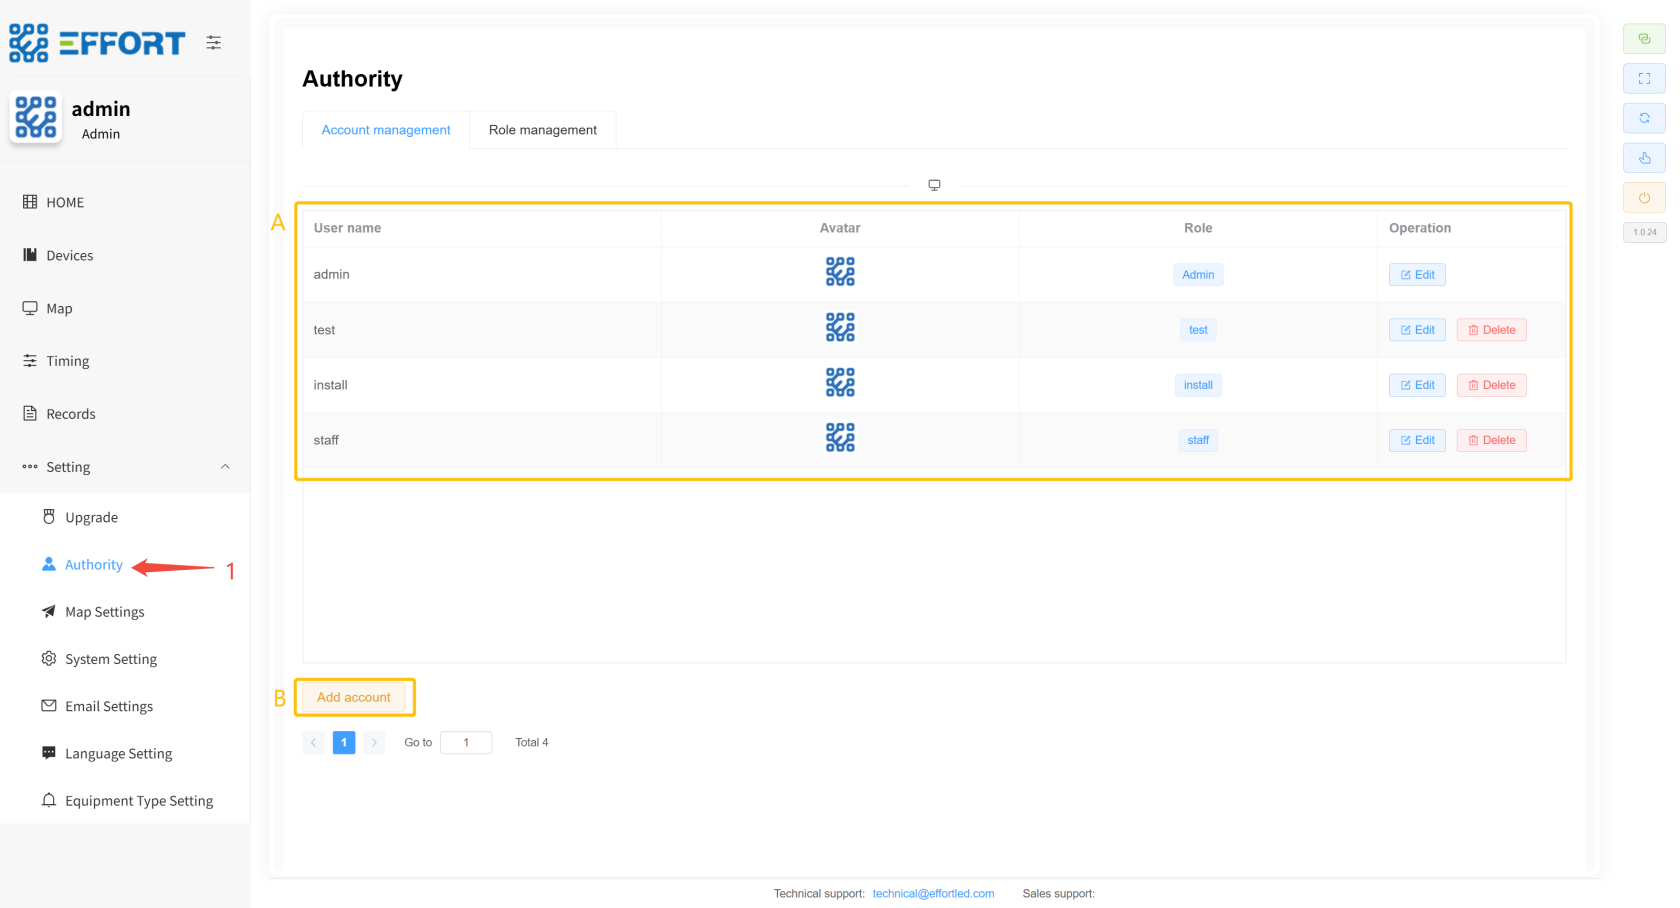
* **
Account configuration*账号配置**
1.
Step步骤 1: Click1:点击 Settings / Allocation / Account
management to enter the account management pagemanagement,进入账号管理页面
2.
Box方框 A: Basic information of the account: username, avatar, role permissions, mobile phone number, and in-line operations of the accountA:账号的基础信息:用户名、头像、角色权限、手机号、账号行内操作
3.
Box方框 B: Add Account buttonB:新增账号按钮
[](http://13.222.61.26:6875/uploads/images/gallery/2026-01/2vUimage.png)
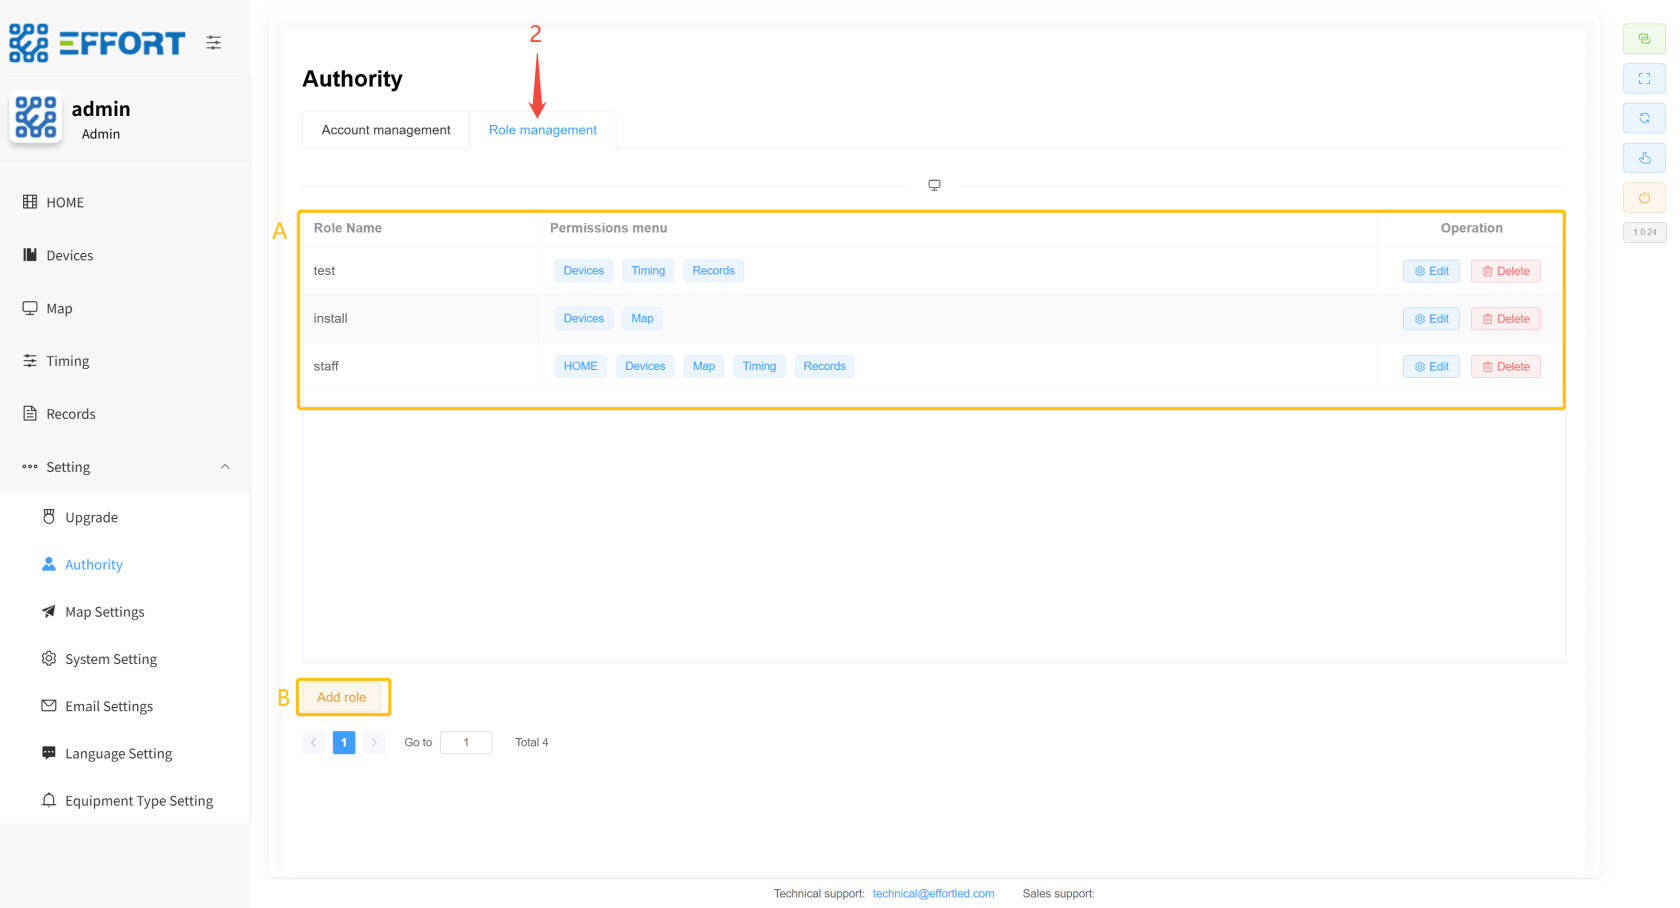
* **
Permission configuration*权限配置**
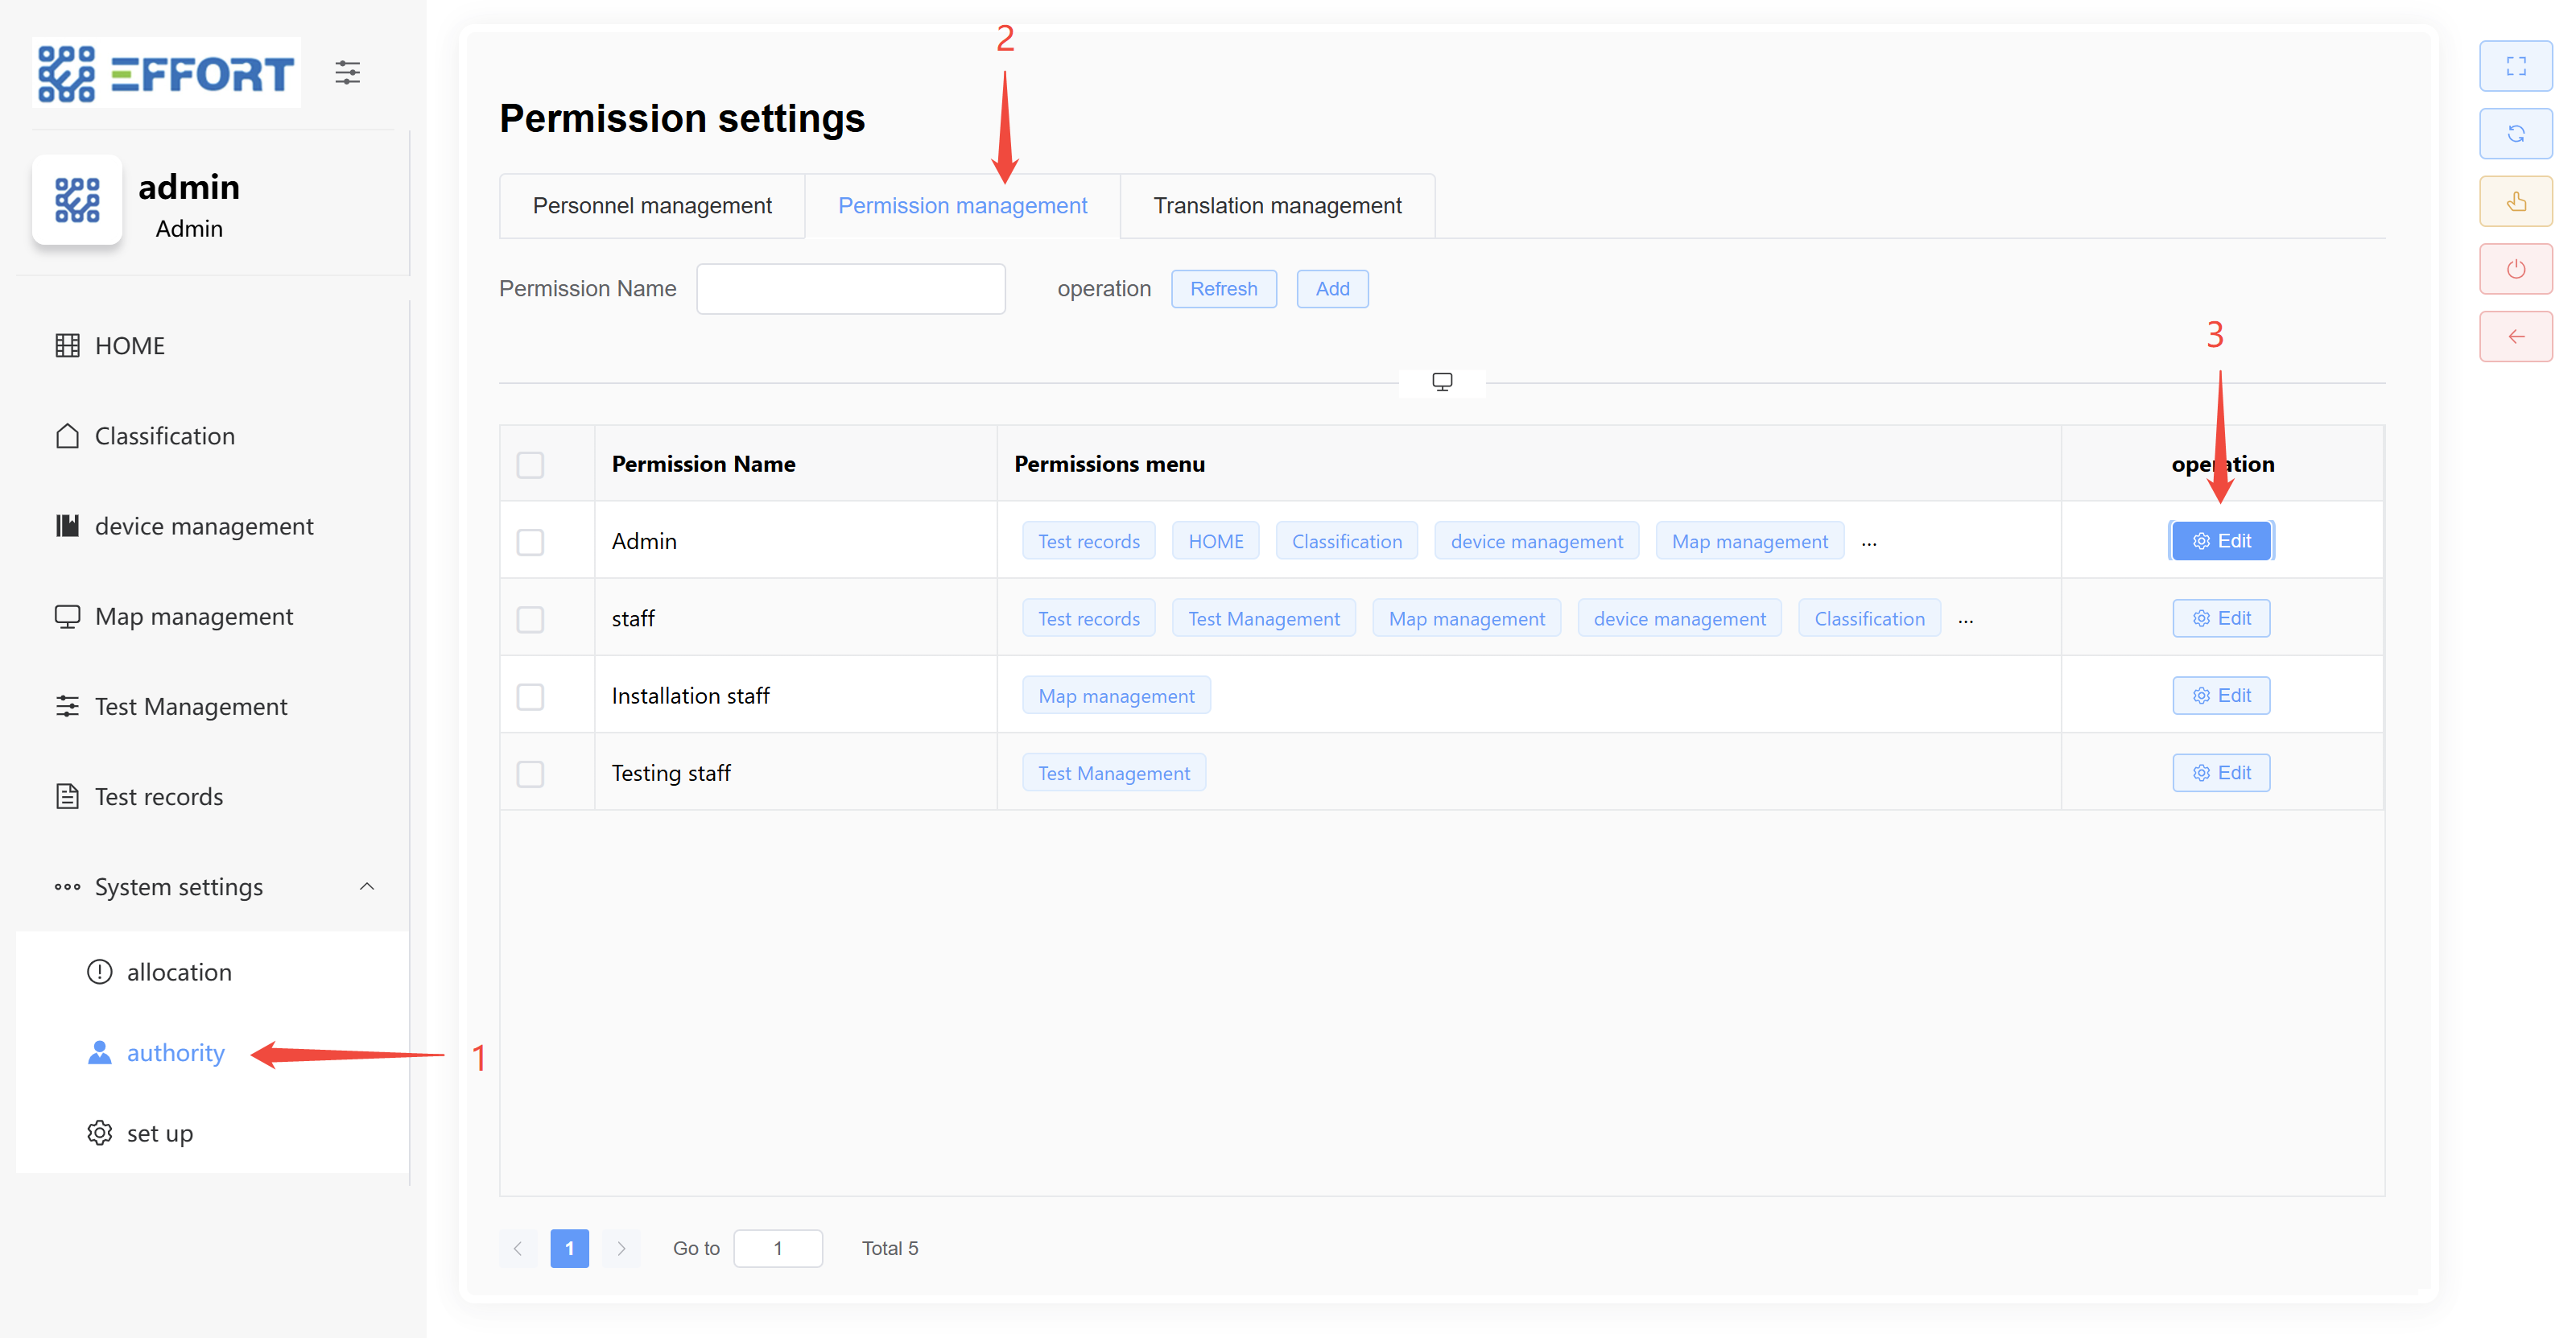
1.
Step步骤 2: Click2:点击 Role
management to go to the permission management pagemanagement,进入权限管理页面
2.
Box方框 B: Basic information of the permission: permission name, permission menu, and actions in the permission rowB:权限的基础信息:权限名、权限菜单、权限行内操作
3.
Box方框 A: Add permission buttonA:新增权限按钮
[](http://13.222.61.26:6875/uploads/images/gallery/2026-01/VKJimage.png)
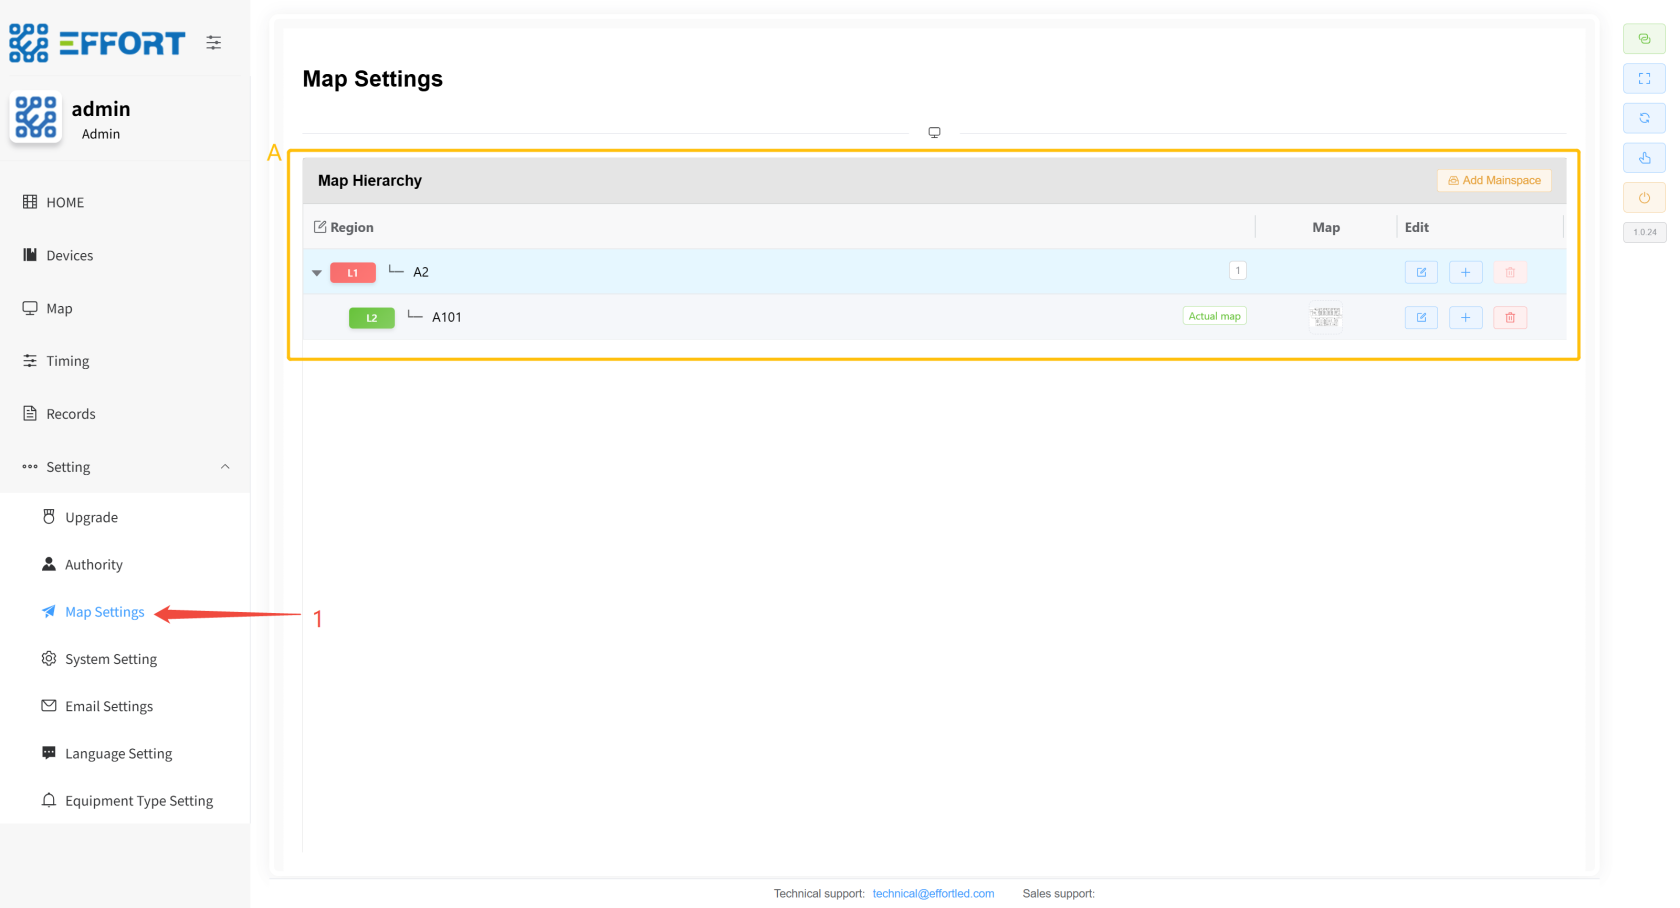
**5.#### 2.
7.2.6.3 Map
Settings**Settings
1.
Step步骤 1: Click1:点击 Settings / Map Settings
to enter the map management page进入地图管理页面
2.
Box方框 A: Basic information of the region: area name, area image, and operation in the area rowA:区域基础信息:区域名、区域图片、区域行内操作
[](http://13.222.61.26:6875/uploads/images/gallery/2026-01/malimage.png)
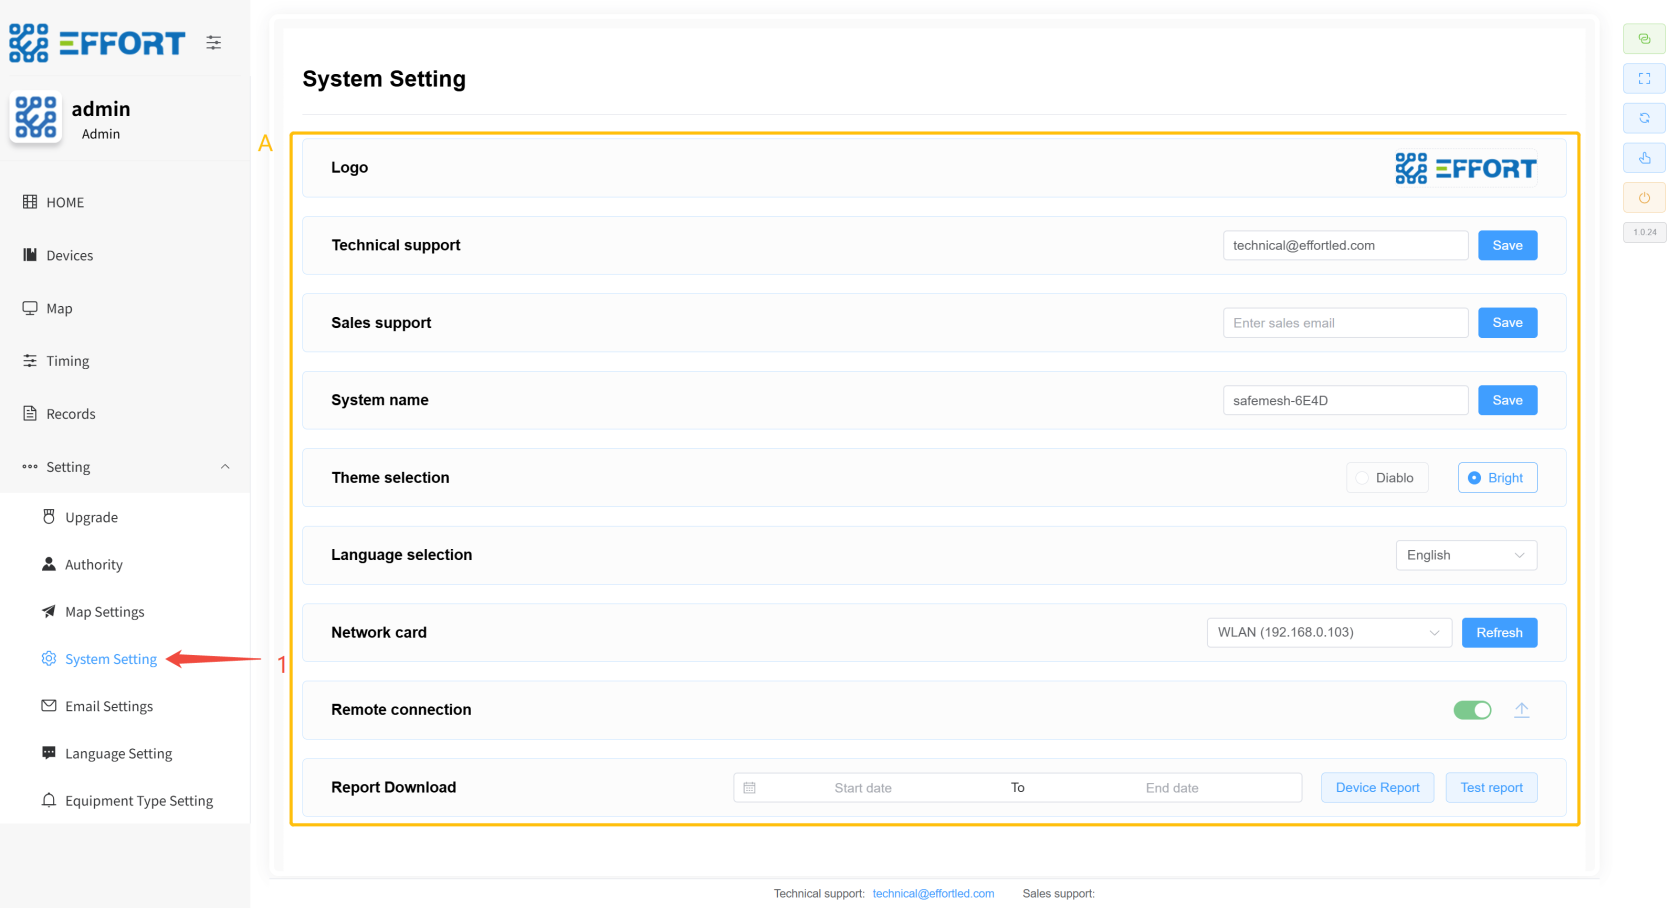
**5.#### 2.
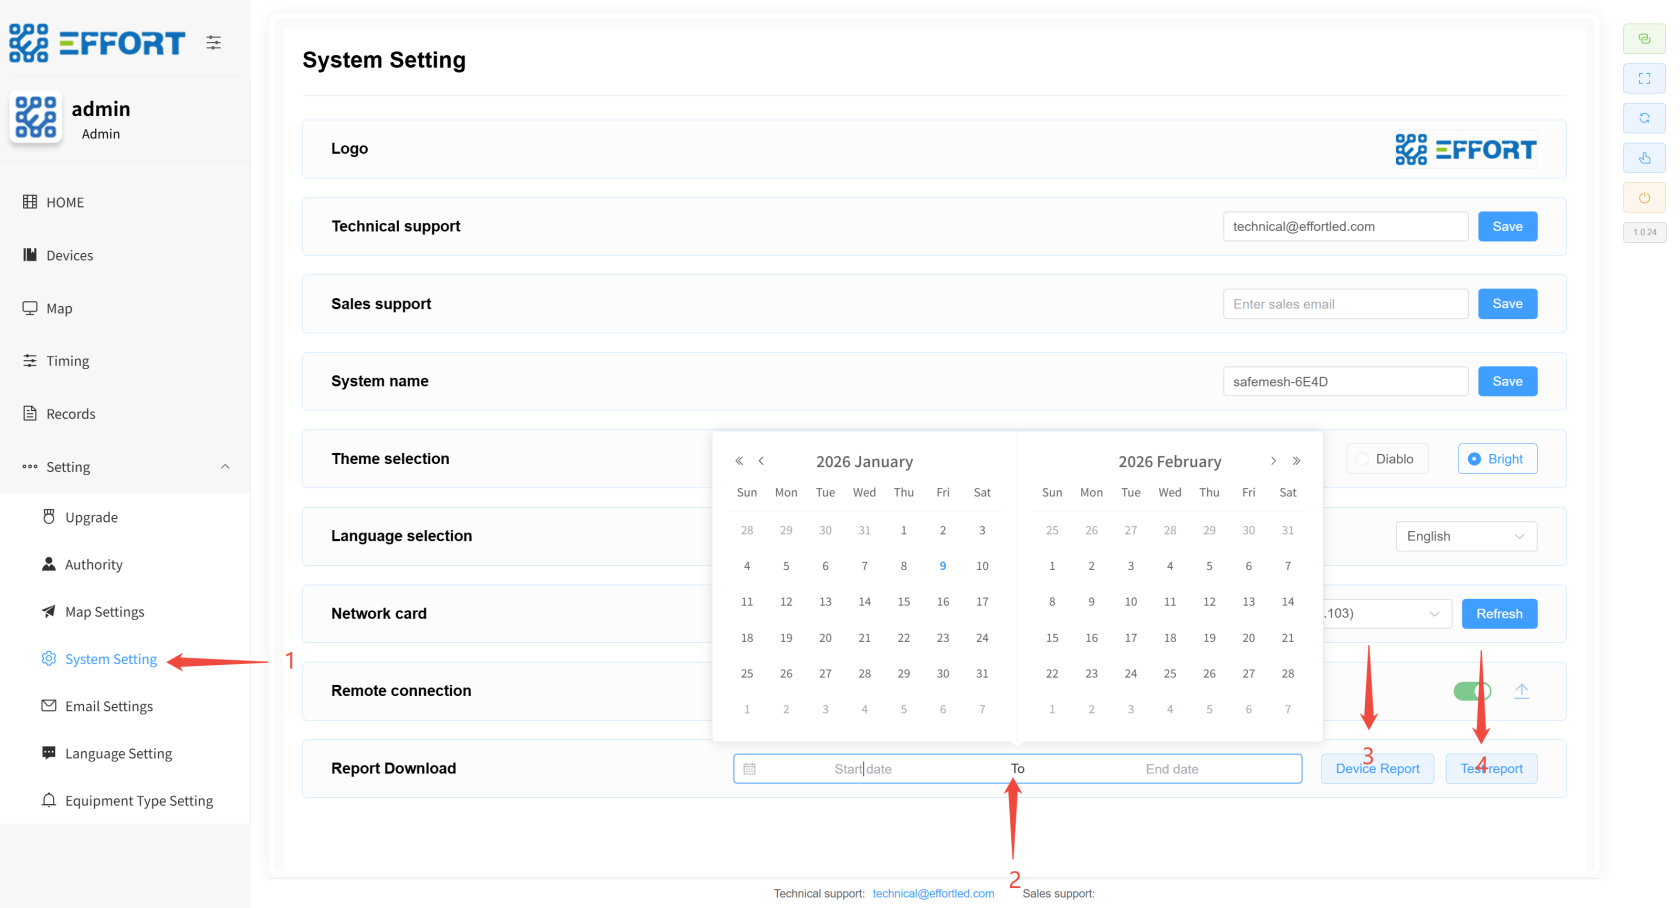
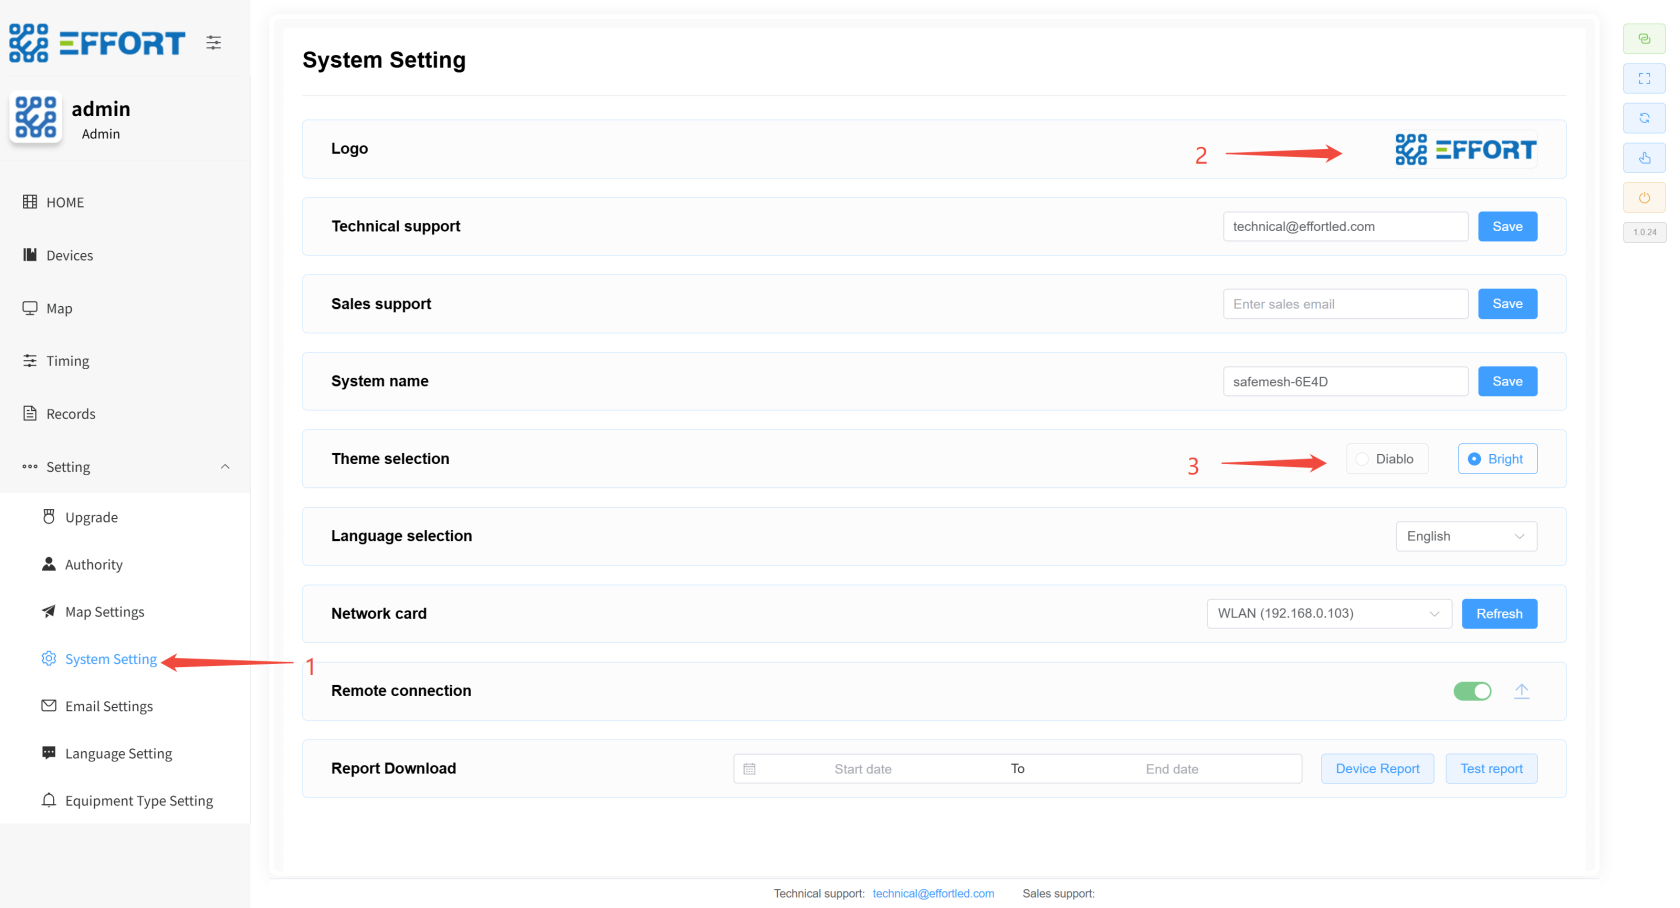
7.2.6.4 System
Setting**Setting
1.
Step步骤 1: Click1:点击 Settings / System
Setting to enter the system settings pageSetting,进入系统设置页面
2.
Box方框 A:A:设置页面包含配置 The settings page contains functions such as configuration LOGO, technical support email, sales support email, system name, theme, language, network card, remote connection, and download test record reportLOGO、技术支持邮箱、销售支持邮箱、系统名称、主题、语言、网卡、远程连接、下载测试记录报告等功能
[](http://13.222.61.26:6875/uploads/images/gallery/2026-01/UXrimage.png)
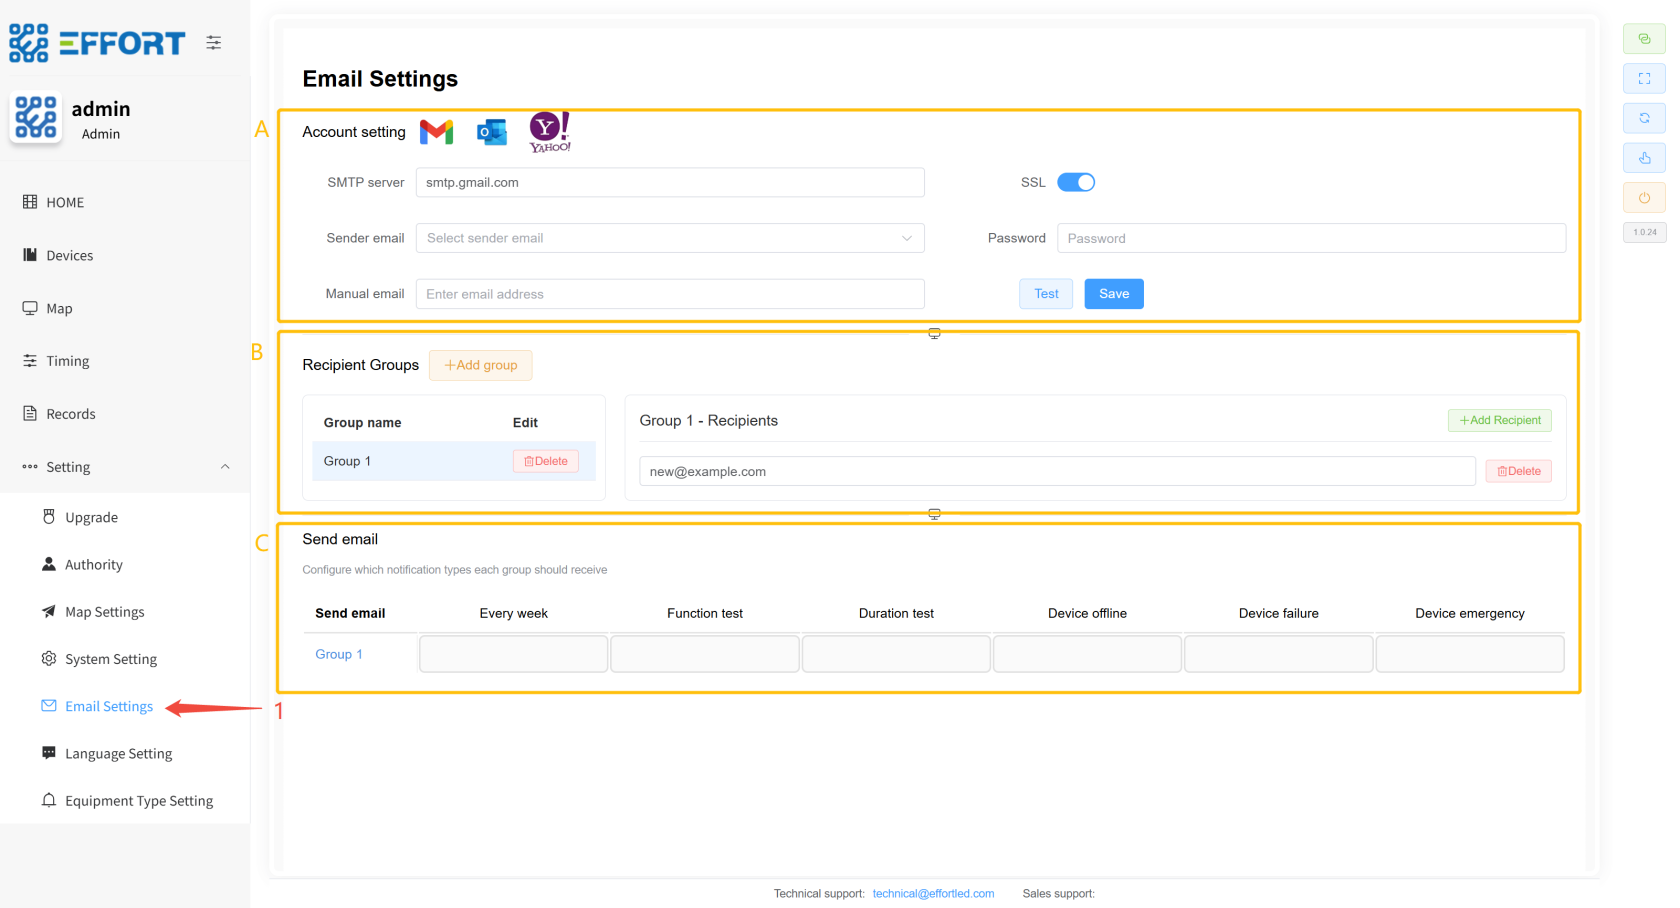
**5.#### 2.
7.2.6.5 Email
Setting**Setting
1.
Step步骤 1: Click1:点击 Settings / Email
Setting to go to the email settings pageSetting,进入邮箱设置页面
2.
Box方框 A: Configure the email sender, select SMTP service, select SSL, enter the sender's email address, and enter the application password of the sender's email addressA:配置邮件发送者,选择SMTP服务,选择SSL、输入发送者邮箱地址、输入发送者邮箱地址的应用密码
3.
Box方框 B: Configure the mail receiving group and enter the recipient's email addressB:配置邮件接收组,输入接收者的邮件地址
4.
Box方框 C: Configure the data required by the mail receiving groupC:配置邮件接收组需要的数据
[](http://13.222.61.26:6875/uploads/images/gallery/2026-01/St1image.png)
* * *
**5.#### 2.
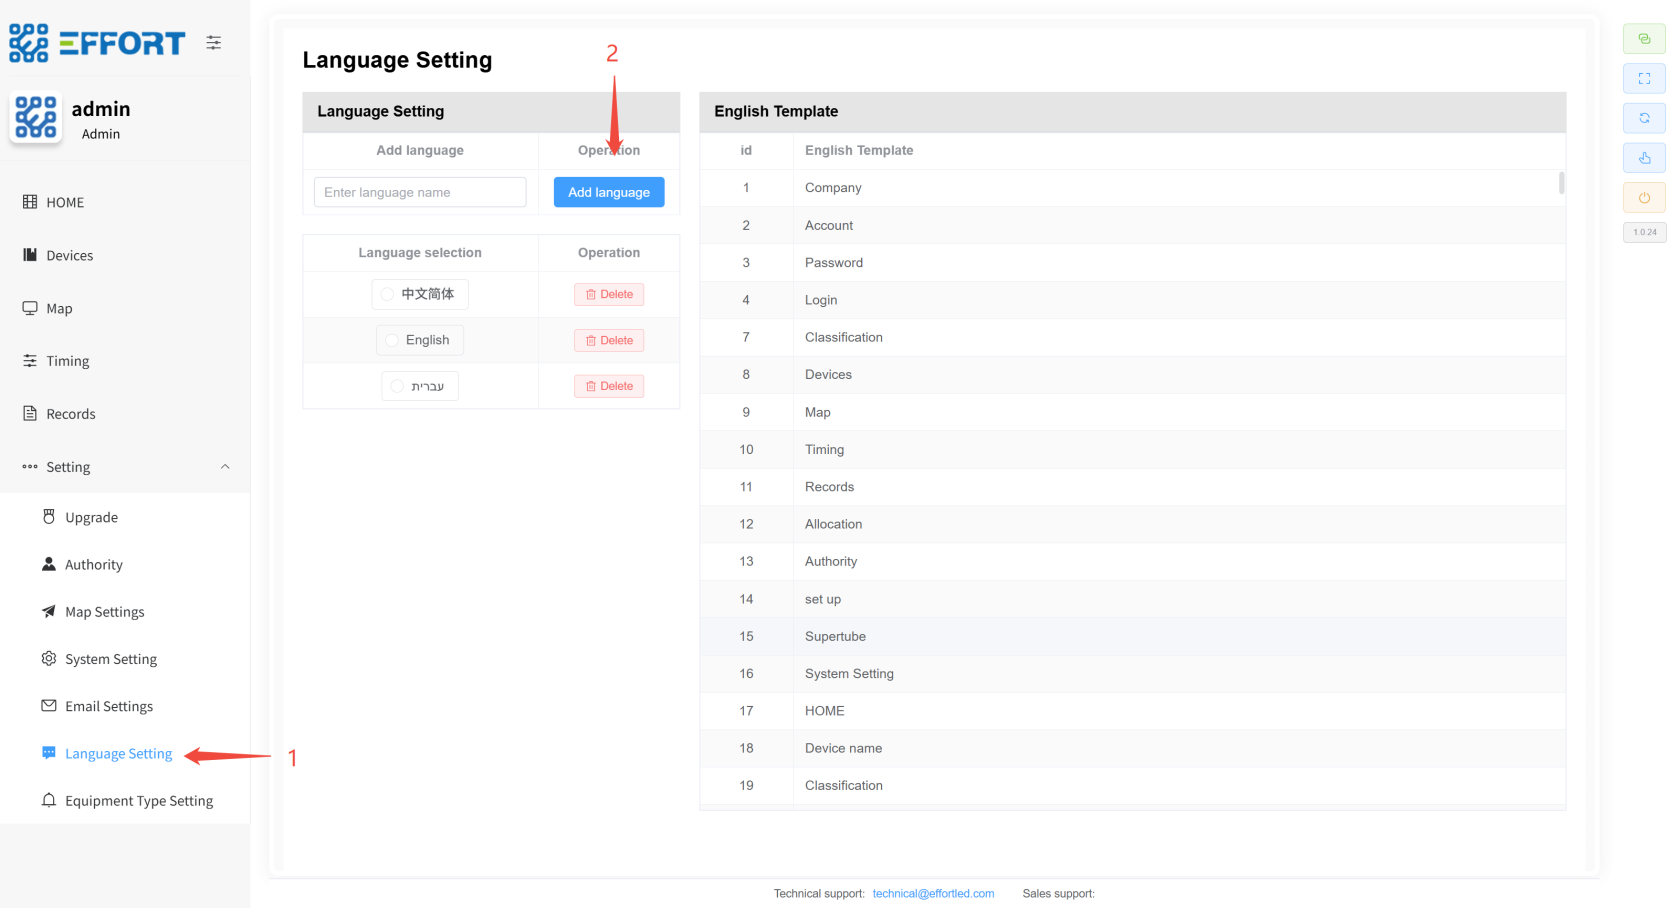
7.2.6.6 Language
Setting**Setting
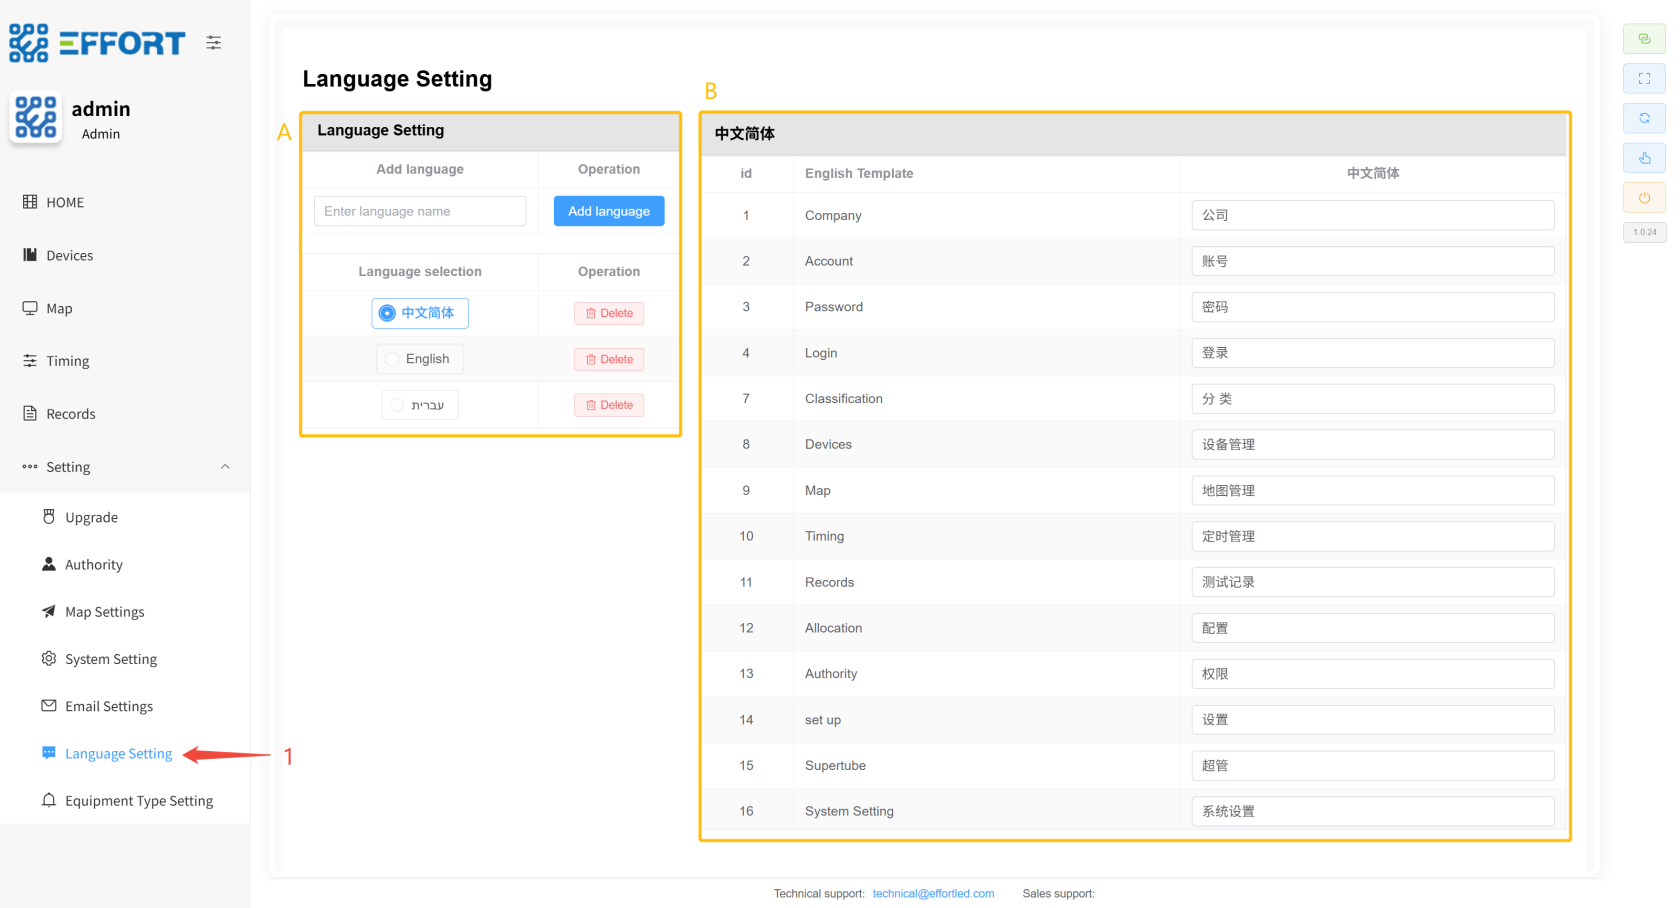
1.
Step步骤 1: Click1:点击 Settings / Language
Setting to enter the translation management pageSetting进入翻译管理页面
2.
Box方框 A: Language Management Action Bar: Add Language Button, Language Selection, Delete LanguageA:语言管理的操作栏:语言新增按钮、语言选择、语言删除
3.
Box方框 B: Basic information of the language table: serial number, English template, and selected language display on the leftB:语言表的基础信息:序号、英文模板、左侧选择语言显示
[](http://13.222.61.26:6875/uploads/images/gallery/2026-01/aPeimage.png)
**5.#### 2.
7.2.6.7 Equipment Type
Setting**Setting
1.
Step步骤 1: Click1:点击 Settings /Equipment Type
Management to enter the Equipment Type Management pageManagement,进入设备分类管理页面
2.
Box方框 A: Basic information of device classification: sorting, classification name, classification icon, and in-line operations of classificationA:设备分类基础信息:排序、分类名称、分类图标、分类行内操作
3.
Box方框 B: Add button for new device typeB:新设备类型增按钮
[](http://13.222.61.26:6875/uploads/images/gallery/2026-01/Ge7image.png)
###### VI. User management3.用户管理 ⚙
️️
Initial account: 初始账号:admin
Initial password: 初始密码:123456
Initial初始角色:admin
role: admin
Users can only see their role's page after logging in, and if the role does not have permission on this page, you will not see this page on the system.用户登录后只能看到自己角色的页面,如果该角色没有此页面的权限,你将不会在系统上看到这个页面。
######## **6.3.1
New characters**新增角色
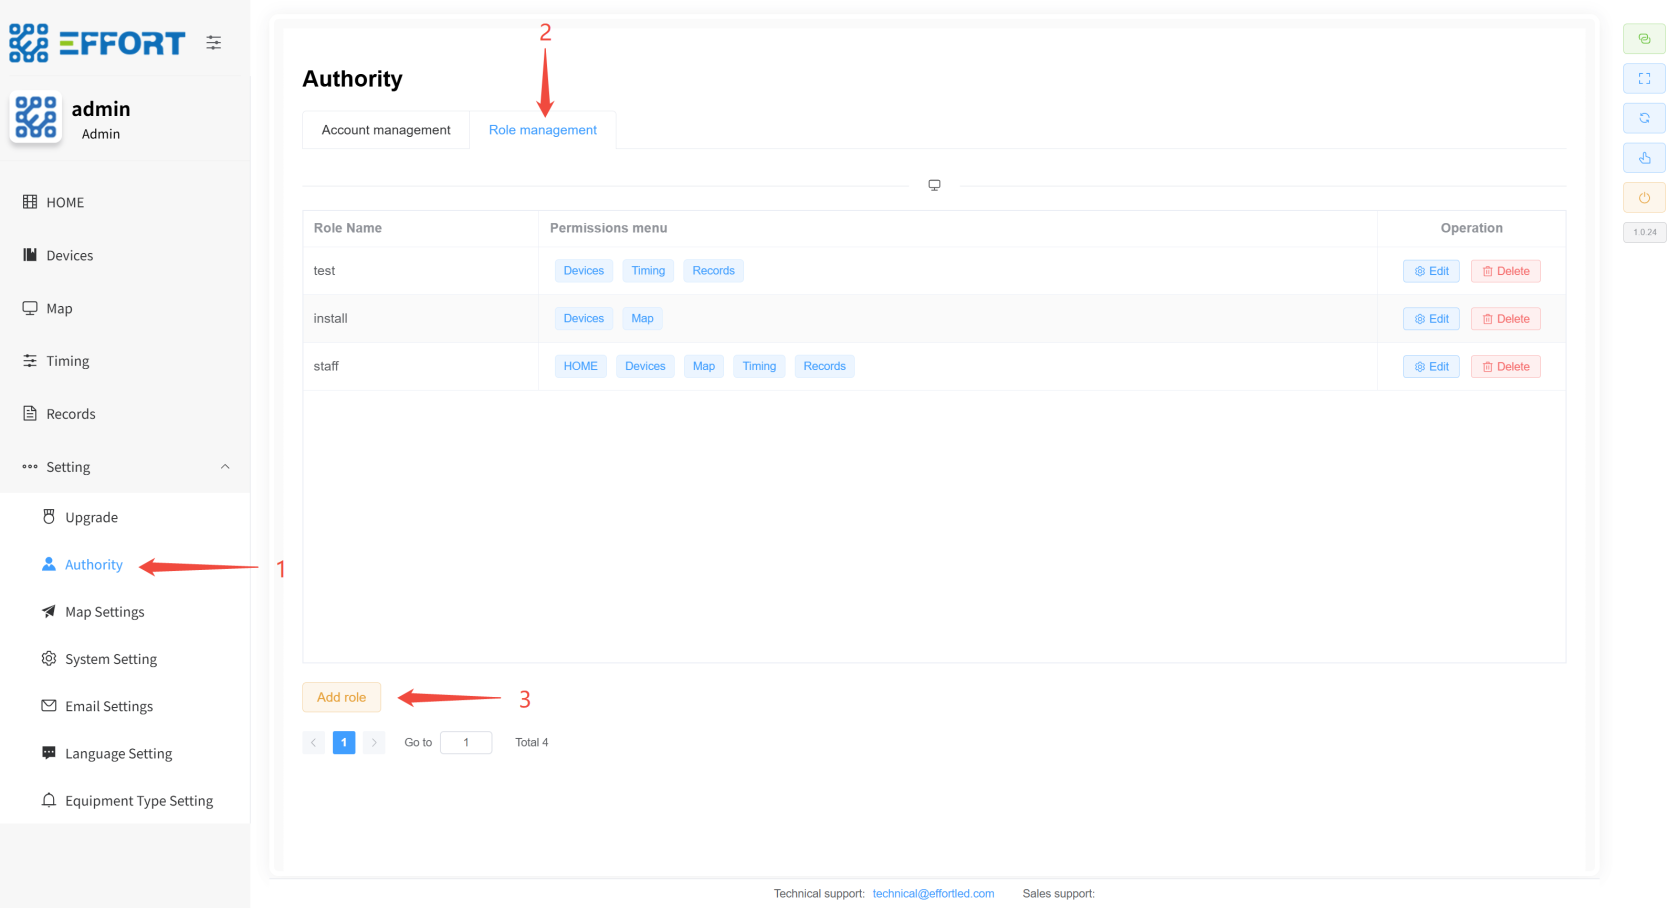
1.
Step步骤 1:1:进入 Go to AuthorityAuthority
2.
Step步骤 2: Go to2:进入 Role
managementmanagement
3.
Step步骤 3:3:点击 Click AddAdd
4.
Step步骤 4: Name the new permission4:为新权限命名
5.
Step步骤 5: Select specific permissions5:选择具体权限
6.
Step步骤 6: Click Confirm to add complete6:点击确认,新增完成
[](http://13.222.61.26:6875/uploads/images/gallery/2026-01/AdHimage.png)
######## **6.3.2
Modifying Roles**修改角色
1.
Step步骤 1:1:进入 Go to AuthorityAuthority
2. 步骤 2:进入 Account management
3.
Step步骤 3:3:点击 Click EditEdit
4.
Step步骤 4: Modify the character name4:修改角色名字
5.
Step步骤 5: Modify specific permissions5:修改具体权限
6.
Step步骤 6: Click Confirm to complete the modification6:点击确认,修改完成
* * *
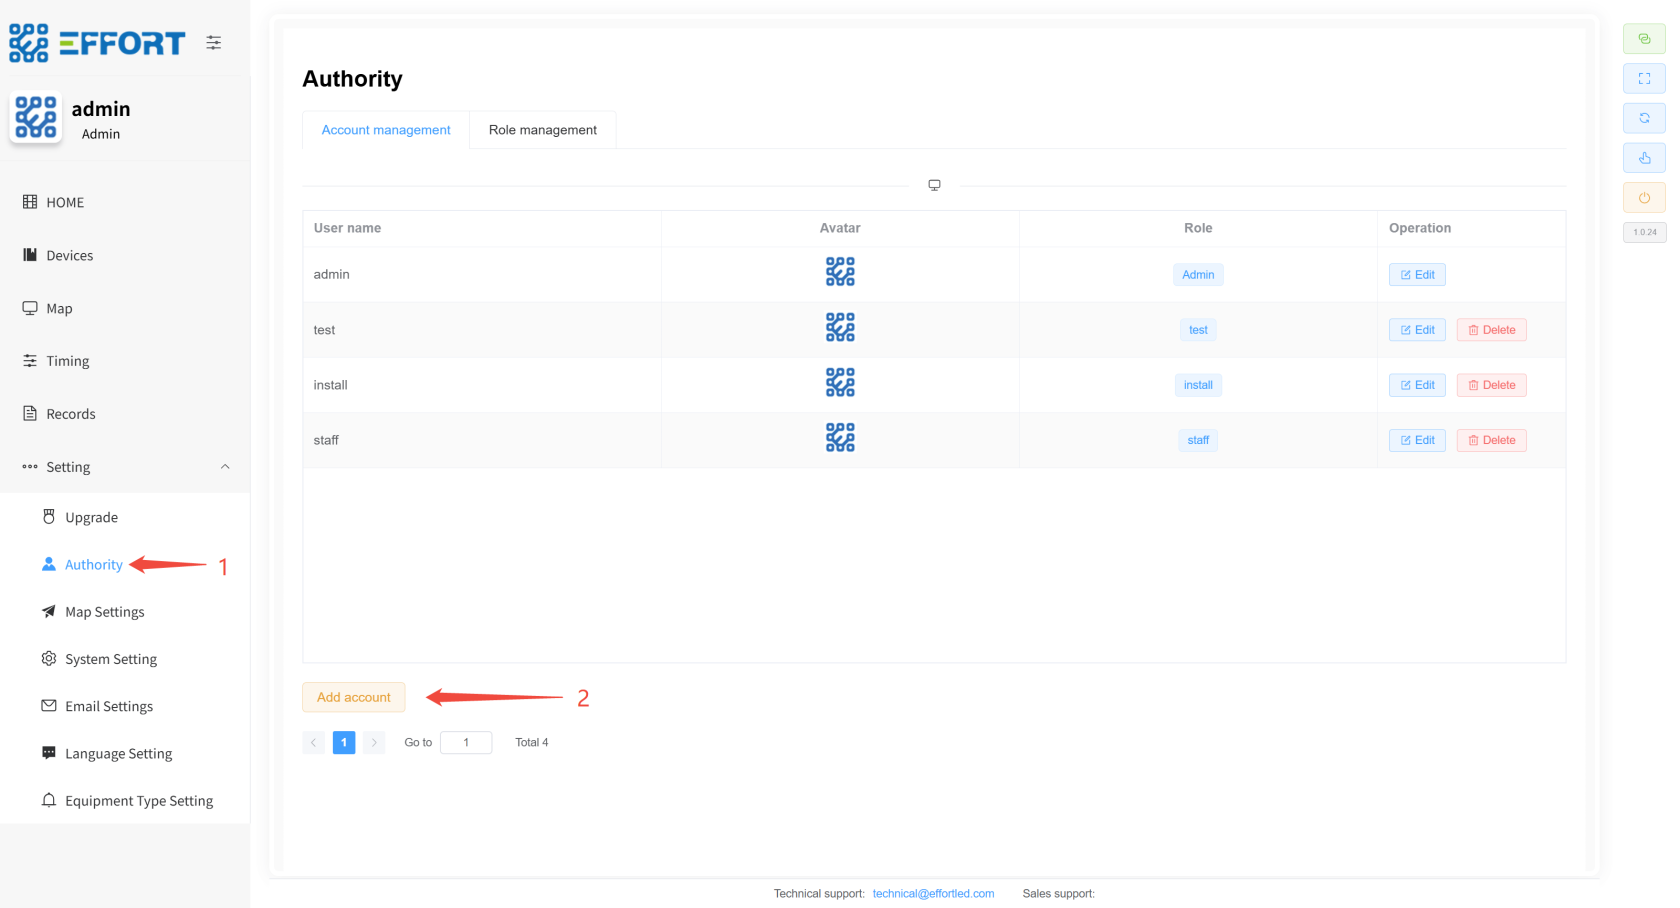
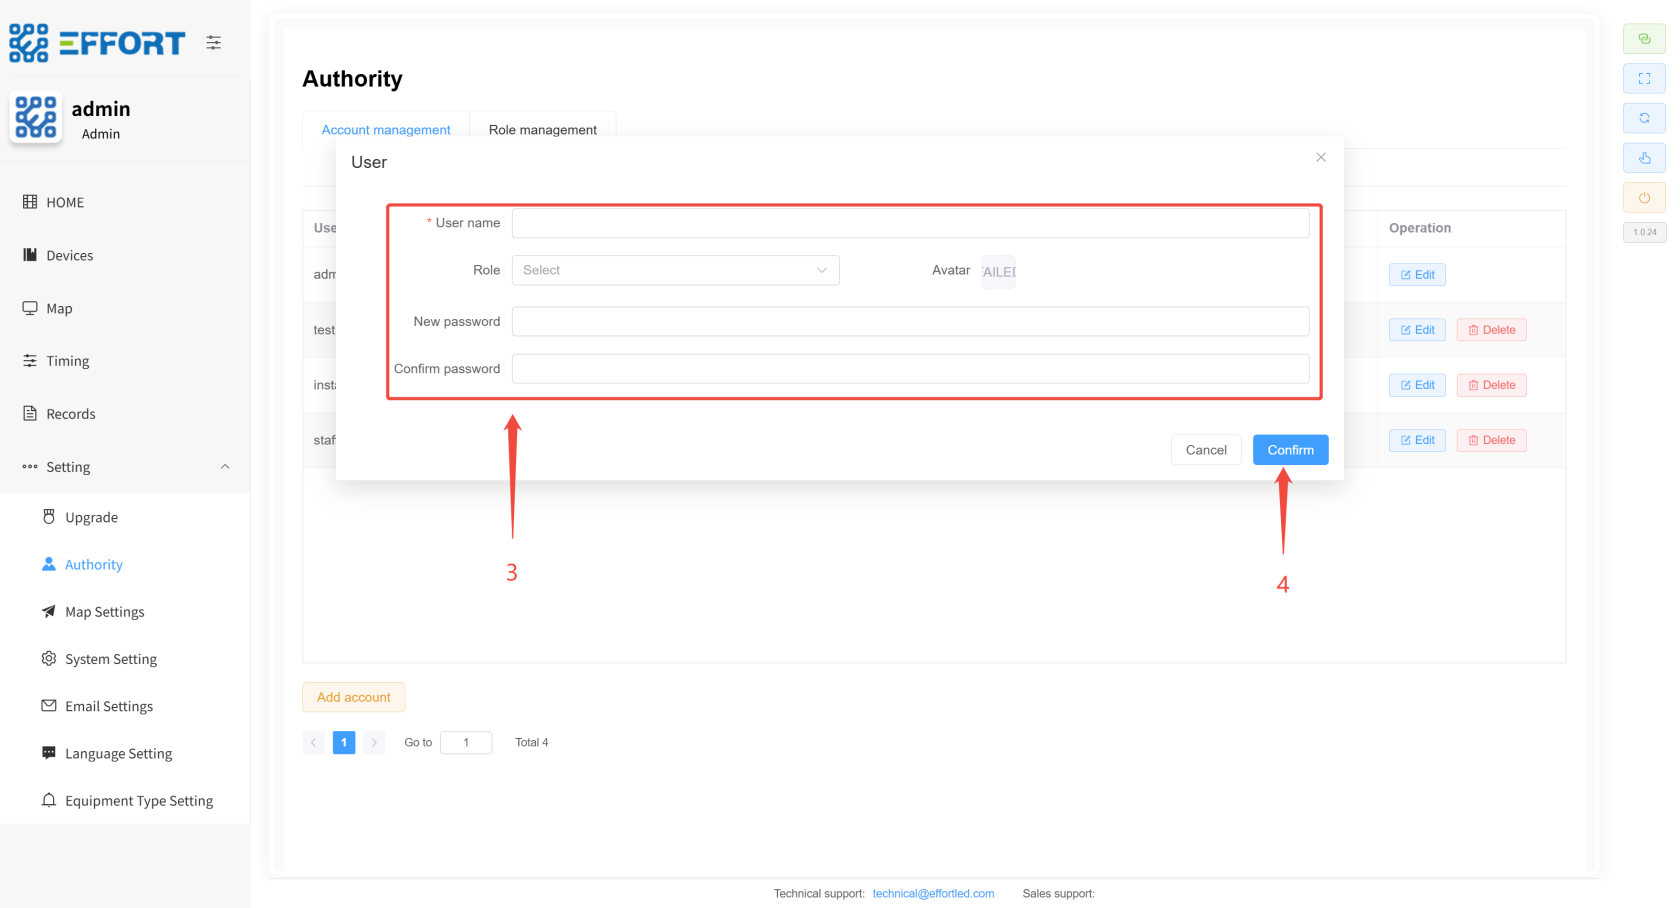
######## **6.3.3
New Users**新增用户
1.
Step步骤 1:1:进入 Go to Authorityauthority
2.
Step步骤 2:2:点击 Click AddAdd
3.
Step步骤 3: Configure the relevant parameters3:配置相关参数
4.
Step步骤 4: Click Confirm to add complete4:点击确认,新增完成
[](http://13.222.61.26:6875/uploads/images/gallery/2026-01/lz1image.png)
[](http://13.222.61.26:6875/uploads/images/gallery/2026-01/AEqimage.png)
* * *
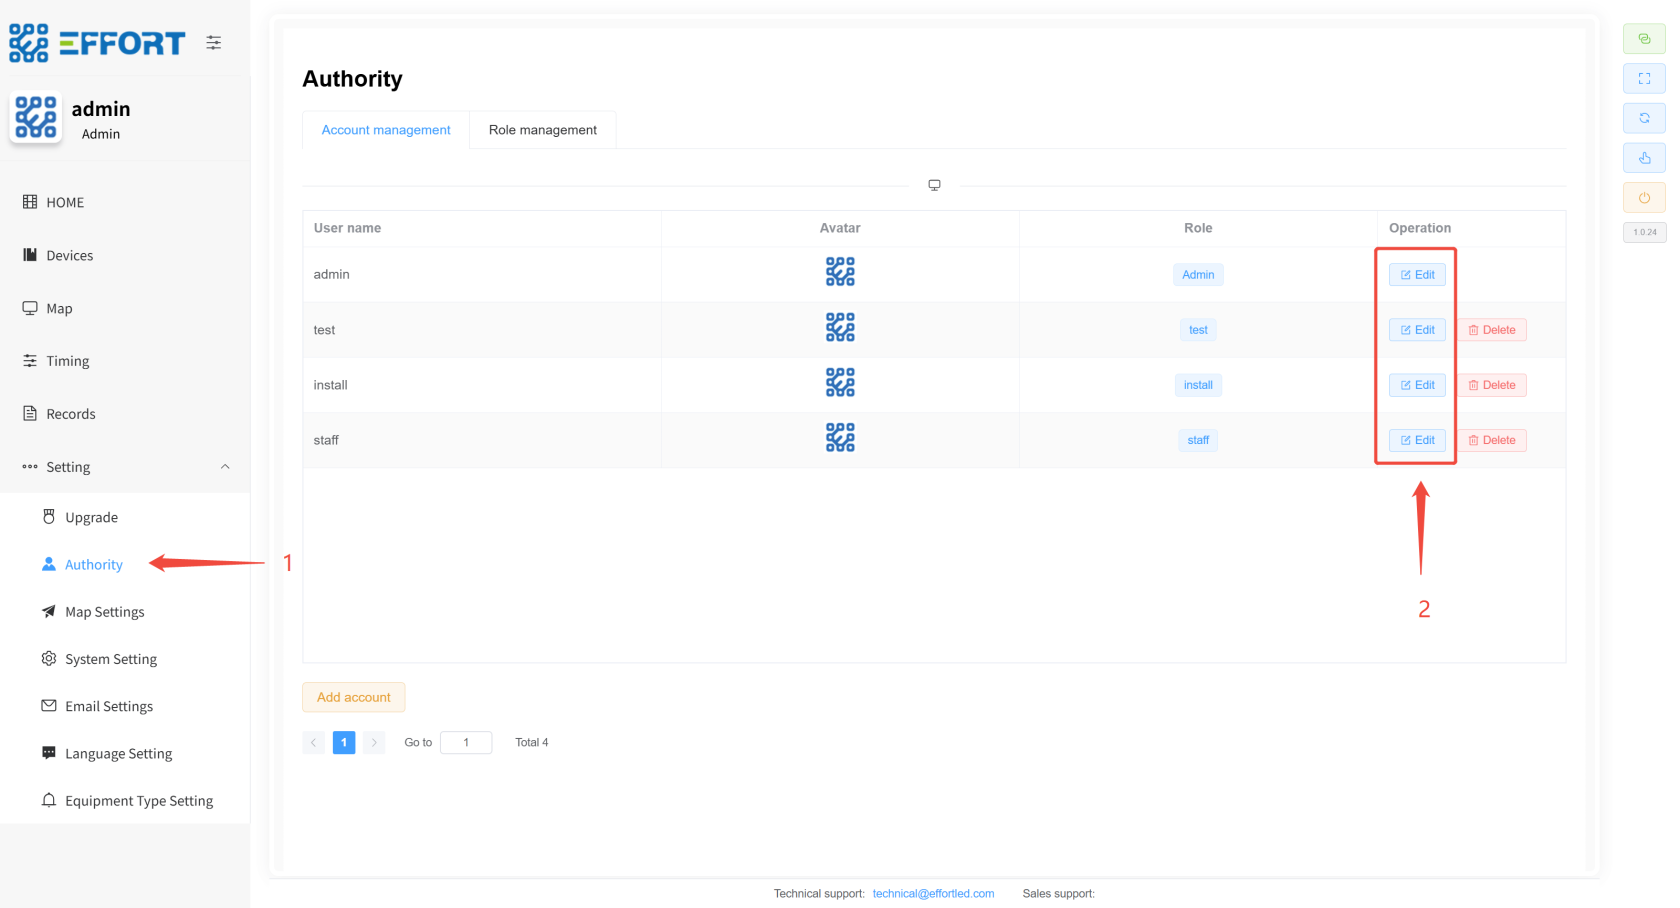
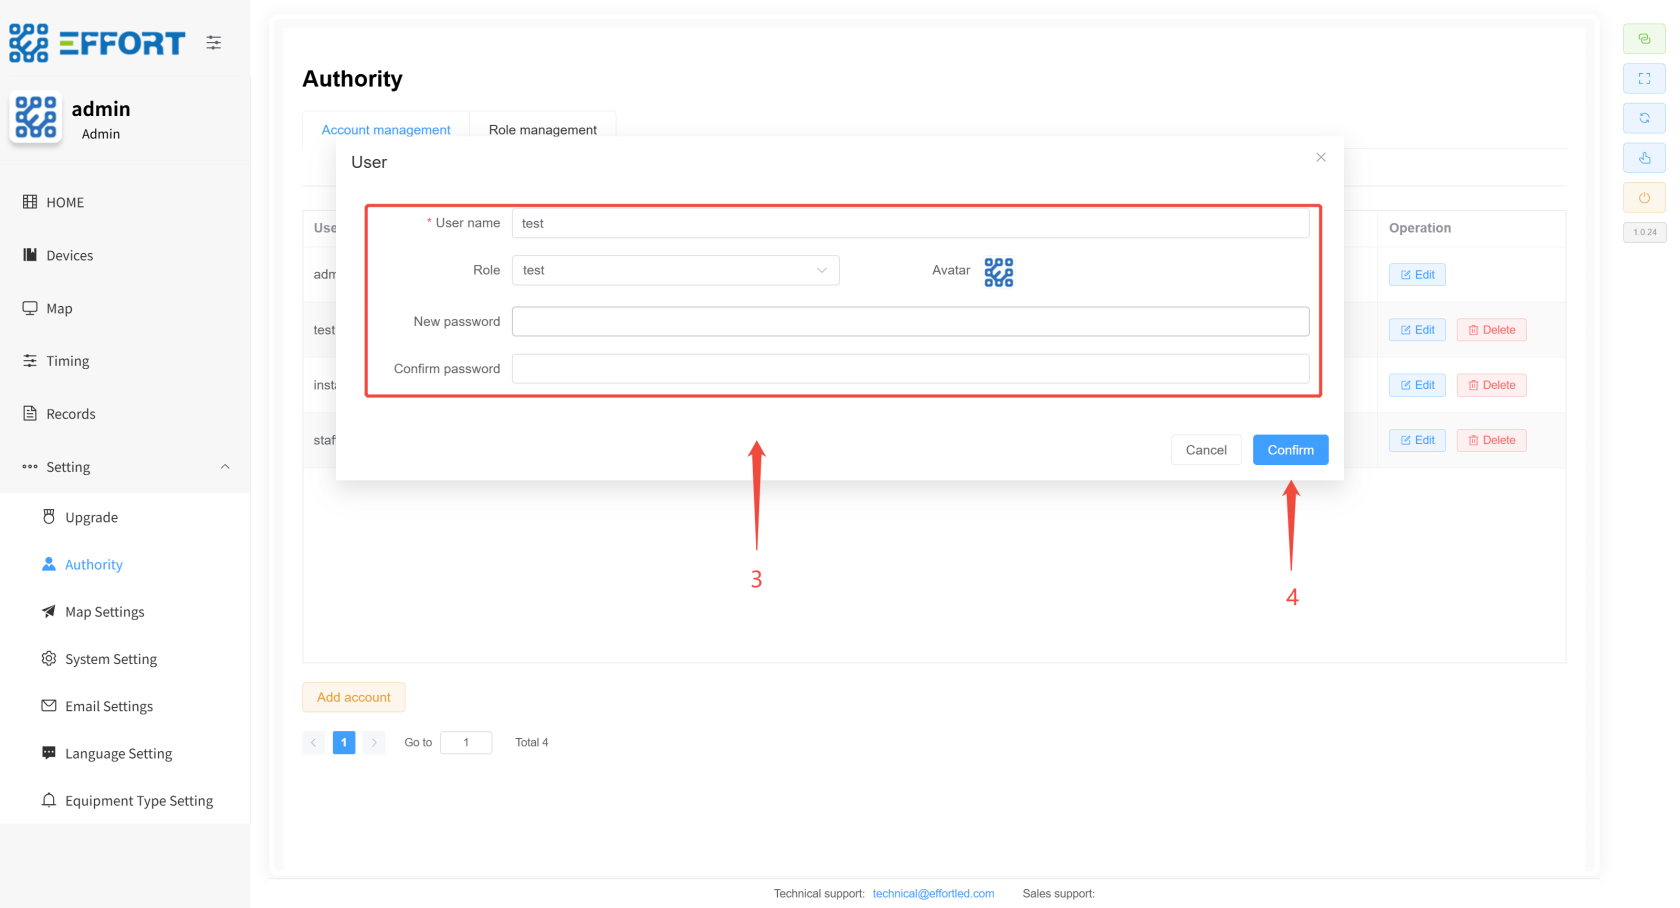
######## **6.3.4
Modifying the User**修改用户
1.
Step步骤 1:1:进入 Go to AuthorityAuthority
2.
Step步骤 2:2:点击 Click EditEdit
3.
Step步骤 3: Modify the relevant parameters3:修改相关参数
4.
Step步骤 4: Click Confirm to complete the modification4:点击确认,修改完成
[](http://13.222.61.26:6875/uploads/images/gallery/2026-01/8Gdimage.png)
[](http://13.222.61.26:6875/uploads/images/gallery/2026-01/yV4image.png)
###### **VII.4\. Workflow工作流描述
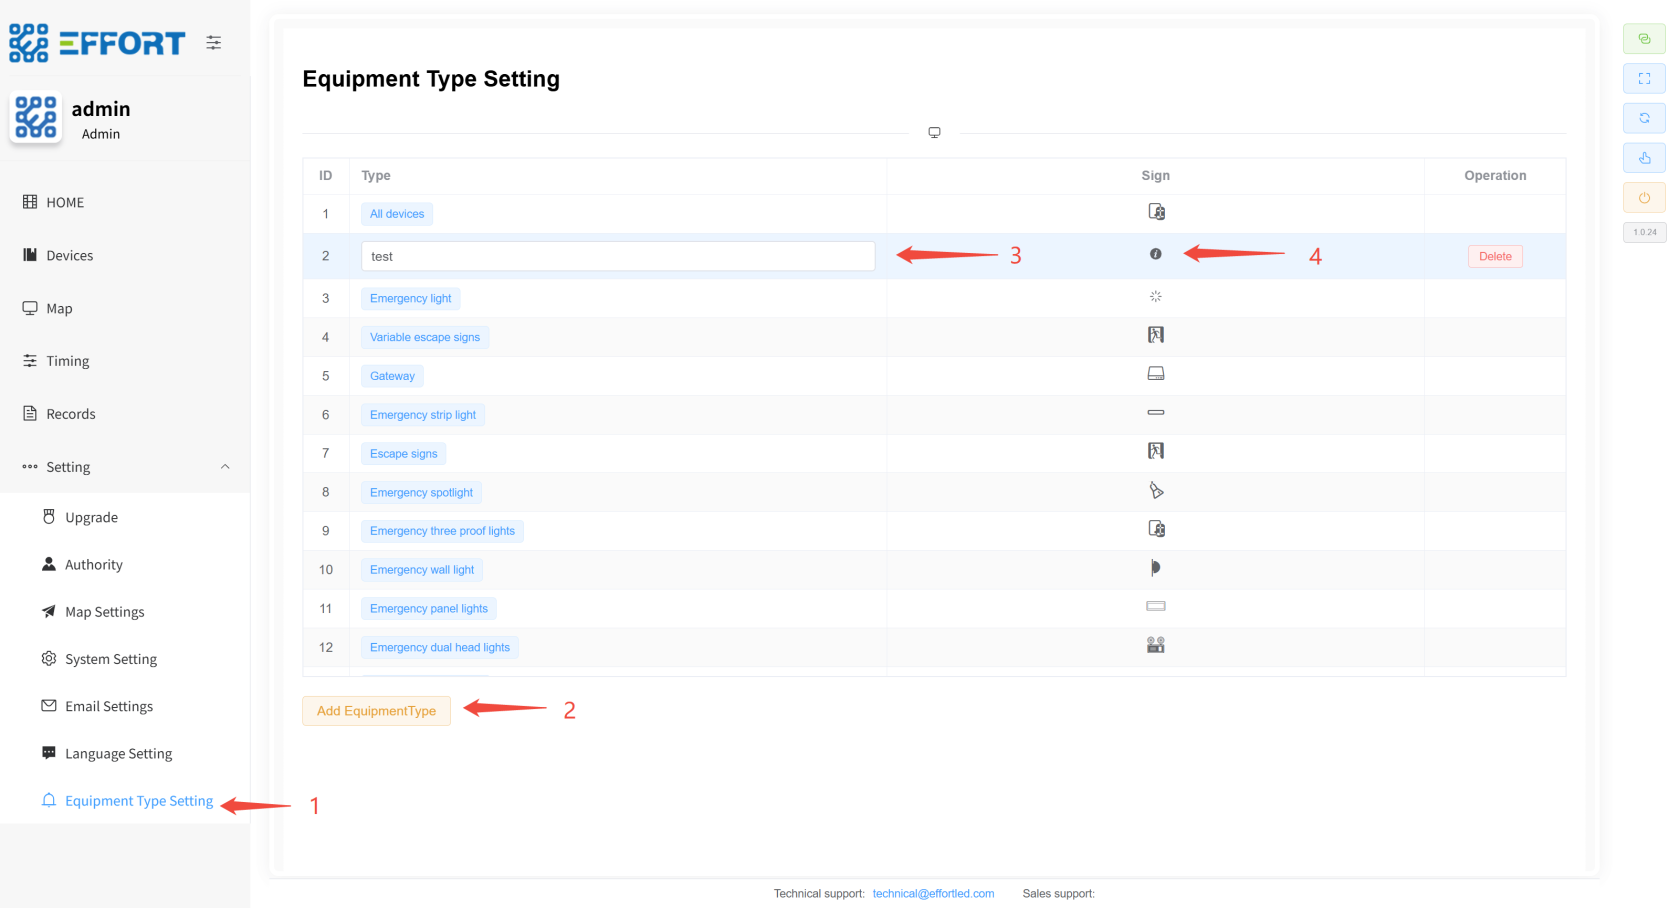
Description**## ###### **7.4.1
New equipment classification新增设备分类 ⚙
️**️
1.
Step步骤 1: Click1:点击 Equipment Type
Setting to enter Equipment Type ManagementSetting进入设备类型管理
2.
Step步骤 2: Then tap2:然后点击 Add
EquipmentType to add a new device classificationEquipmentType,添加新的设备分类
3.
Step步骤 3: Click the category name to modify the category name3:点击分类名,修改分类名称
4.
Step步骤 4: In the4:在 Sign
area, select the icon and the configuration is complete区域,选择图标,配置完成
[](http://13.222.61.26:6875/uploads/images/gallery/2026-01/R5himage.png)
* * *
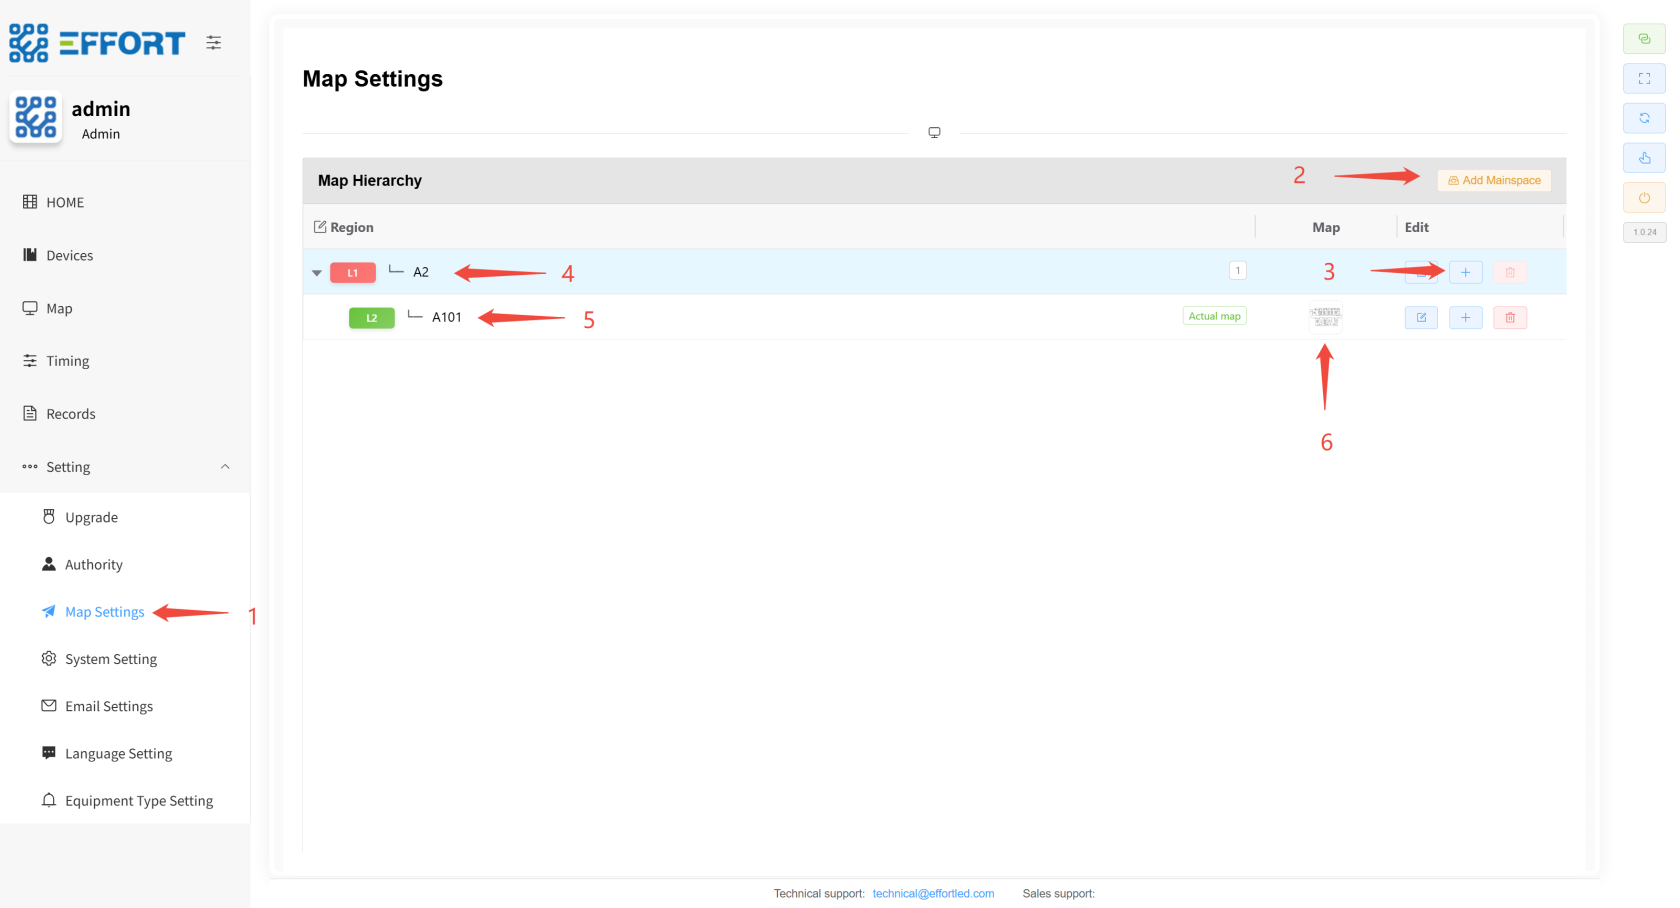
######## **7.4.2
Import Map (Product Import Guidelines are available). 导入地图(产品导入指引已有)⚙
️**️
1.
Step步骤 1: Click1:再点击 map
settings again to enter the map management pageSettings进入地图管理页面
2.
Step步骤 2: Click2:点击 Add
MainspaceMainspace,添加 to add the primary area一级区域
3.
Step步骤 3: Then click3:然后点击 "+"
,添加 to add the secondary area, you can continue to add down.二级区域,可以继续向下添加......
4.
Step步骤 4 & 5: Click on the area name to modify the region name4、5:点击区域名,修改区域名称
5.
Step步骤 6: In the 6:在**
最后一级**
last level** area, upload the area map and the configuration is complete区域,上传区域地图,配置完成
* * *
[](http://13.222.61.26:6875/uploads/images/gallery/2026-01/G8timage.png)
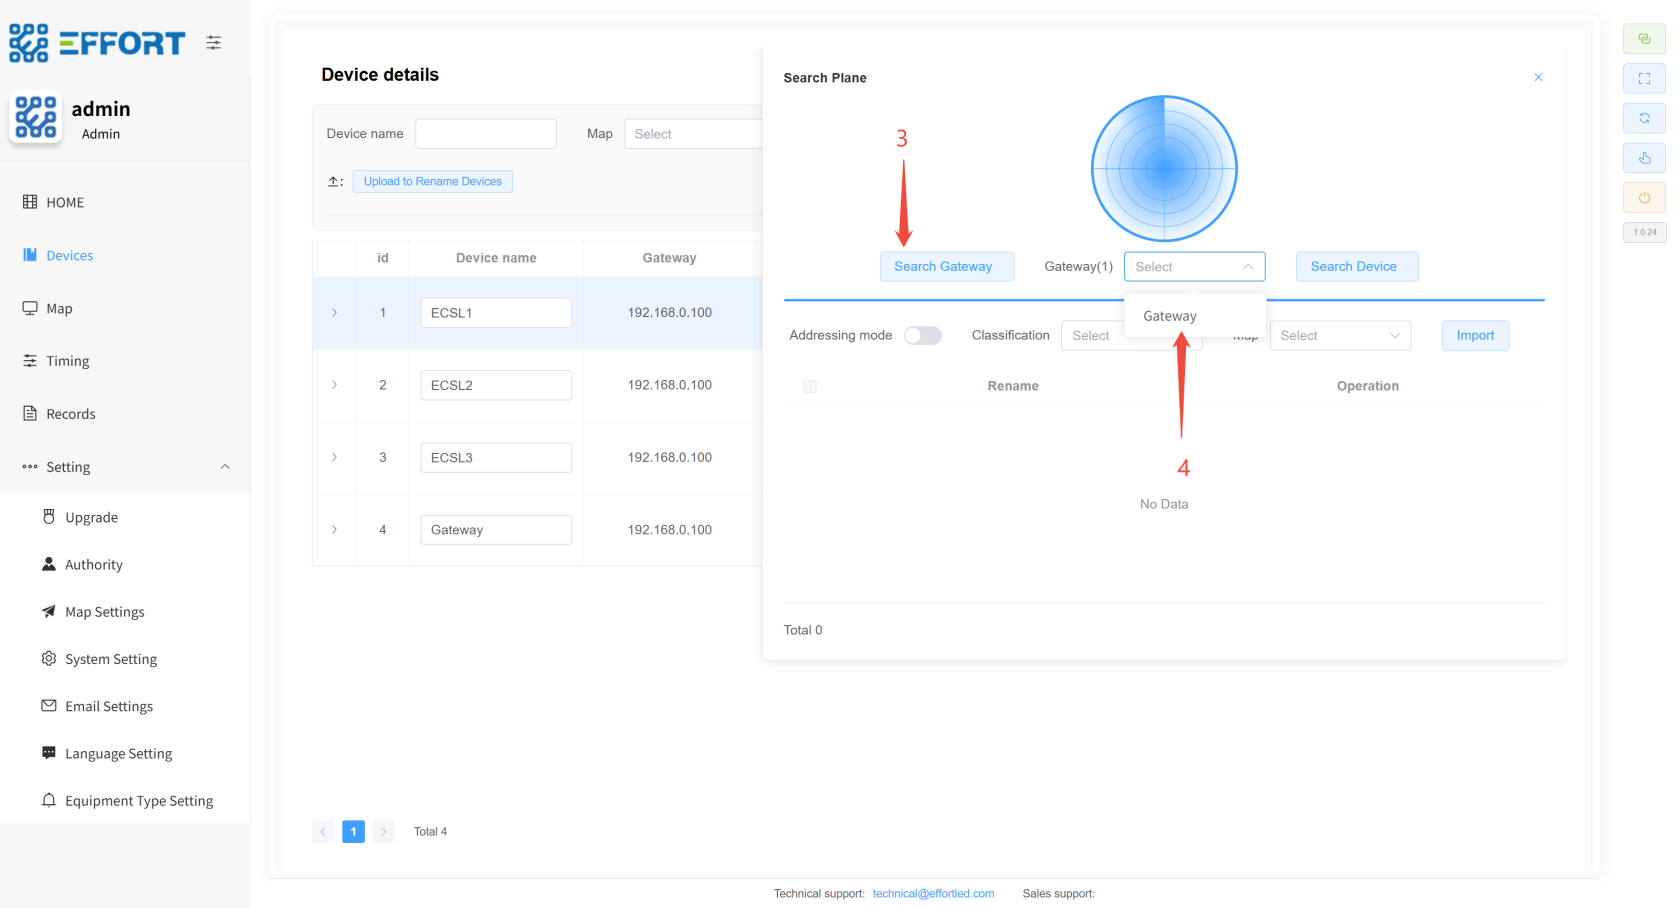
######## **7.4.3
Import gateways and devices导入网关、设备 👤
**
* **
Gateway Import Steps*网关导入步骤**
1.
1.步骤 Step1:进入 1: Go to DeviceDevice
2.
Step步骤 2: Click2:点击 Search Device
to open打开 Search
PlanePlane
3.
Step步骤 3: Click on3:点击 Search
Gateway and wait for aboutGateway,等待 30
seconds秒左右
4.
Step步骤 4: Click on the selected gateway4:点击选中搜索出来的网关
[](http://13.222.61.26:6875/uploads/images/gallery/2026-01/5bOimage.png)
[](http://13.222.61.26:6875/uploads/images/gallery/2026-01/bs9image.png)
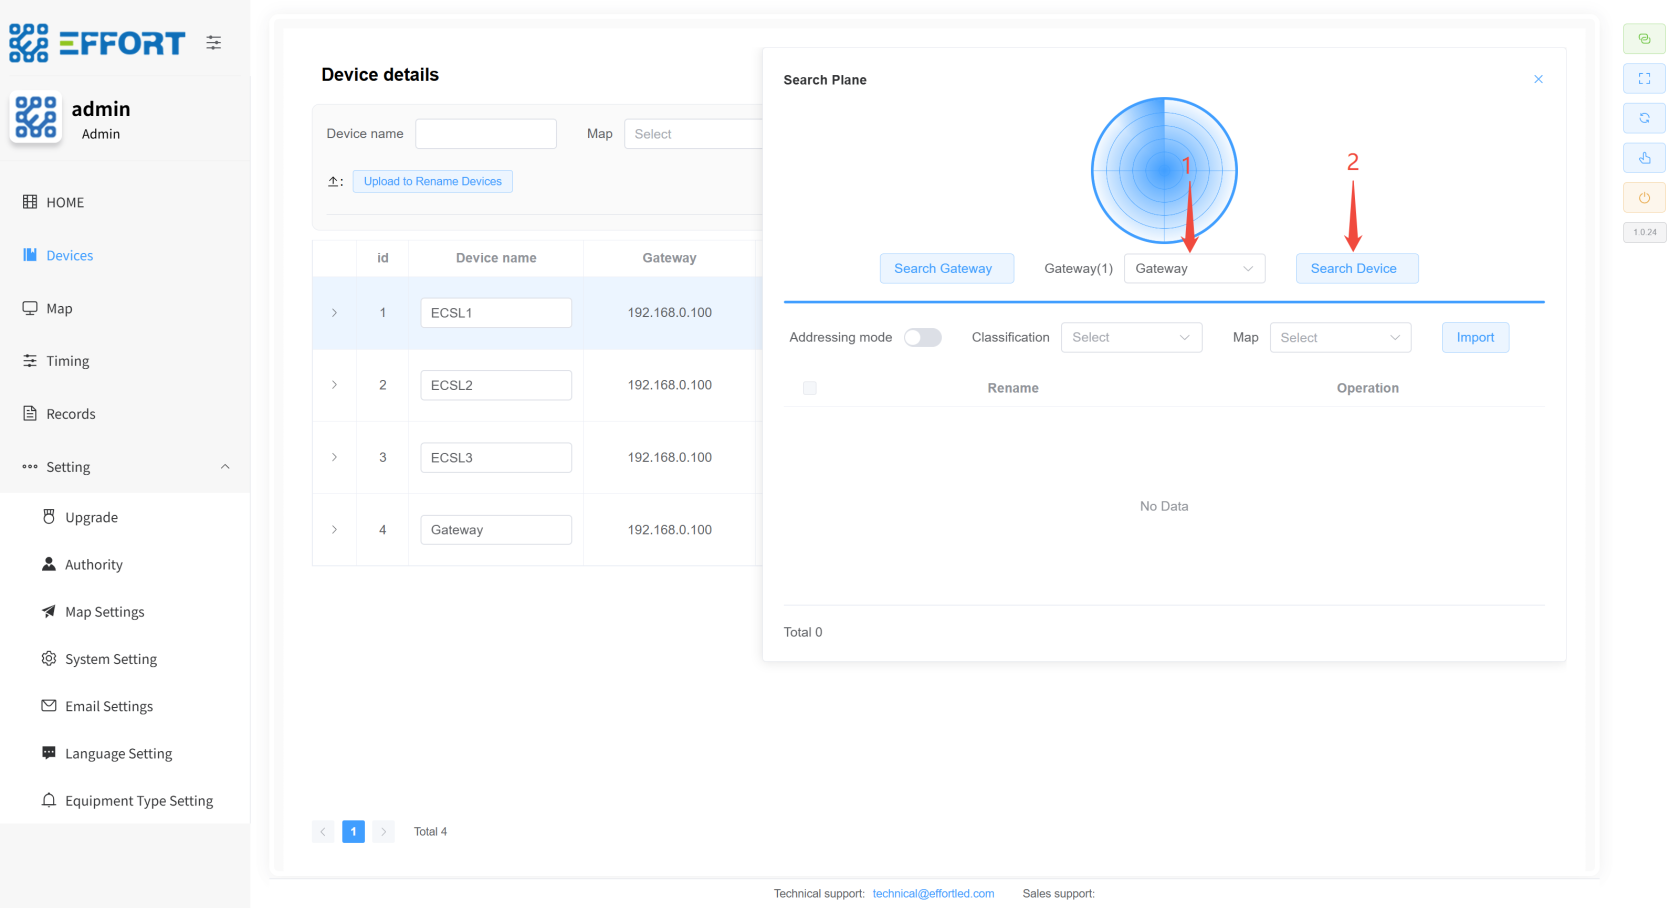
* **
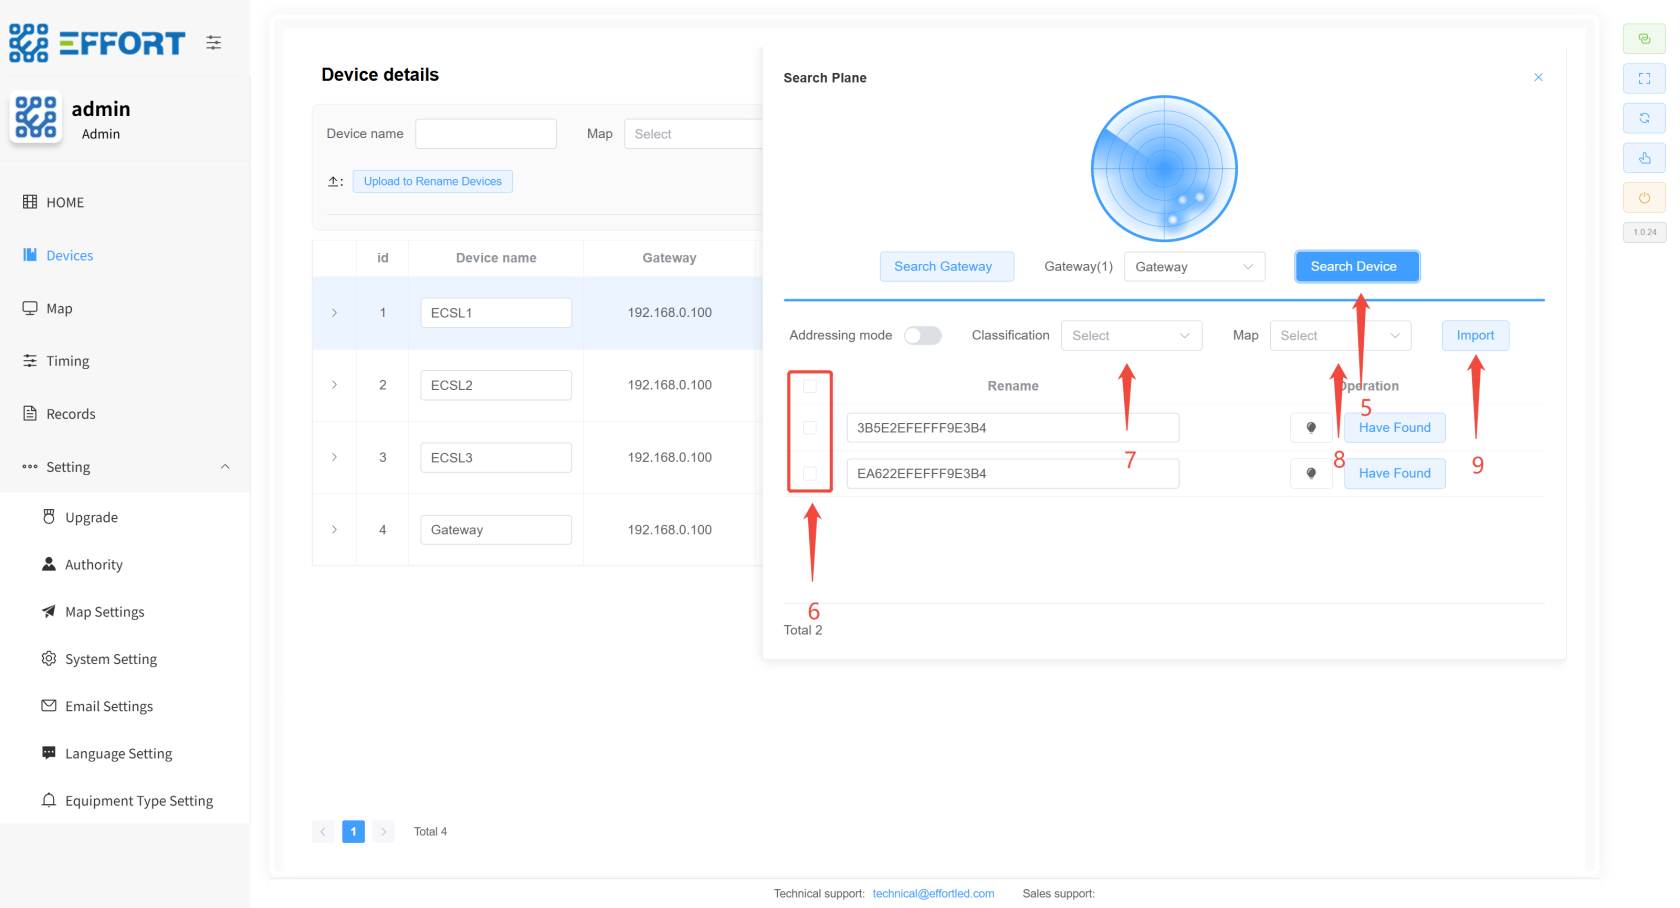
Device Import Steps*设备导入步骤**
1.
1.步骤 Step 1: Select the gateway first1:先选中网关
2.
Step步骤 2: Click2:点击 Search
DeviceDevice
3.
Step步骤 3: Select the search mode3:选择搜索模式
4.
Step步骤 4:4:点击Search Click Search DeviceDevice
5.
Step步骤 5:5:搜索完毕后再次点击Search Once the search is complete, tap Search Device again to stop the searchDevice停止搜索
6.
Step步骤 6: Select the device6:选择设备
7.
Step步骤 7: Select the device classification7:选择设备分类
8.
Step步骤 8: Select the region8:选择区域
9.
Step步骤 9: Click Import9:点击导入
[](http://13.222.61.26:6875/uploads/images/gallery/2026-01/Rw5image.png)
[](http://13.222.61.26:6875/uploads/images/gallery/2026-01/37Himage.png)
[](http://13.222.61.26:6875/uploads/images/gallery/2026-01/Vwaimage.png)
* * *
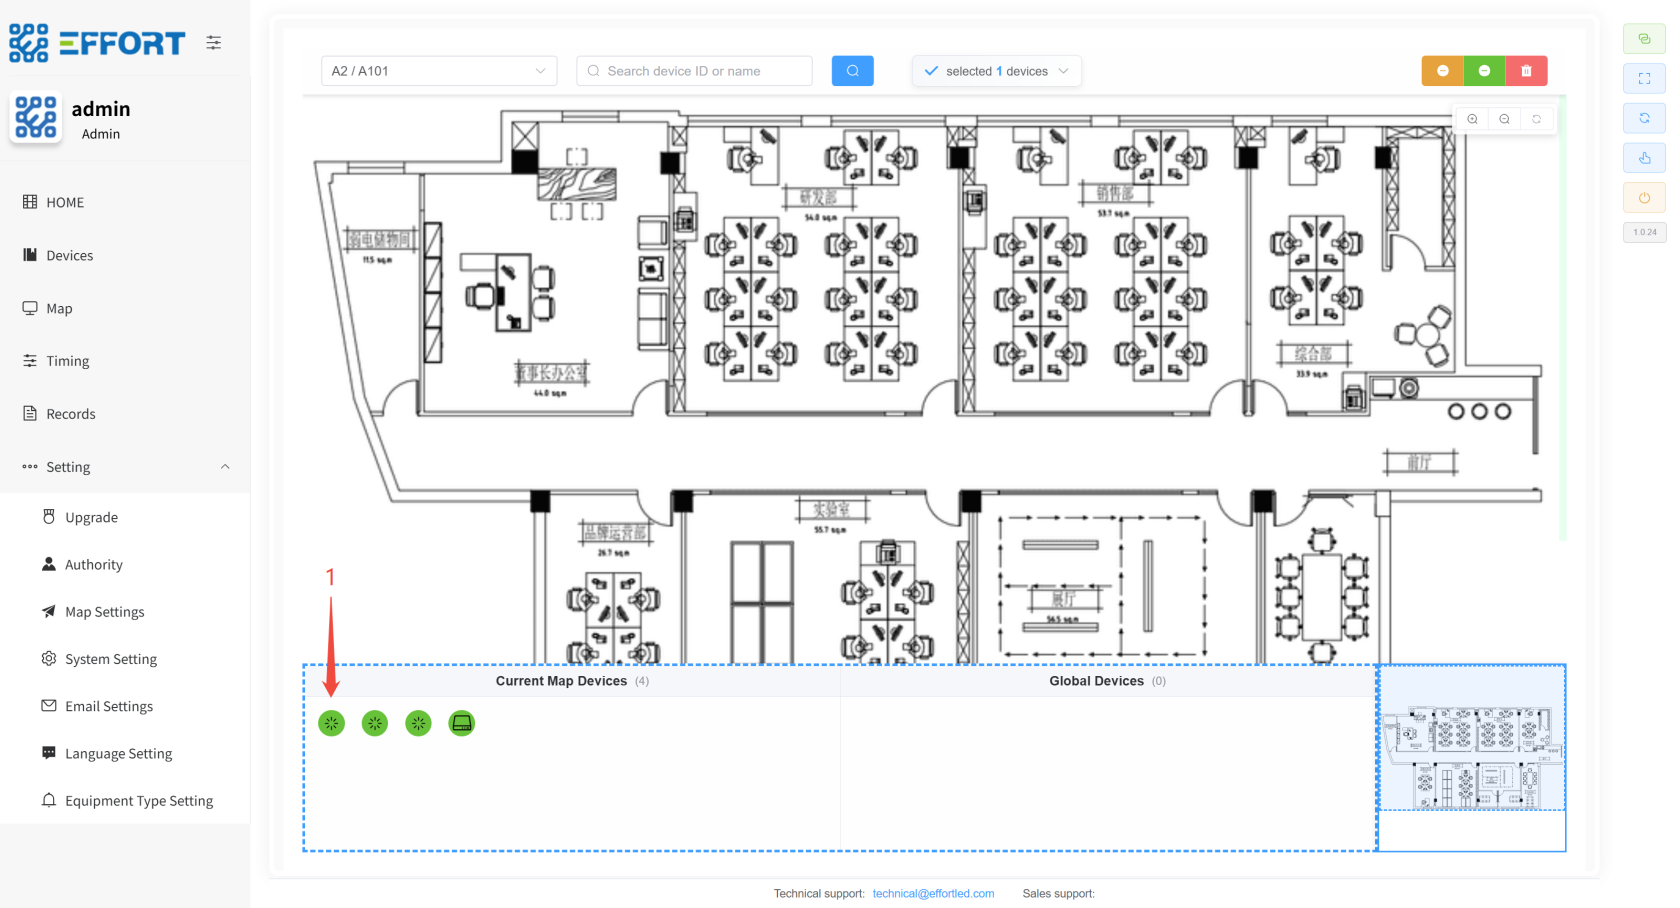
######## **7.4.4
Placing the Device on the Map设备放置至地图 👤
**
Step步骤 1: Left-click and hold the device to drag it into the map1:左键按住设备,将其拖入地图
[](http://13.222.61.26:6875/uploads/images/gallery/2026-01/B35image.png)
* * *
######## **7.4.5
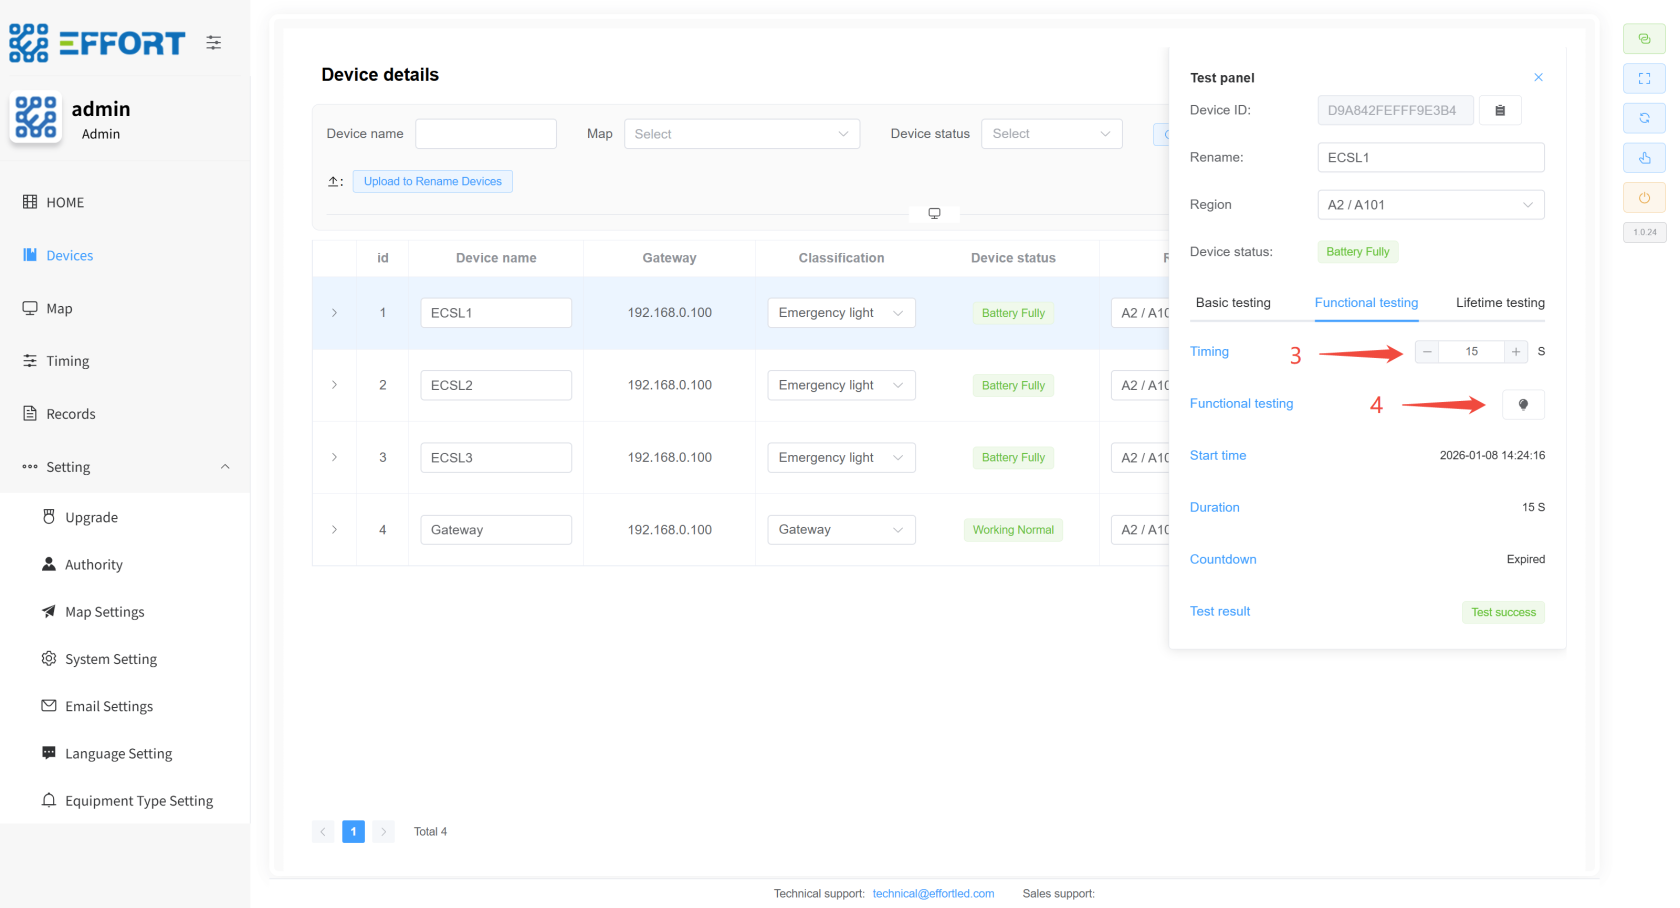
Temporary functional inspection and life inspection临时功能检、寿命检 👤
**
* **
Temporary functional inspection steps*临时功能检步骤**
1.
1.步骤 Step1:进入 1: Go to DevicesDevices
2.
Step步骤 2: Click to enter the2:点击进入 Test
PanelPanel
3.
Step步骤 3: Configure the duration3:配置持续时间
4.
Step步骤 4: Click the icon to enter the temporary function check4:点击图标进入临时功能检
[](http://13.222.61.26:6875/uploads/images/gallery/2026-01/K8Dimage.png)
[](http://13.222.61.26:6875/uploads/images/gallery/2026-01/or0image.png)
* **
Temporary life inspection steps*临时寿命检步骤**
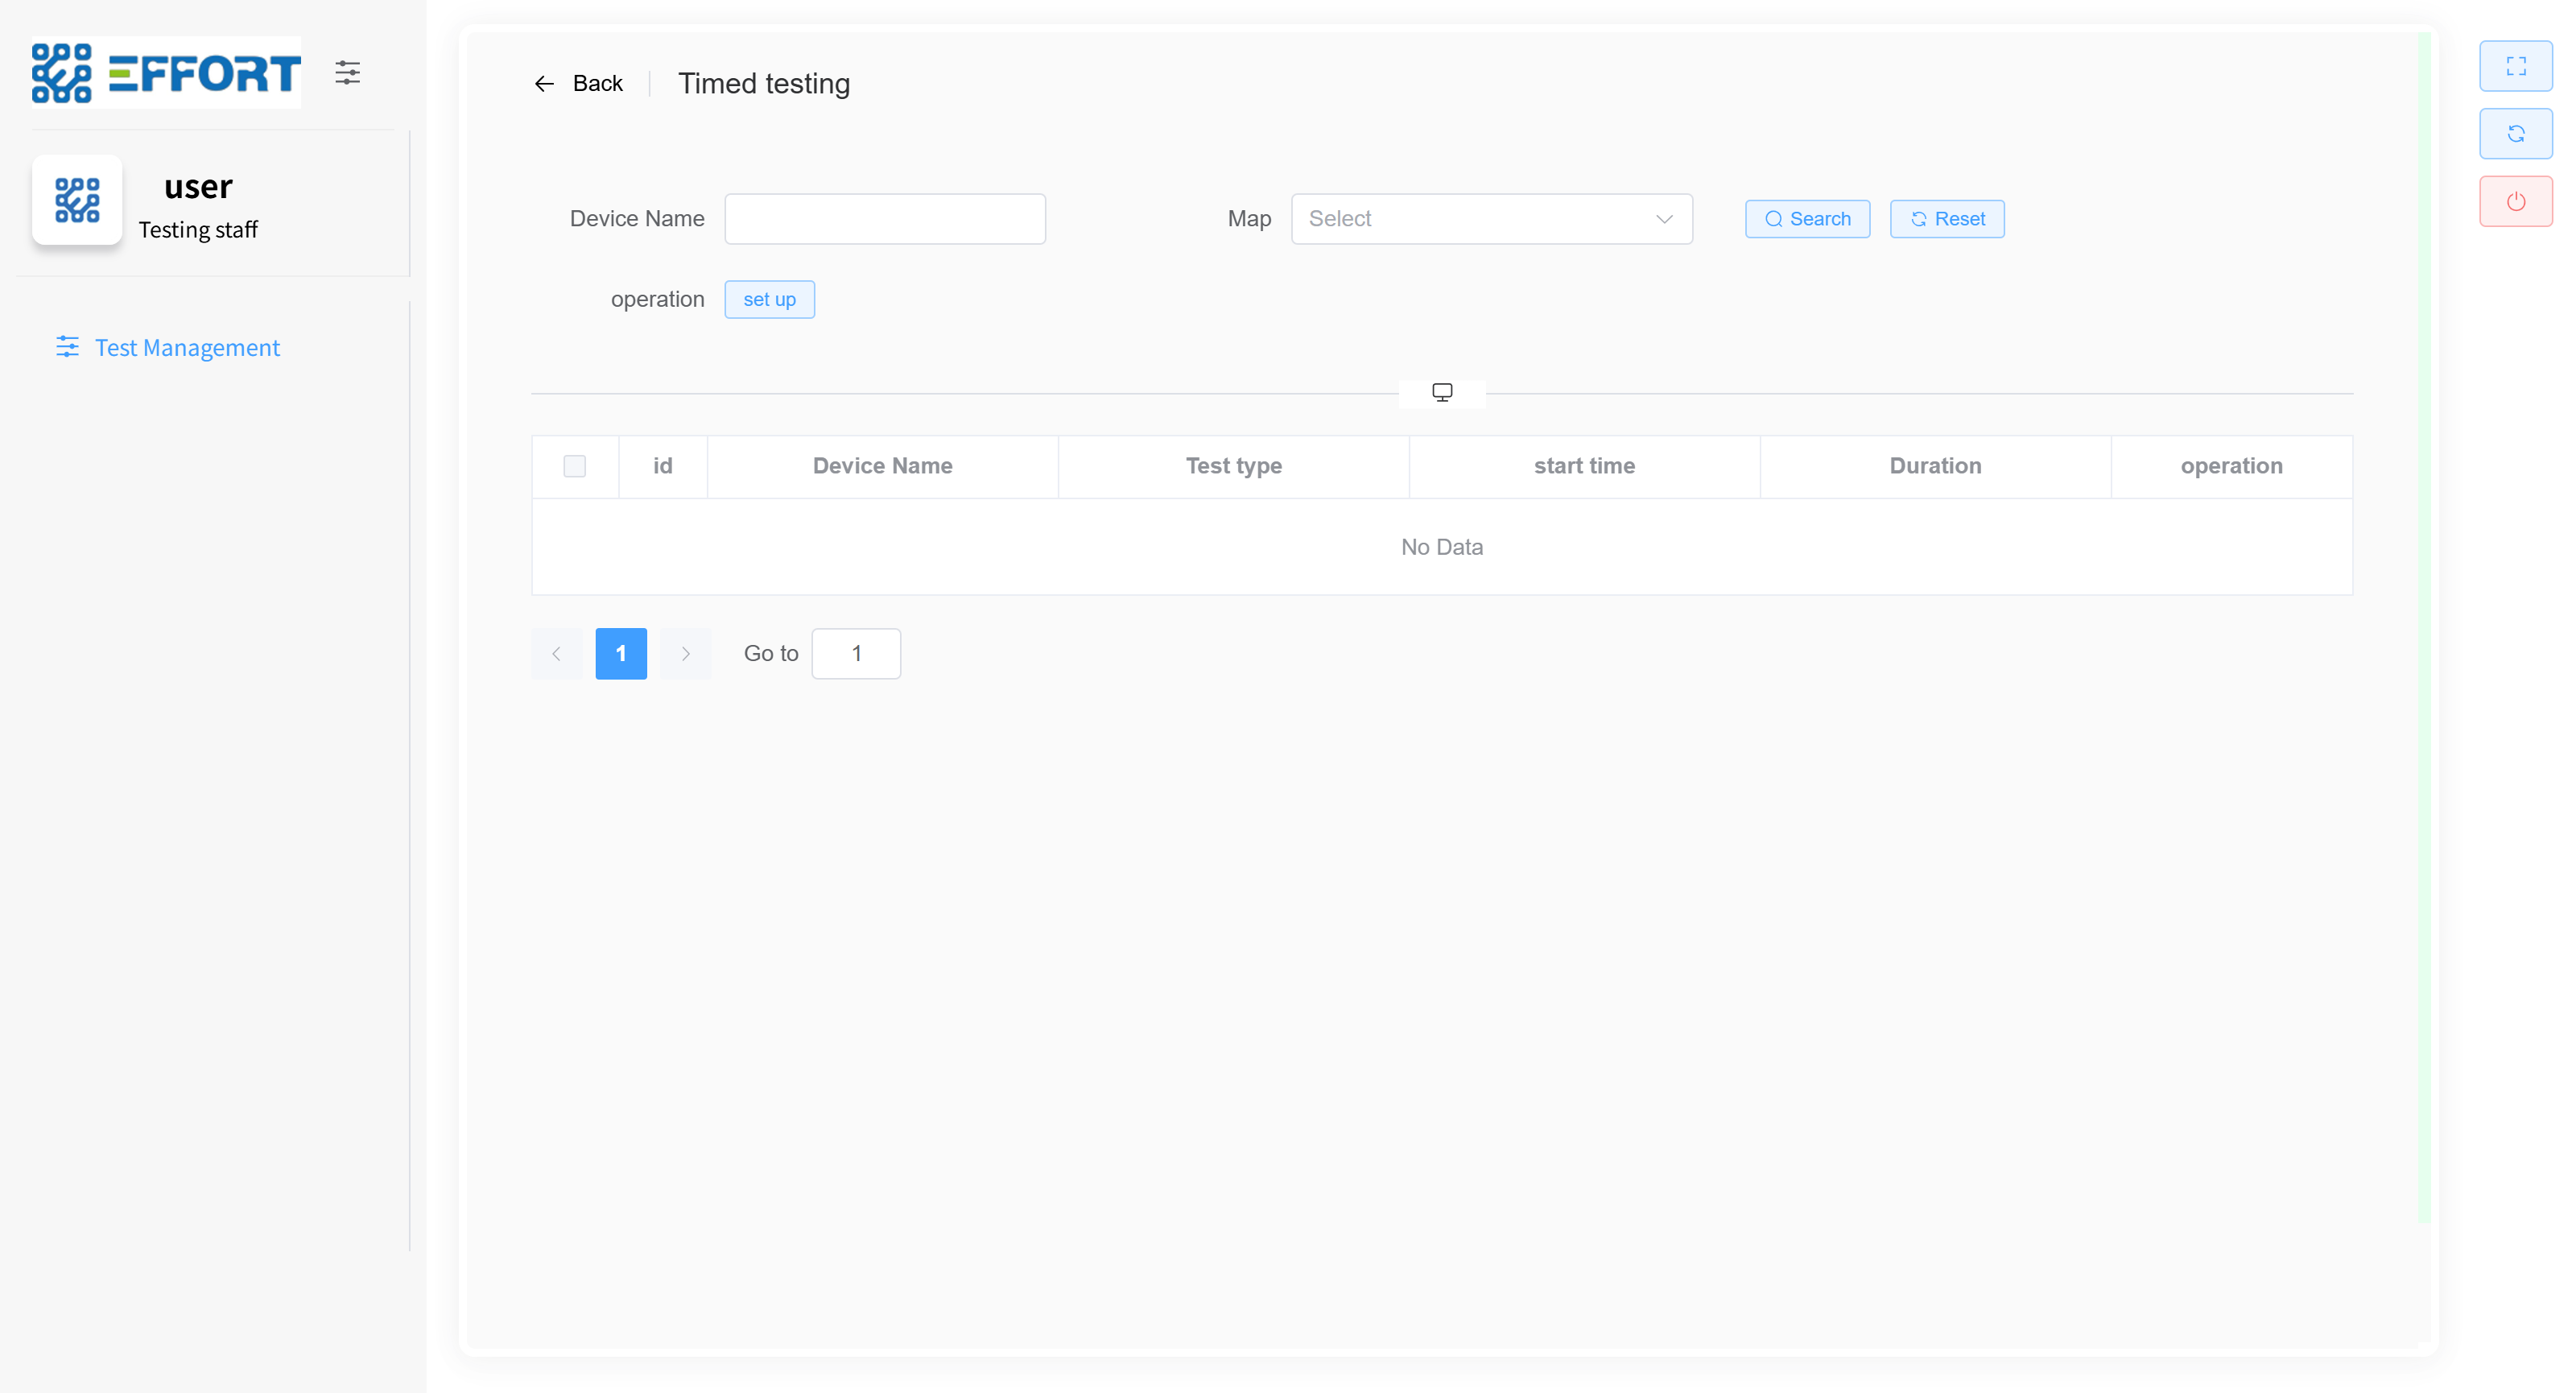
1.
1.步骤 Step 1: Go to1:进入 Lifetime
testingtesting
2.
Step步骤 2: Configure the duration2:配置持续时间
3.
Step步骤 3: Click the icon to enter the temporary life test3:点击图标进入临时寿命检
[](http://13.222.61.26:6875/uploads/images/gallery/2026-01/2CXimage.png)
######## **7.4.6
Timing function inspection and life inspection定时功能检、寿命检 👤
**
1.
Step步骤 1:1:进入 Go to TimingTiming
2.
Step步骤 2: Click the Batch2:点击Batch Configure Test
Time buttonTime按钮
3.
Step步骤 3: Select the device for which you need to set a schedule3:选中需要设置定时的设备
4.
Step步骤 4: Configure timing-related parameters4:配置定时相关参数
5.
Step步骤 5: Click5:点击 Start
setting and the configuration is completesetting,配置完成
* * *
[](http://13.222.61.26:6875/uploads/images/gallery/2026-01/xDXimage.png)
[](http://13.222.61.26:6875/uploads/images/gallery/2026-01/accimage.png)
######## **7.4.7
Test Report Download测试报告下载 ⚙
️**️
1.
Step步骤 1: Go to1:进入 System
SettingsSetting
2.
Step步骤 2: Click Select date2:点击选择日期
3.
Step步骤 3: Click Download3:点击下载 device
reportReport
4.
Step步骤 4: Click to download the4:点击下载 test
reportReport
* * *
[](http://13.222.61.26:6875/uploads/images/gallery/2026-01/YsZimage.png)
######## **7.4.8
Switching Languages切换语言 ⚙
️**️
1.
Step步骤 1: Click1:点击 System Setting
to go to the System Settings page,进入系统设置页面
2.
Step步骤 2: Click the selection box to switch the language2:点击选择框,切换语言
[](http://13.222.61.26:6875/uploads/images/gallery/2026-01/JuUimage.png)
* * *
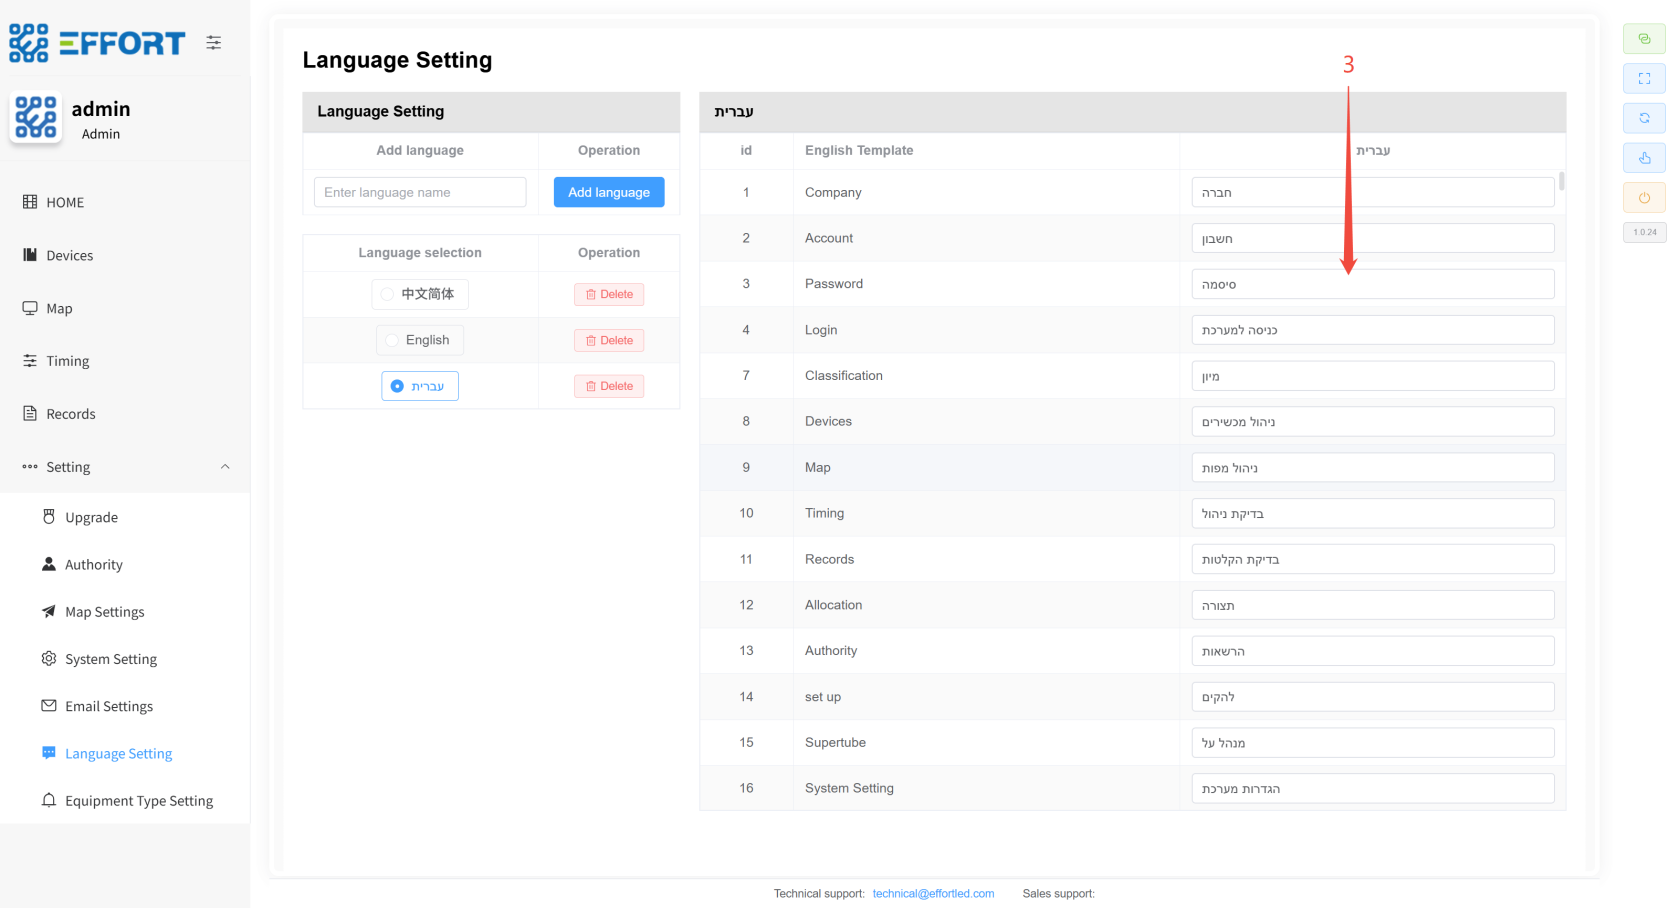
######## **7.4.9
Configuring Custom Languages配置自定义语言 ⚙
️**️
1.
Step步骤 1: Click1:点击 Language
management to go to the translation management pagemanagement,进入翻译管理页面
2.
Step步骤 2: Click2:点击 Add
language to add a language template or select an existing language templatelanguage新增一种语言模板,或者选择现有的语言模板
3.
Step步骤 3: Modify the actual display language according to the template language3:根据模板语言 English
TemplateTemplate,修改实际显示语言
[](http://13.222.61.26:6875/uploads/images/gallery/2026-01/xzsimage.png)
[](http://13.222.61.26:6875/uploads/images/gallery/2026-01/1xvimage.png)
* * *
######## **7.4.10
Set设置 the LOGO and themeLOGO、主题 ⚙
️**️
1.
Step步骤 1: Click1:点击 System setting
to enter the system settings interface进入系统设置界面
2.
Step步骤 2:2:点击图片,上传新系统 Click on the image to upload the new system logoLOGO
3.
Step步骤 3: Click the theme checkbox to switch themes3:点击主题选框,切换主题
[](http://13.222.61.26:6875/uploads/images/gallery/2026-01/biqimage.png)
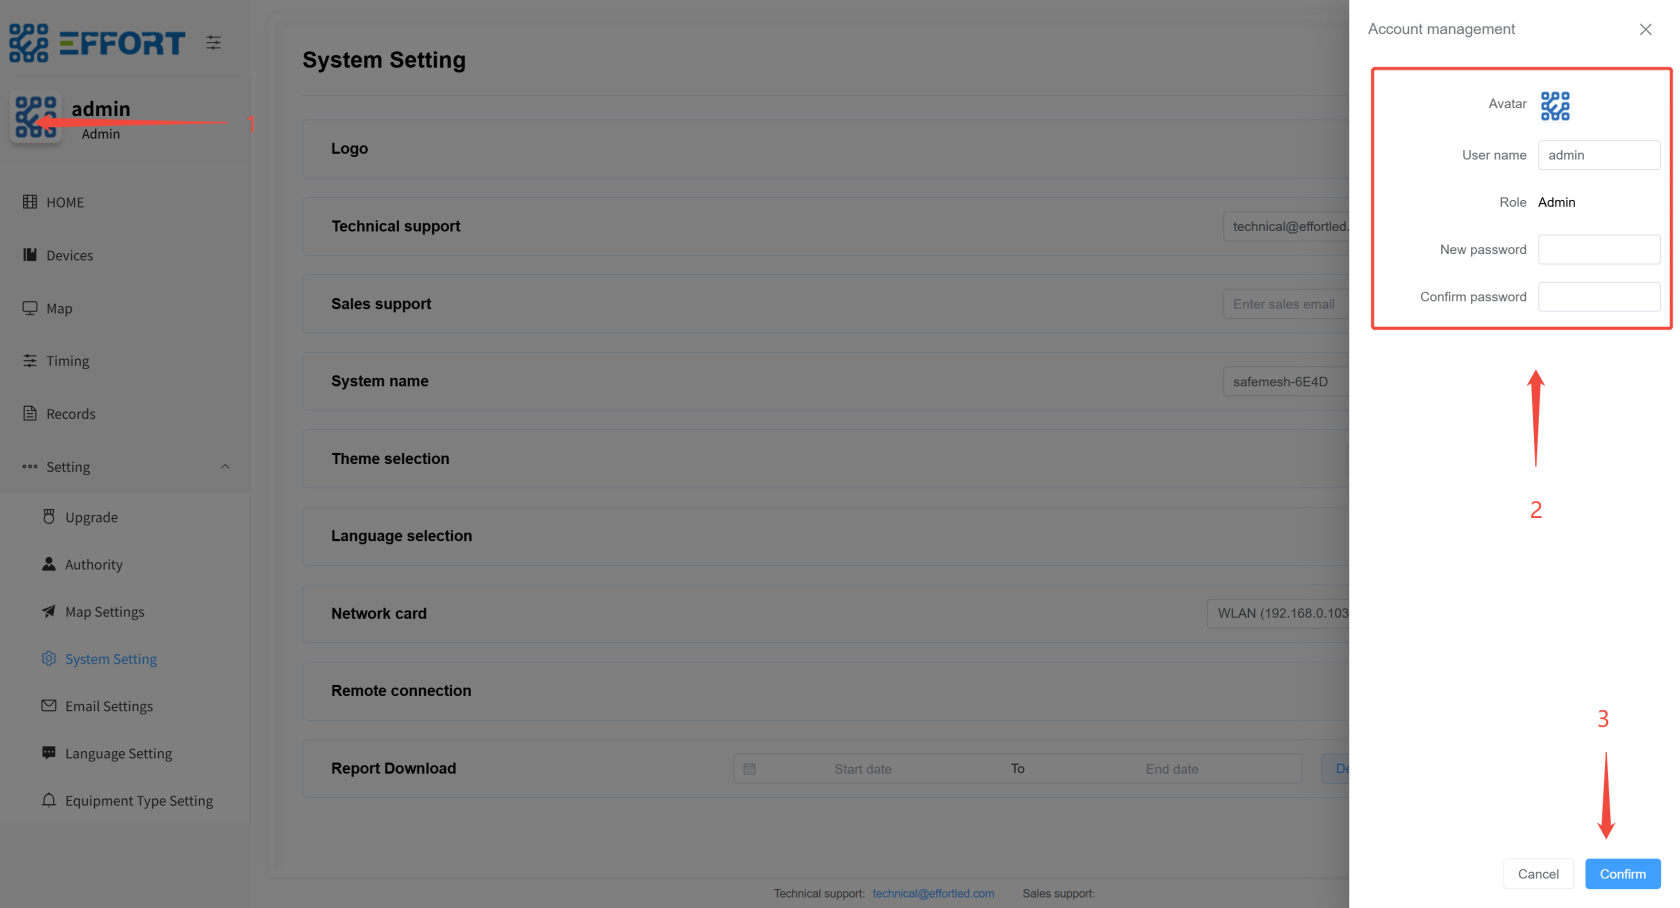
######## **7.4.11
Modification of personal information修改个人信息 👤
**
1.
Step步骤 1: Tap on your profile picture1:点击个人头像
2.
Step步骤 2: Enter your personal information2:输入个人信息
3.
Step步骤 3: Click OK to modify your personal information3:点击确定,修改个人信息
* * *
[](http://13.222.61.26:6875/uploads/images/gallery/2026-01/astimage.png)
######## **7.4.12
Gateway网关固件升级 Firmware⚙️
1. 步骤 1:点击 Upgrade
⚙️**
1. Step 1: Click Upgrade to go to the firmware upgrade page进入固件升级页面
2.
Step步骤 2: Click Upload the new version of the firmware file2:点击上传新版本的固件文件
3.
Step步骤 3: Select the gateway you want to upgrade3:选择要升级的网关
4.
Step步骤 4: Click4:点击 Start
Upgrade and wait for the upgrade to completeUpgrade,等待升级完成
[](http://13.222.61.26:6875/uploads/images/gallery/2026-01/txiimage.png)
* * *
######## **7.4.13
QR code positioning二维码定位 👤
**
1.
Step步骤 1: Transfer the form to the computer where the system is located1:将表格传输到系统所在的电脑
2.
Step步骤 2: Go to the system2:进入系统 device management
page页面点击 andchoose clickfile Choose File to import the table just now, and the device renaming is complete导入刚刚的表格,设备重命名完成
[](http://13.222.61.26:6875/uploads/images/gallery/2026-01/Gjsimage.png)
##### VIII. Technical Support and Resources (Safelink has no content, for follow-up)
###### **8.1 Get help:**
* Technical Support Portal URL
* Supported email addresses
* Support phone/hotline number
* Working hours
* Online community/forum links
###### **8.2 Quick Links:**
* Provide the online document library URL if the document is online.
* List **direct download links** or find locations for all core documentation (such as product documentation download pages). \*\* (Links to all the previously mentioned document names must be included here!) ) \*\*
